
Bohemian DIY spans from fifteen-dollar clay wall hangings to weekend-long felted sweater rugs, and the deciding factor is rarely skill level. What actually stops most projects is the drying stage: air-dry clay cracks when the center holds moisture, so the piece is only ready when the underside no longer feels cool against your cheek. That single check separates a finished piece from a ruined Saturday.
1. DIY Clay Wall Hanging
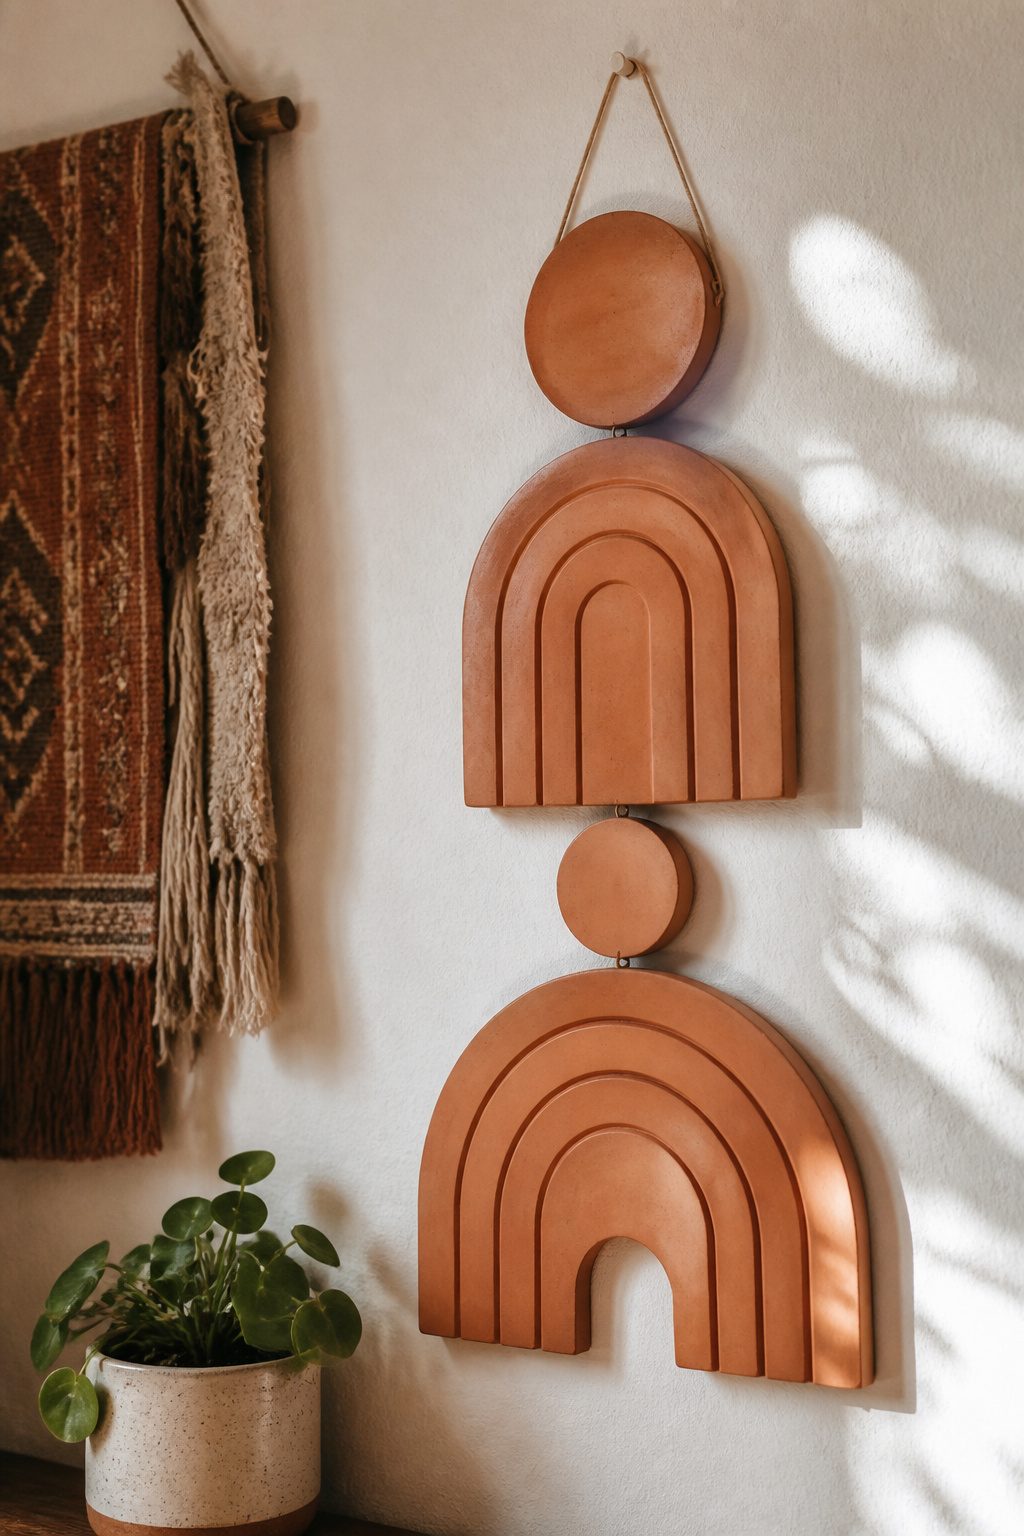
Air-dry clay keeps this wall piece light enough to hang on a single nail or even a sturdy Command strip, which matters when your lease says no new holes. I roll the clay to about a quarter-inch thick, then press in texture with whatever sits nearby: a fork, a doily, the ridged side of a seashell. Shapes stay simple, circles and arches mostly, because thin clay warps if you get too fancy with the silhouette.
Drying takes roughly 24 to 48 hours depending on humidity and thickness. The piece is ready when the underside no longer feels cool against your cheek, not when the top looks dry. I learned that after a piece cracked on the wall because the center held moisture. Once fully dry, a quick sand with fine grit and a coat of matte acrylic in terracotta or warm white keeps the boho palette without competing with whatever textiles you already have hung.
For mounting, two small sawtooth hangers work on larger pieces, but most of mine just get a loop of twine pressed into the back while the clay is still soft. The whole project runs under fifteen dollars in materials and fills a Saturday afternoon, start to finish.
2. Felt Rug from Recycled Sweaters
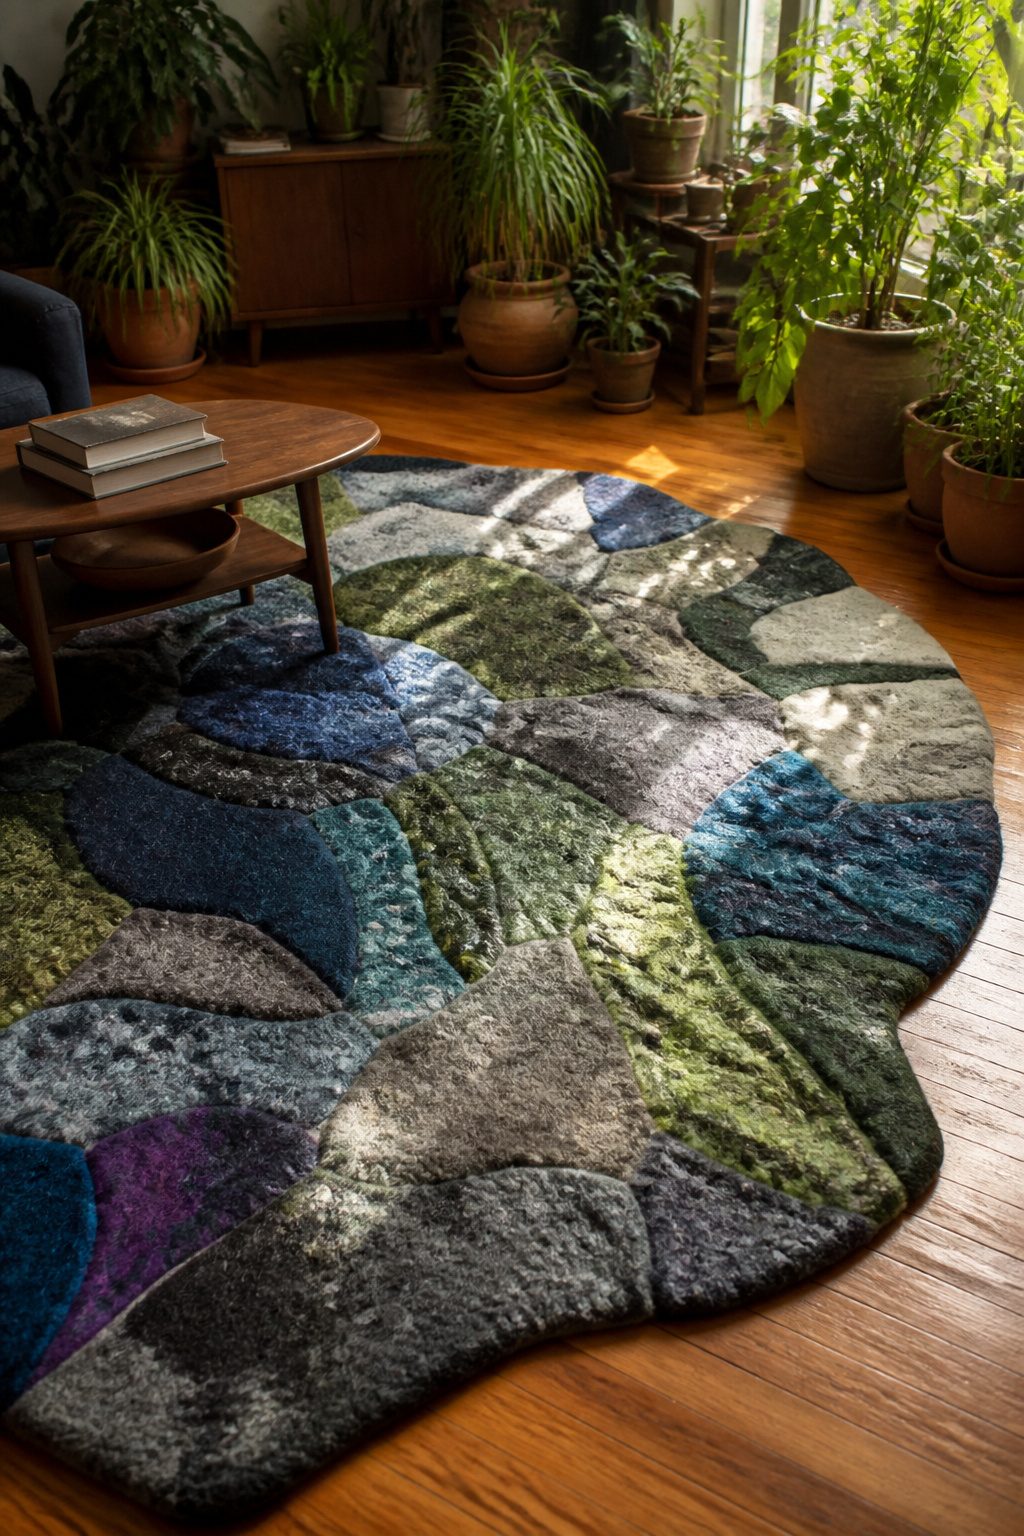
Felted wool sweaters from thrift stores make a rug with real weight underfoot, the kind that stays put on hardwood without a grip pad. I look for pure wool or high-wool blends in the sweater bins; acrylic won’t felt no matter how many hot washes you give it. Run them through a hot cycle with agitation, then a cold rinse, and the fibers lock together into dense fabric you can cut without unraveling.
The shaping is where the bohemian part happens. I lay the felted pieces on the floor and cut freehand curves, nothing measured, then whipstitch the edges together with heavy thread. The irregular outline reads as intentional rather than sloppy because the thickness gives it presence. A weekend gets you through felting and assembly; the floor layout alone takes an evening of moving pieces and living with the shape before you commit a single stitch.
3. Ring Yarn Art
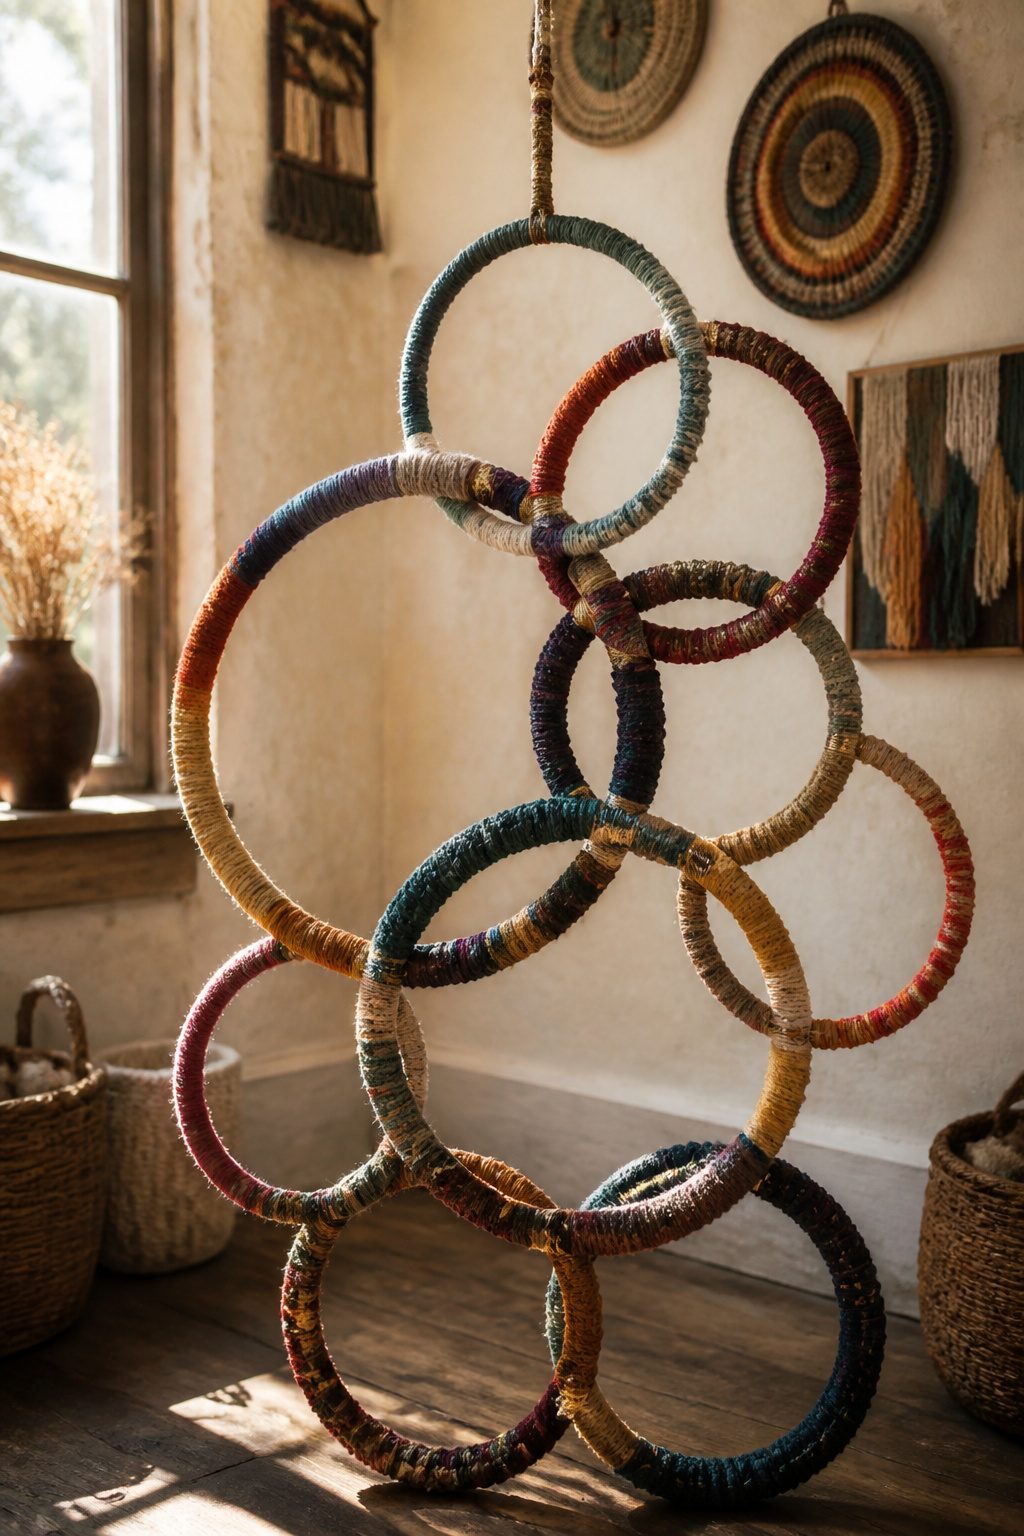
Metal embroidery hoops or plain wooden rings from the craft store become the bones of a layered wall piece once yarn takes over. I like to start with three sizes, nested inside one another and tied together at one point so they hang at slightly different heights. The trick is wrapping each ring in a different fiber: cotton rope for the base, a fuzzy wool for the middle, and something thin and shaggy on the smallest. Hot glue at the start and finish keeps the wraps from sliding, but the real texture comes from varying the tension. Some rings tight and smooth, others loose enough that the yarn stands away like fringe.
Color works the same way. Deep jewel tones against an earthy terracotta or mustard wrap read as bohemian without needing every shade at once. The sources lean toward bold, but two or three colors across five rings feels richer than five colors fighting. Leave the outer ring bare wood if the wall is already busy; paint it olive or burgundy if the room needs the weight.
Shower curtain rings wrapped in cotton rope or twine work at a smaller scale, and the hardware is already built in. I would skip the glue entirely on those and let the rope ends tuck under the last wrap, since hot glue on metal shows and catches dust.
4. Feather Lampshade
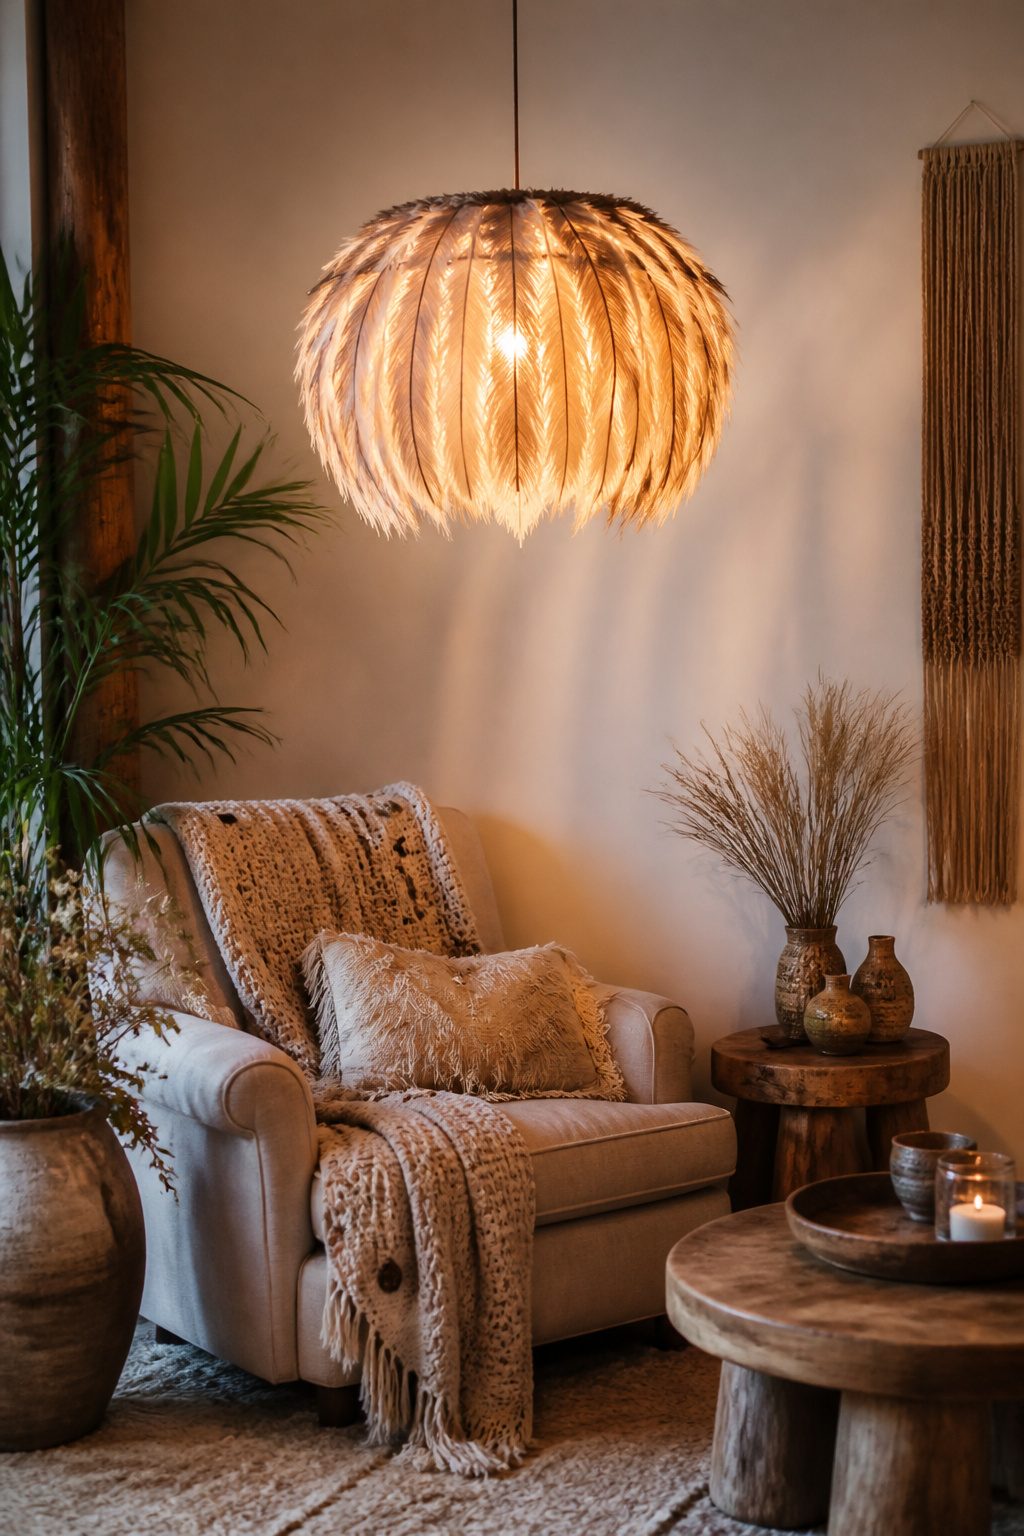
A plain wire lampshade frame, the kind that shows up at thrift stores for a few dollars, is the starting point that makes this project feel possible in a single afternoon. I attach feathers with thin floral wire rather than glue, because wire lets you rearrange until the density looks right from every angle. Glue sets too fast and leaves you stuck with gaps.
Sourcing feathers ethically matters more than the color match. Craft stores carry synthetic options now that handle heat better than real plumes anyway, and vintage hat feathers from estate sales reuse what already exists. If you do buy natural feathers, look for domestic farm sources with clear labeling rather than wild-collected plumes, which carry legal restrictions most sellers do not advertise clearly.
Warm-toned bulbs pull the look together. Cool daylight LEDs turn white feathers clinical and gray; something in the 2700K range keeps the glow amber and soft, which is where the boho effect actually lives. The feathers catch that warmth and throw shadows against the wall that read as texture, not clutter, which is the balance this style needs.
5. Boho Mirror Decor
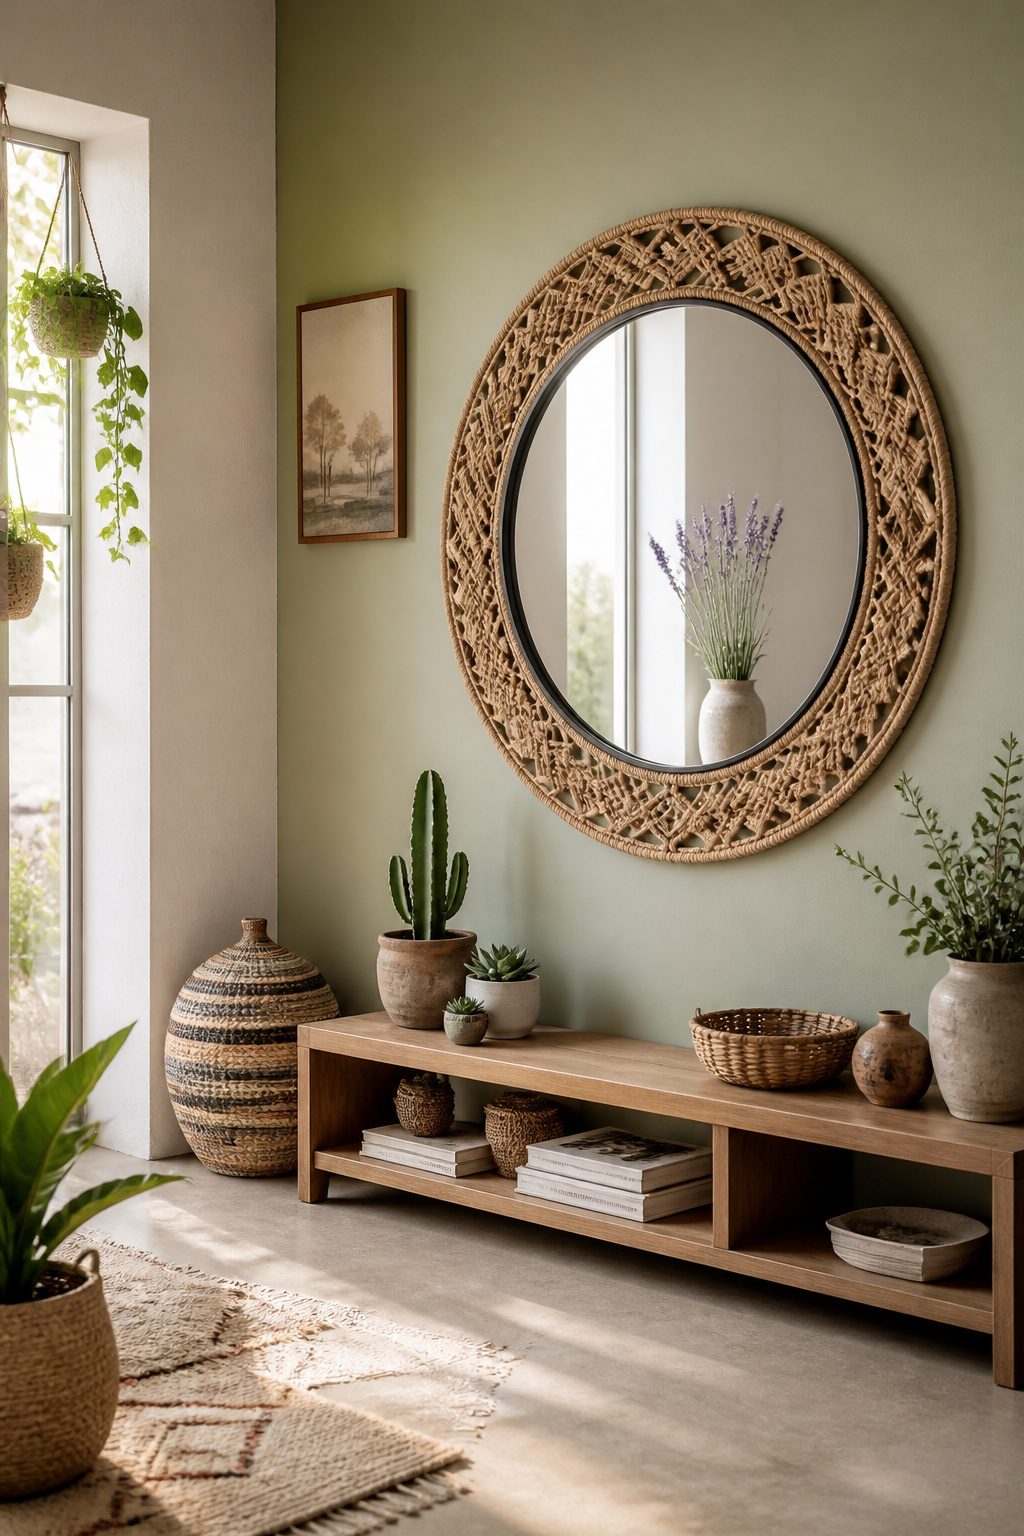
A plain mirror with a thin metal or plastic frame is the easiest starting point for a boho border. Jute rope wraps cleanly if you glue it in tight coils from the inside edge outward, but the texture can read nautical if you stop too soon; I like to mix in a few rows of macrame cord to break up the regularity. Driftwood needs more patience. Pieces collected from lake or river shorelines dry out lighter and smoother than ocean driftwood, and you will spend an evening sorting them by curve so the gaps stay small. Hot glue works for lightweight sticks under six inches, but anything heavier needs small wire brads tapped into the frame back, which is where rental hanging gets tricky.
Command strips hold almost nothing once you add frame weight; a mirror over ten pounds needs a picture hook rated for twice the load, or a French cleat if the landlord already has a screw in the wall. I have patched more drywall than I care to admit from assuming a single nail would do.
6. Macrame Wall Hanging
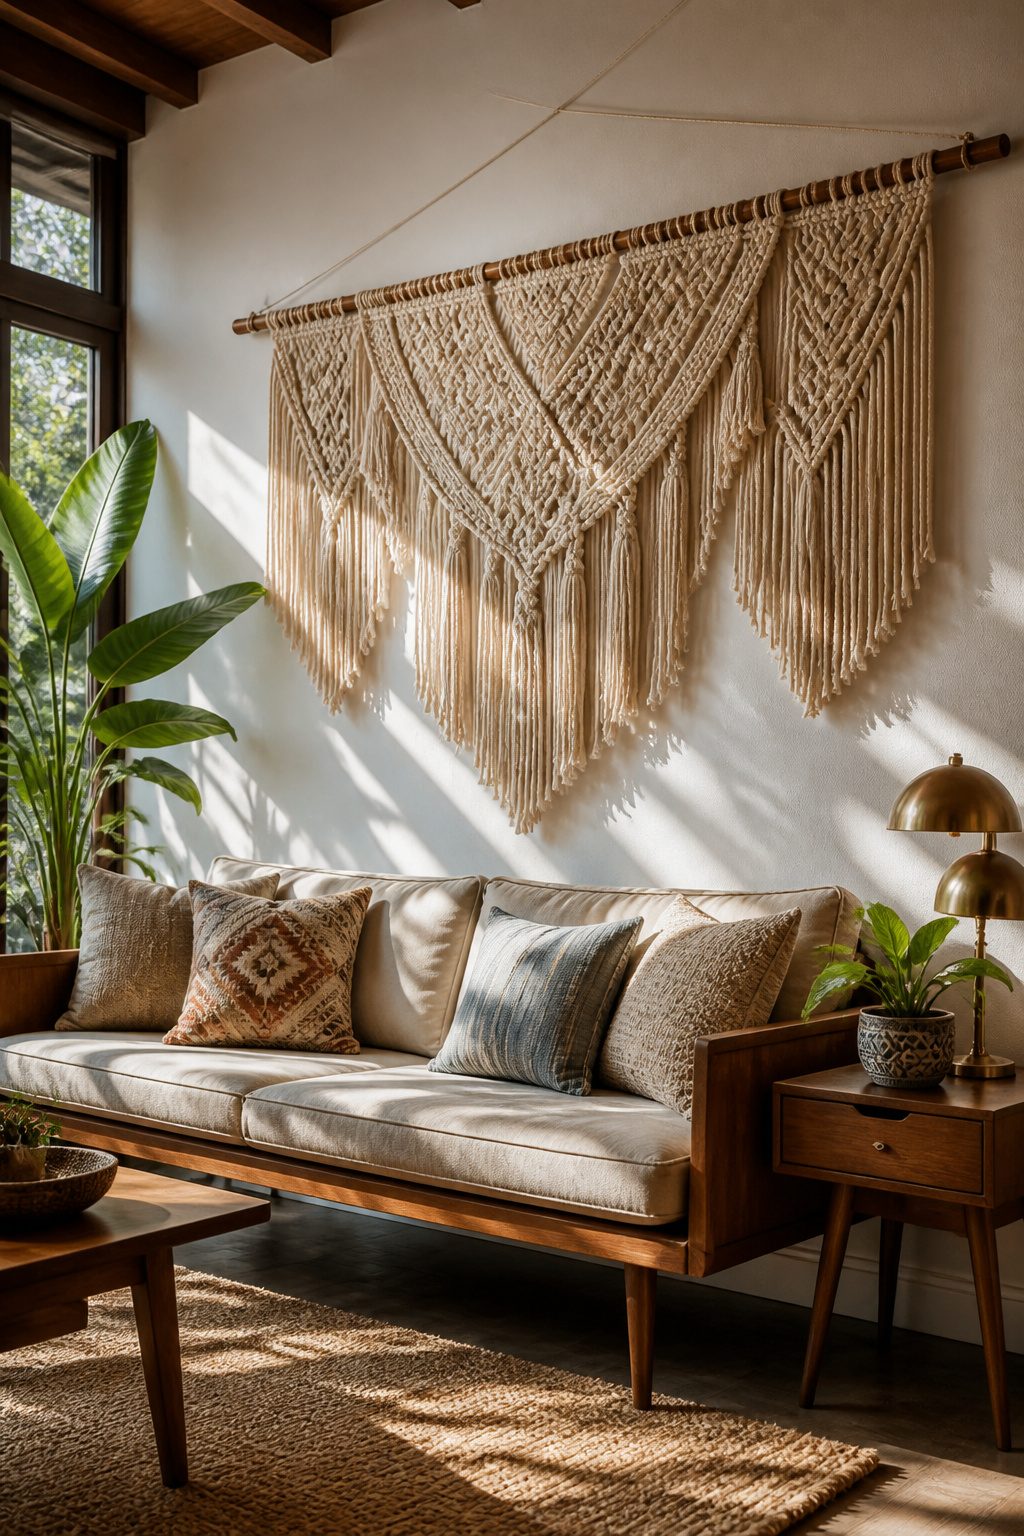
Cotton cord and a few basic knots are all it takes to build a macrame wall hanging that actually fills a wall rather than getting lost on it. The square knot and the half hitch do most of the work; the lark’s head gets your cords onto the dowel. Nautical rope works, though cotton cord hangs straighter and frays cleaner when you trim the fringe.
Scale the piece to the wall, not the other way around. A narrow strip over a sofa reads like a mistake. Measure the furniture or the open wall space, then build the hanging to about two-thirds that width. The length can run long in bohemian rooms; the texture matters more than perfect symmetry.
Macrame stays central to bohemian decor because it adds weight without color commitment. In a rental with beige walls and no painting allowed, a large neutral hanging gives the room something to look at without risking the deposit. The knots catch light differently throughout the day, so the piece shifts while everything else stays static.
Start with a 12-inch dowel for practice, but plan the second piece bigger. The first one will likely hang in a bedroom corner while you figure out tension; the third usually ends up behind the couch where guests see it.
7. Tassel Chandelier
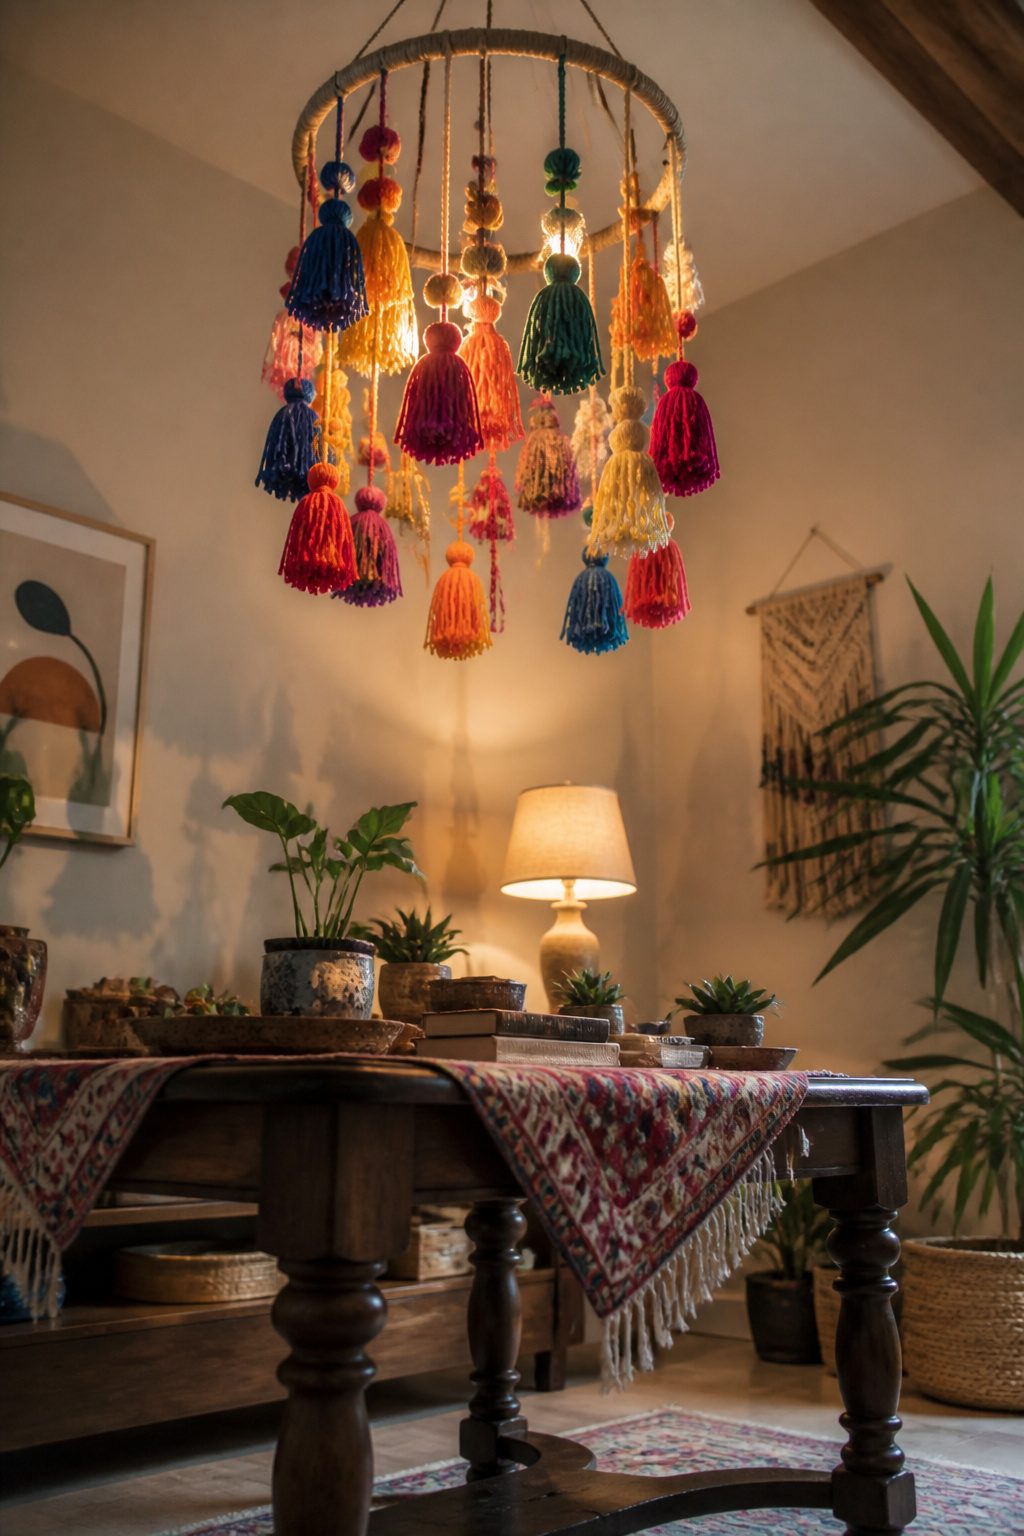
Yarn tassels hung at staggered lengths from a simple hoop or branch turn a bare ceiling into something that catches afternoon light. I started with a brass embroidery hoop, wrapped the inner ring in jute to hide the metal, and knotted tassels directly onto the frame with Lark’s Head knots so they could be slid and re-spaced until the balance looked right. Leave at least six inches of clear space above any bulb; cotton and wool both scorch, and synthetic yarns melt. For that reason I skip this design over anything hotter than a 40-watt equivalent LED, which stays cool enough to touch even after hours.
Renters boxed out by hardwiring laws have two honest paths. A plug-in pendant kit from the hardware store threads through the center of the hoop and hangs from a swag hook in the ceiling plaster, no electrician needed. The other route skips electricity entirely: battery-operated fairy lights coiled inside the hoop, with the battery pack taped flat to the top where the tassels hide it. I have used both; the plug-in gives real light for a reading corner, while the fairy-light version is mood only, best over a bed where you already have a wall sconce or floor lamp doing the work.
8. Denim Feathers Wall Hanging
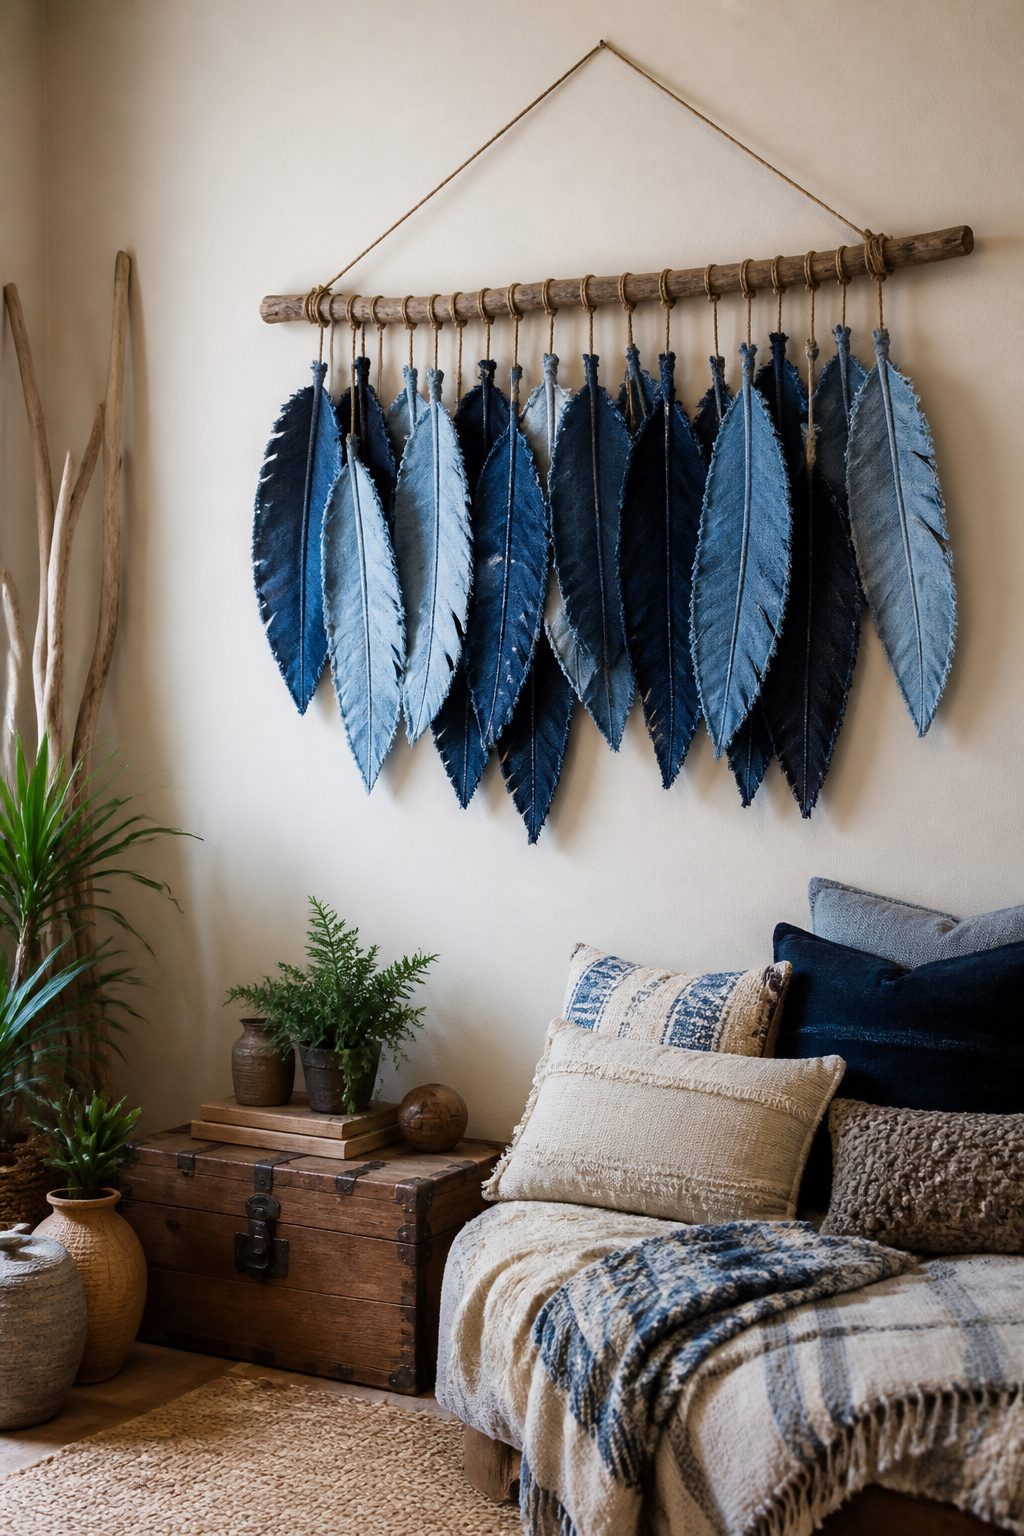
Old jeans carry color variation that no single dye batch matches, and that range is what makes this wall piece read as texture rather than flat craft project. I cut feather shapes with the grain running lengthwise so the legs’ natural fade lines become the spine of each plume, then brush both sides with fabric medium thinned just enough to pool in the seams. Three to five washes of blue, from near-white pocket lining to dark indigo hem, give the grouping depth without any extra color work. The stiffened denim dries rigid enough to stitch through but holds a curve if you pinch it while wet. I arrange them on a piece of driftwood or a thick dowel with the lightest shapes at the center and darker ones fanning outward, overlapping so no backing shows. String works too for a lighter look, though the feathers will swivel if you don’t tack each one at two points. The whole thing hangs on a single nail and weighs next to nothing, which matters more than I expected in a rental with crumbly plaster walls.
9. Hanging Clay Tubes for Air Plants
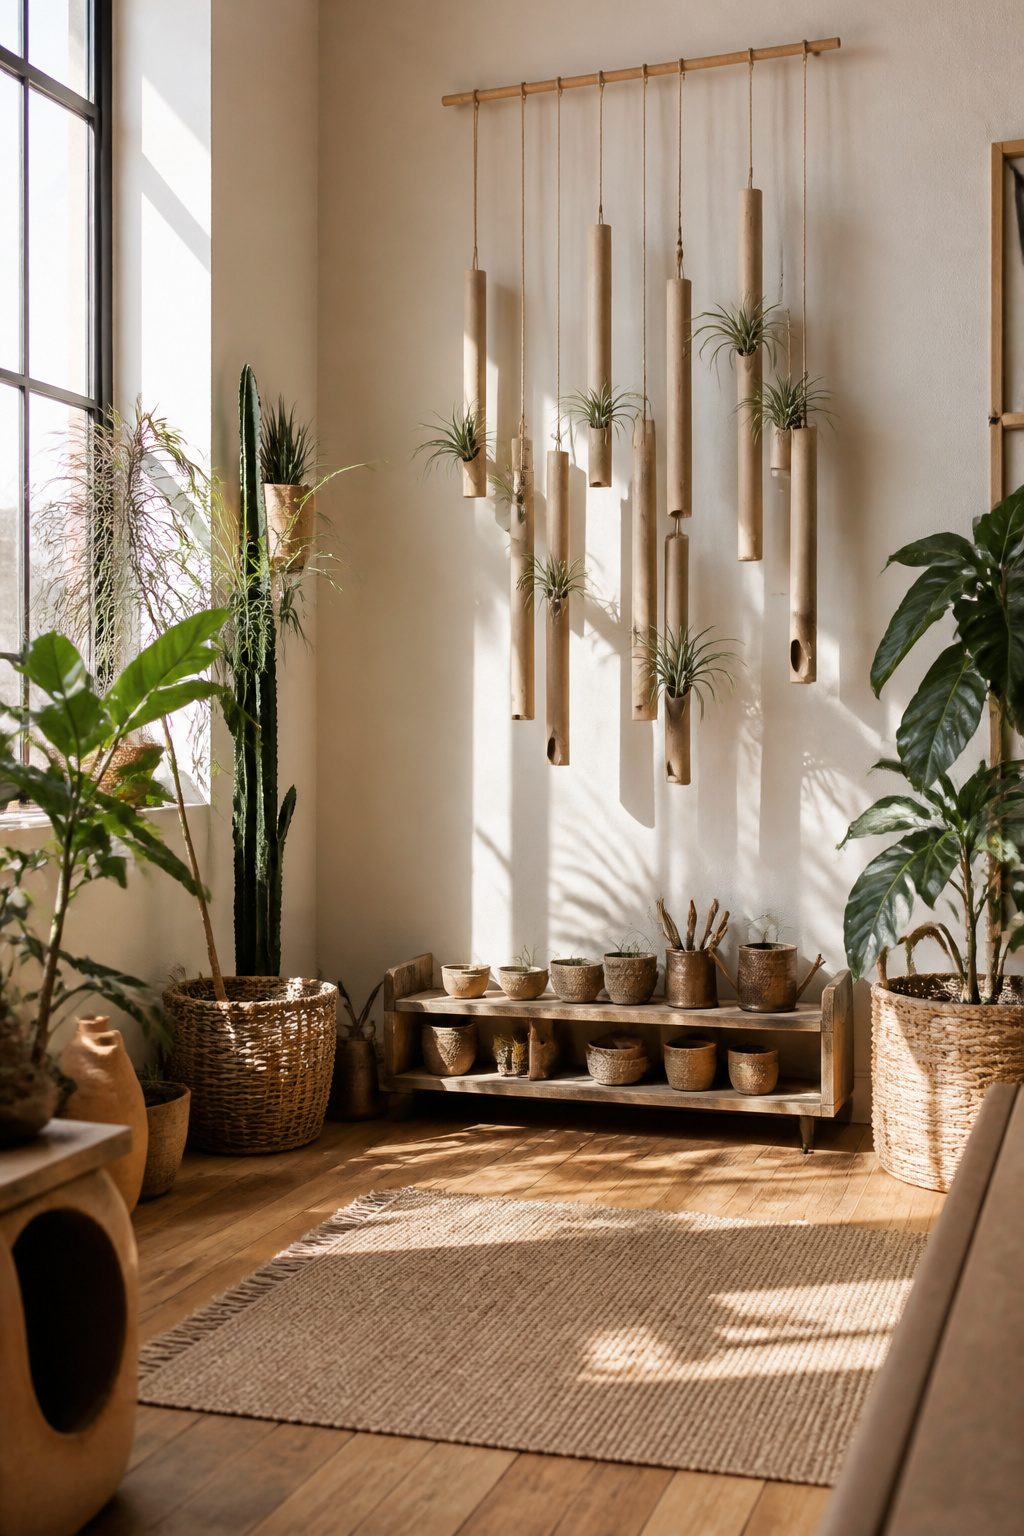
Air-dry clay rolls into thin tubes faster than you’d expect, though my first batch came out lumpy because I rushed the wedging. Smooth, even pressure with a small dowel or a thick drinking glass gives you tubes about the diameter of a drinking straw, which feels right for the scale. Let them dry until they no longer feel cool against your cheek, usually a full day in dry air; half-dry clay looks solid but snaps when strung.
Air plants suit this format because they want airflow on all sides and hate sitting in moisture. The tube offers a grip point without trapping water, and the clay itself stays dry enough to prevent rot. Twine or thin leather cord threaded through the tube’s hollow center lets you hang them at varying heights near a window. Mist the plants twice weekly and dunk them monthly; the clay weathers a little from the moisture but holds up fine for years if you let it dry fully between waterings.
10. Rag Rug with T-Shirt Yarn
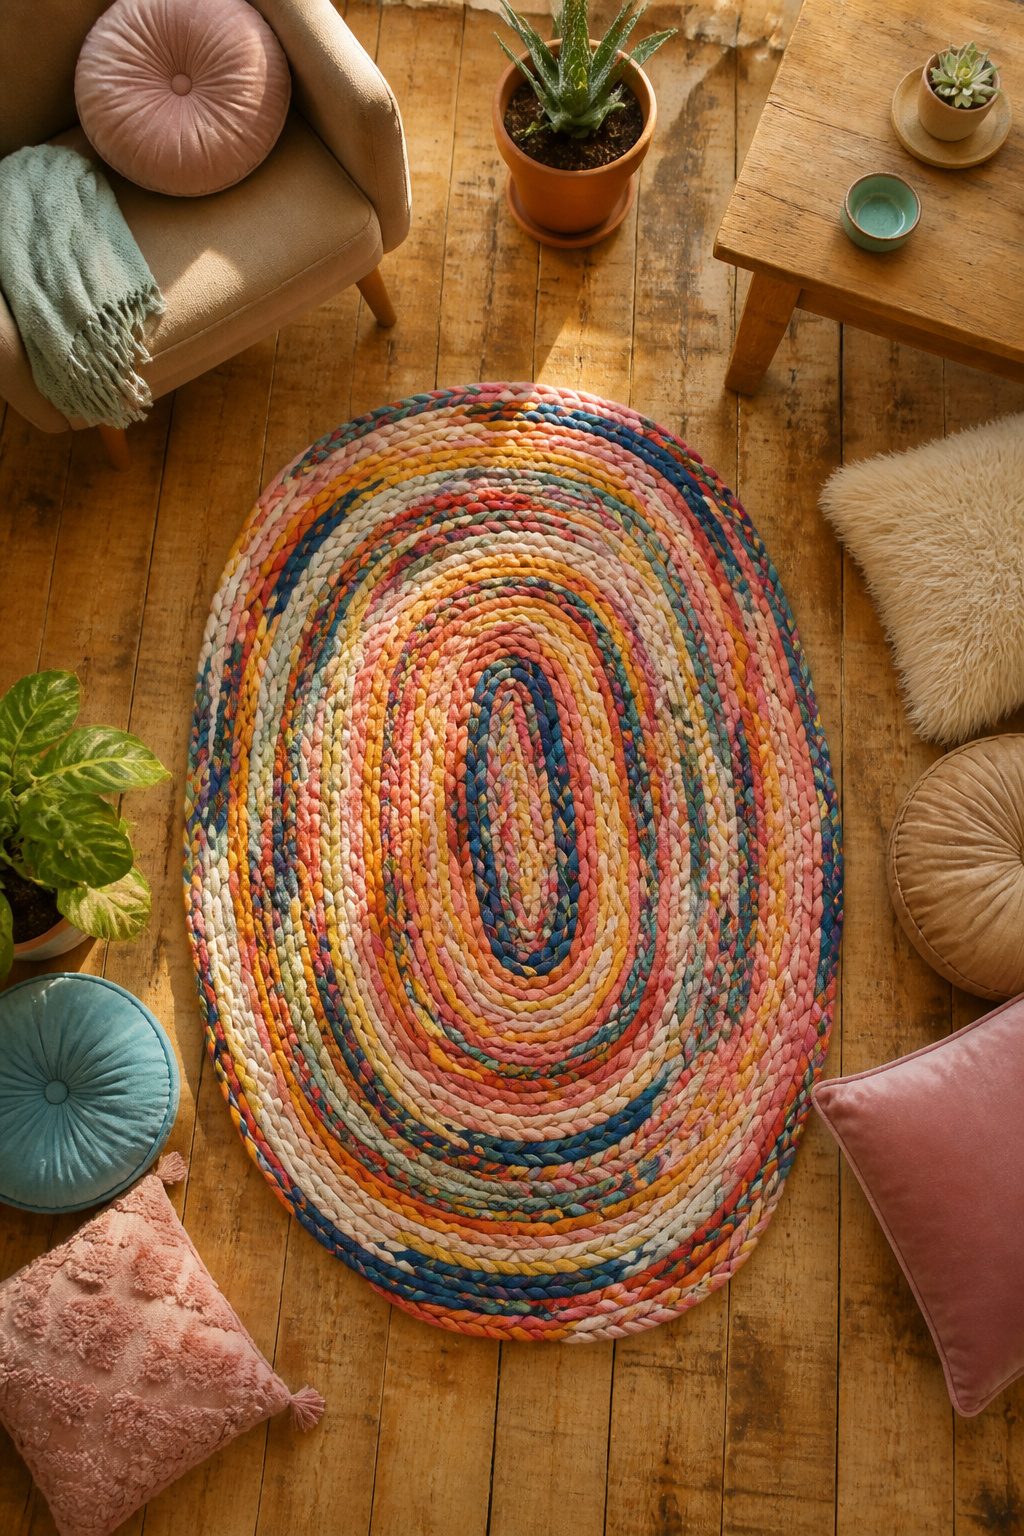
Worn t-shirts pile up faster than most of us admit, and the cotton jersey they are made from has a secret advantage: it rolls into a clean tube when stretched, so the cut edges disappear without hemming. I start by removing the seams and cutting the body into one continuous spiral about an inch wide, then pull each strip hard so it curls into what makers call t-shirt yarn. A bag of ten to twelve shirts yields enough for a two-foot oval, depending on how tight you braid or crochet.
For a flat rug that stays flat, add a non-slip rug mat sewn to the underside or work in a round of single crochet increases every third row, which spreads the fabric outward instead of letting it cup. The jersey gives underfoot, so high-traffic spots like the kitchen sink or bedside do not wear through the way a wool weave might, and when a section finally mats down, you can patch it with a new braid whip-stitched over the thin spot.
11. Embroidered Canvas Wall Art
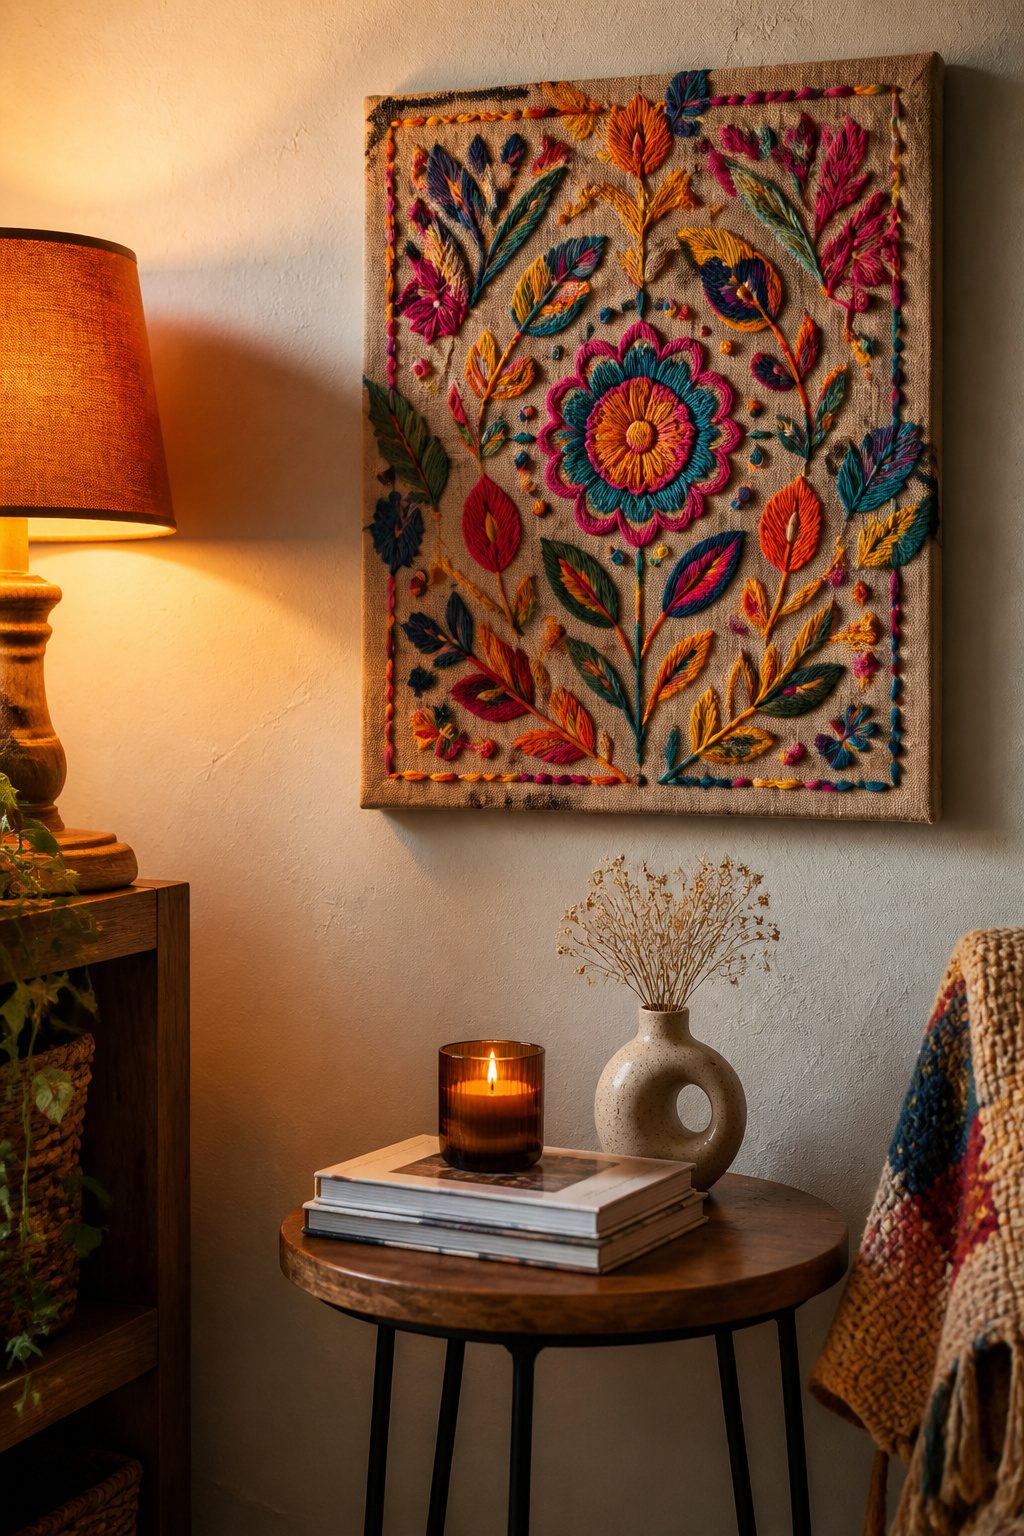
Stretching a scrap of embroidered fabric over a store-bought canvas frame takes about twenty minutes and costs less than a framed print. The trick is choosing fabric with enough open weave to let a needle pass without a thimble, but tight enough that stitches do not sag over time. Linen-cotton blends work better than pure quilting cotton, which can pucker when you pull it drum-tight across the bars.
For the design, a pencil rubbed on the back of any printed motif turns the paper into your own carbon paper. Lay it face-up, scribble the back, flip it onto the stretched fabric, and trace the lines with a ballpoint pen. The graphite transfers cleanly and washes out later if you stay inside the embroidery. No light box, no printer ink, no special pens needed.
Stitches that read from across a room are the simple ones: running stitch for outlines, French knots for dots of color, and chain stitch for anything you want to look like a drawn line. Satin stitch, which fills shapes solid, tends to disappear into a blur unless you use heavy thread or work it very large. I learned that the hard way on a small leaf that looked like a green smudge from the sofa. Three strands of standard six-strand floss on a 12-inch panel is about right; finer thread gets lost, and thicker rope thread can distort the weave.
12. Macrame Three-Pot Planter Holder
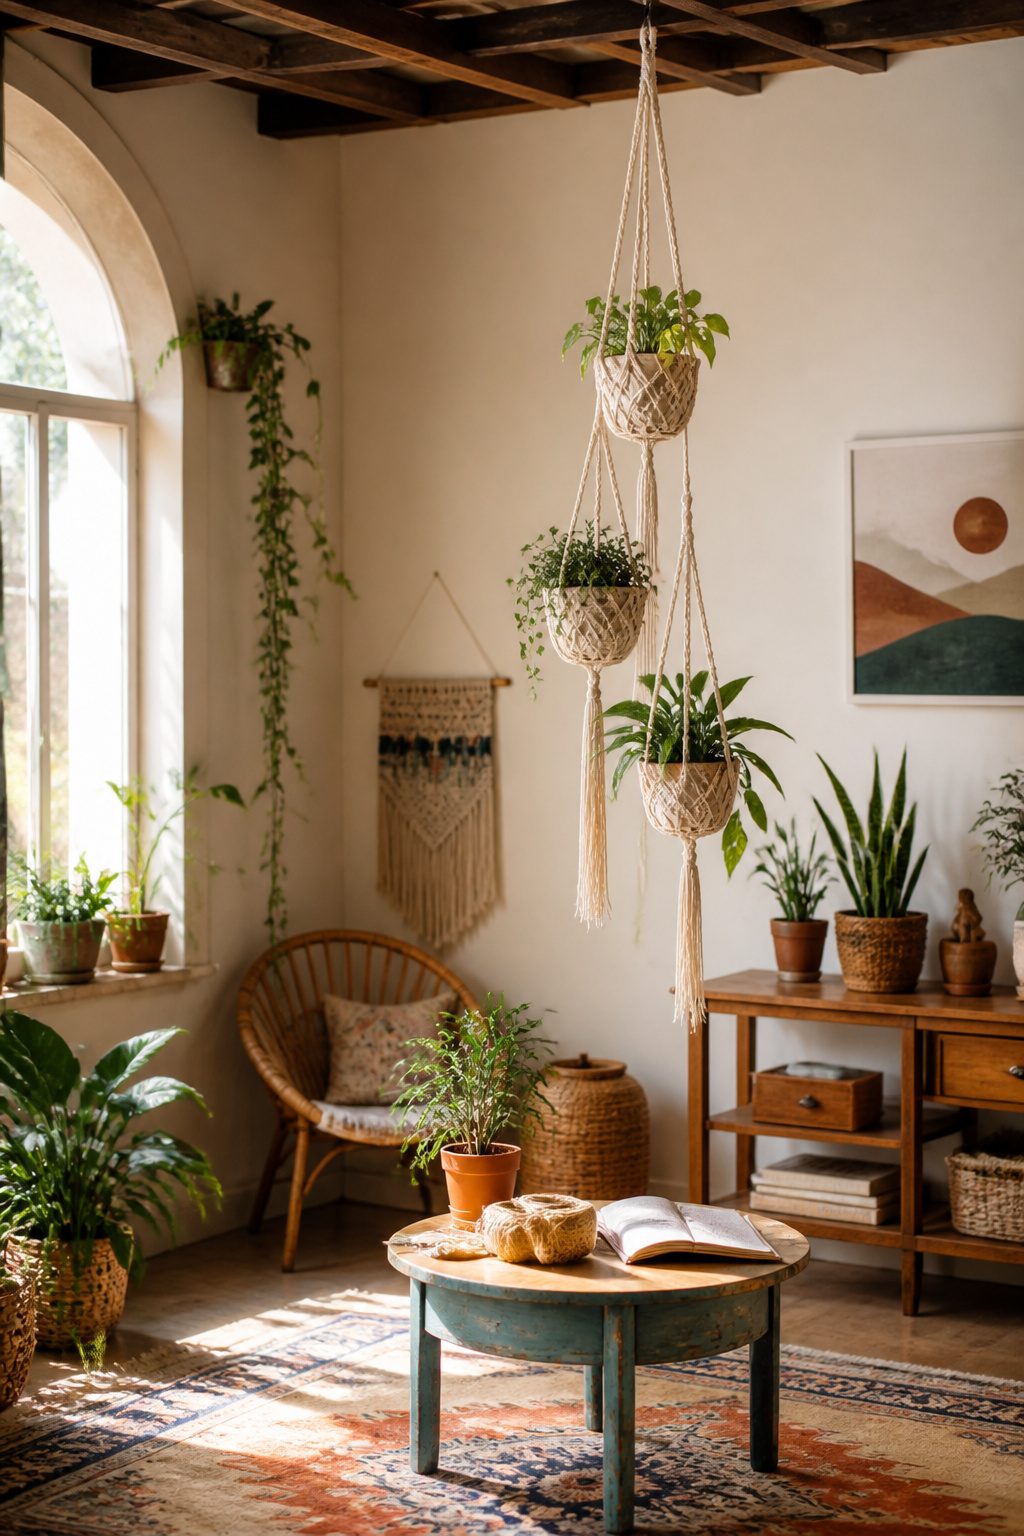
Three staggered pots in one hanging piece gives the layered, collected look that defines bohemian walls, and macrame is the cheapest way to get there. I started with a single 4mm cotton cord, about 50 feet, and a wooden ring from a craft bin. The top pot sits highest and smallest, maybe a 3-inch terracotta, anchored by a simple square-knot basket. Two longer cords drop below it to hold 4-inch and 5-inch pots at uneven intervals; the asymmetry matters more than perfect spacing.
Terracotta wins over ceramic here for one reason: weight distribution. Unglazed clay runs lighter than glazed ceramic of the same size, and when three pots swing together, every ounce shifts the balance. A heavy ceramic pot on the lowest tier turns the whole piece into a pendulum that knocks against the wall. Keep each pot under 5 inches and under 2 pounds dry, and the ring will hold without extra ceiling hardware.
The knotting itself is repetitive: wrap, knot, measure against your hand, repeat. I mark cord lengths with masking tape so the baskets stay level. A weekend afternoon gets you from raw cord to hung plant, and the cotton weathers to a soft gray that looks intentional by month three.
13. Anthropologie-Style Dried Flower Wall Art
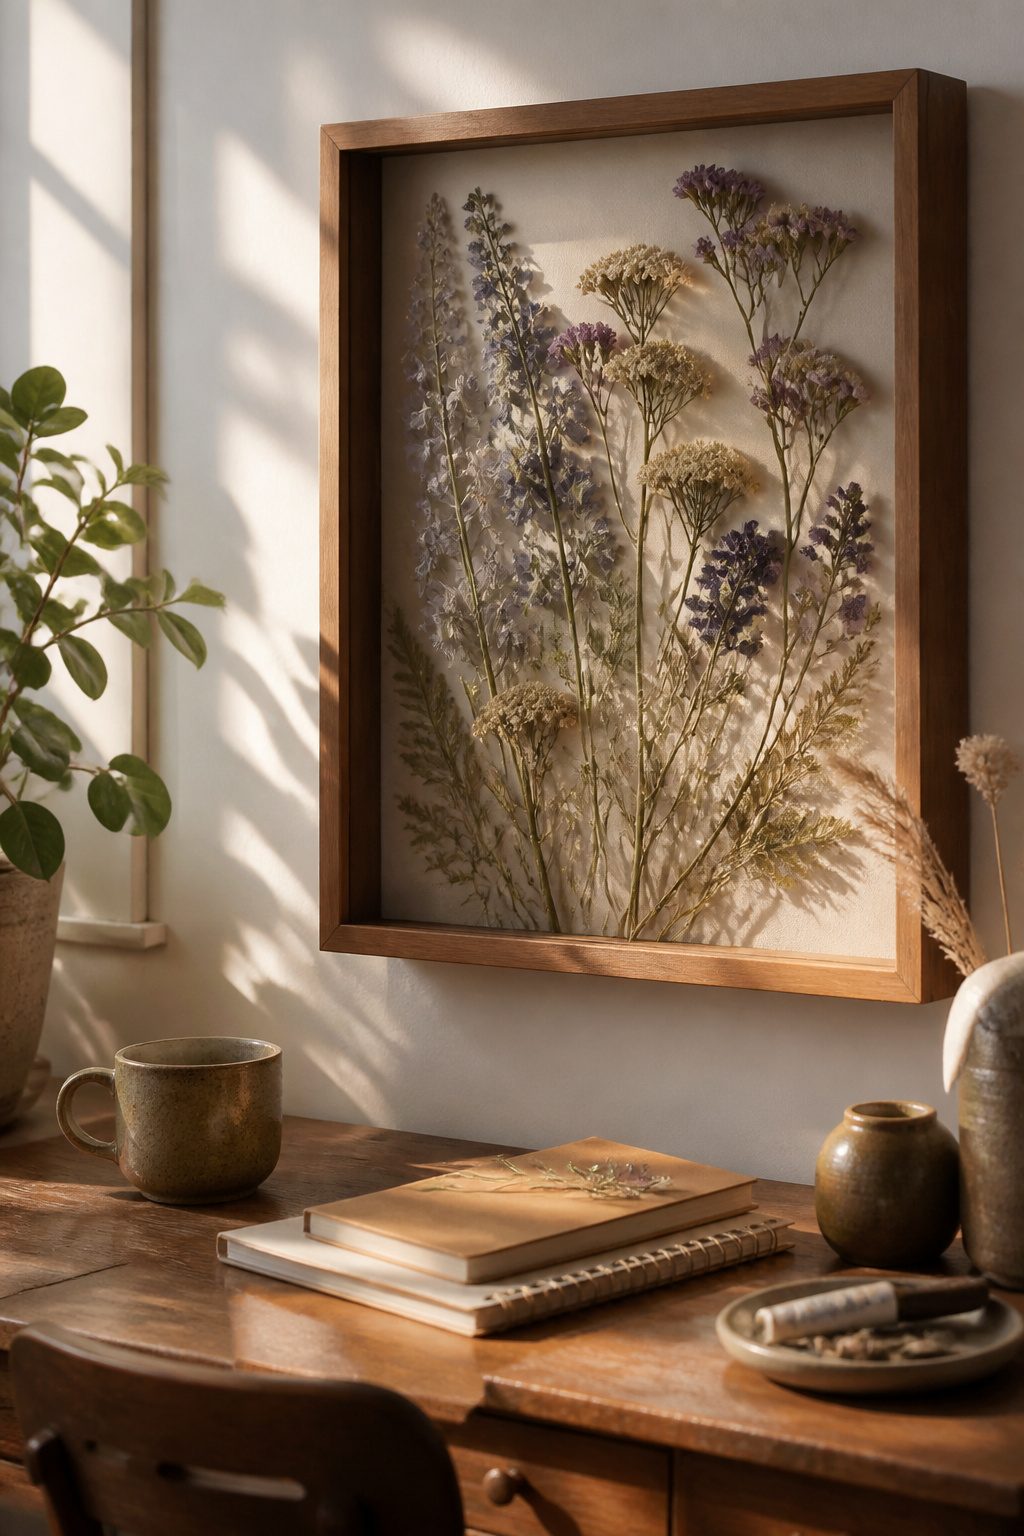
Pressed flowers in a shadow box look like the seventy-dollar Anthropologie panels, but the materials cost about eight dollars and the work takes an afternoon. Larkspur, statice, and yarrow hold their color for years; roses and hydrangeas brown within months even with silica gel, so I skip them now. The pressing itself is just newspaper between cardboard, weighted with books for two weeks. Shadow boxes from craft stores run five to seven dollars, or you can float stems between two sheets of glass in a thrifted frame. Sourcing is the part most people overthink. Grocery store bouquets past their prime, stems abandoned at community garden plots, or roadside wildflowers in late summer all dry for free. A friend who splits her perennials every spring is how I got the purple allium that still reads blue three years later.
14. Painted Rope Wall Decor
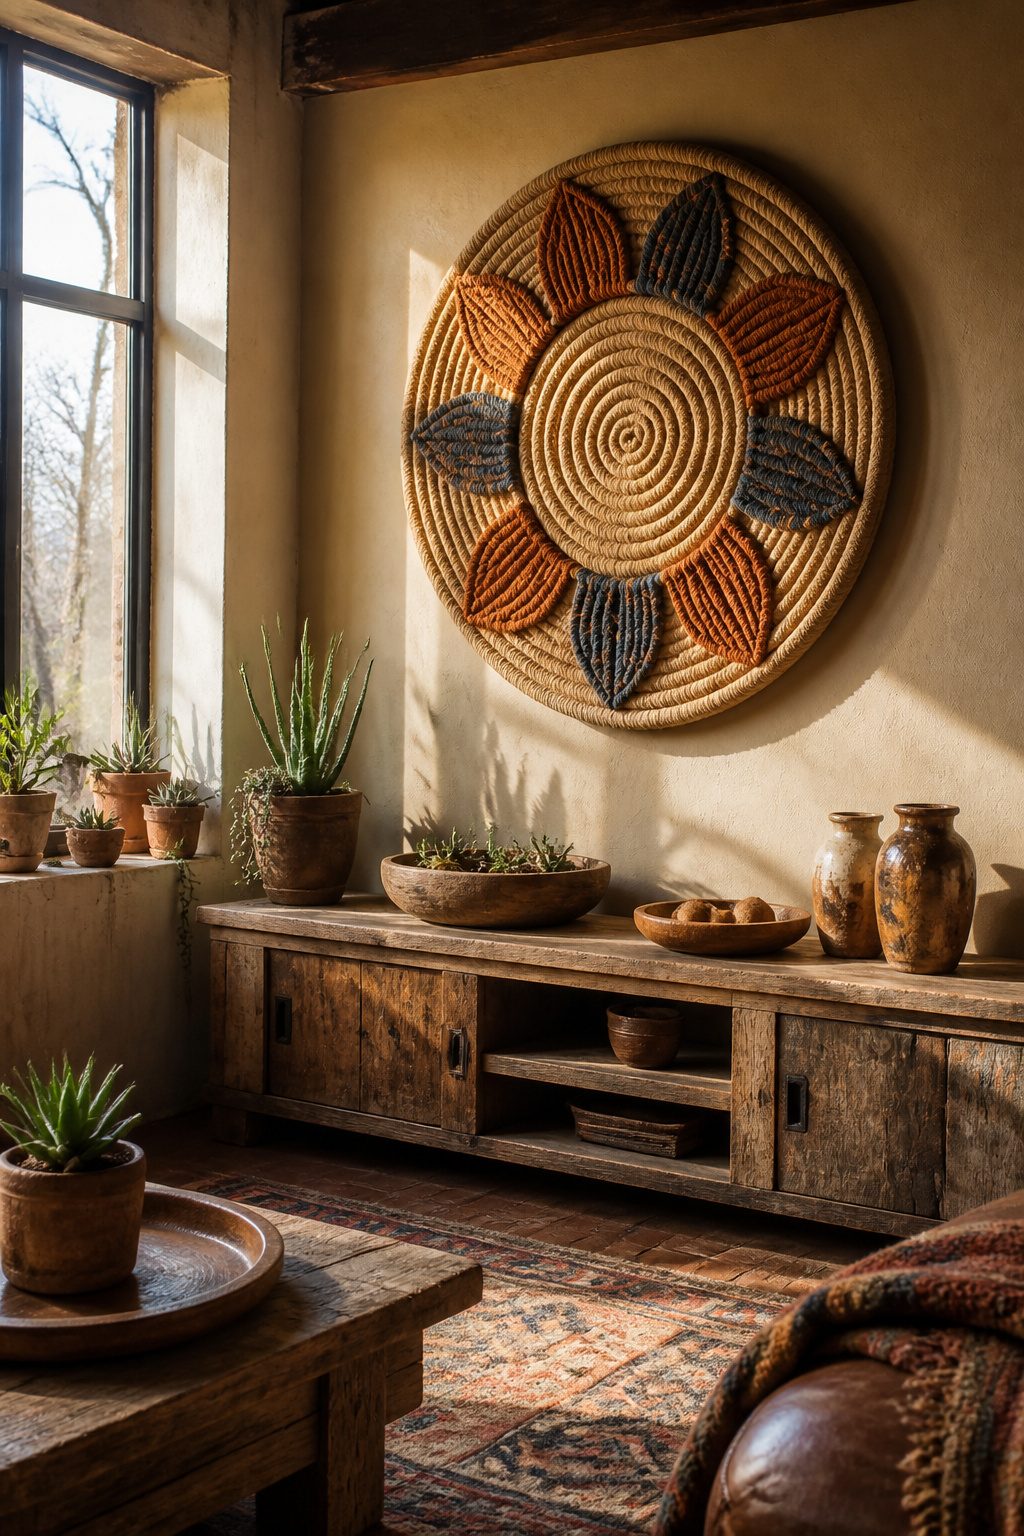
Sisal rope has a rough, sandy texture that already reads as bohemian before you do anything to it. Coiling and wrapping it into loose spirals or stacked rings takes about an hour and costs less than a spool of craft-store cord. I shape mine on the floor first, pinning loops with masking tape until the form holds, then hot-glue the contact points. The glue stays hidden inside the coils.
Paint only the raised surfaces with cheap acrylics, leaving the valleys raw. That contrast between dyed fiber and natural tan is what keeps it from looking like nautical decor. I use a stiff brush and dab rather than stroke; brushing sideways frays the rope.
Mounting without wall damage means skipping nails entirely. 3M Command strips cut to size and pressed onto the back of the heaviest coil work for pieces under two pounds. For anything larger, a picture ledge or a narrow shelf lets the piece lean. The rope is light enough that a single finishing nail in a stud, patched later with spackle, is the most invasive you should need.
15. Jute Light Fixture
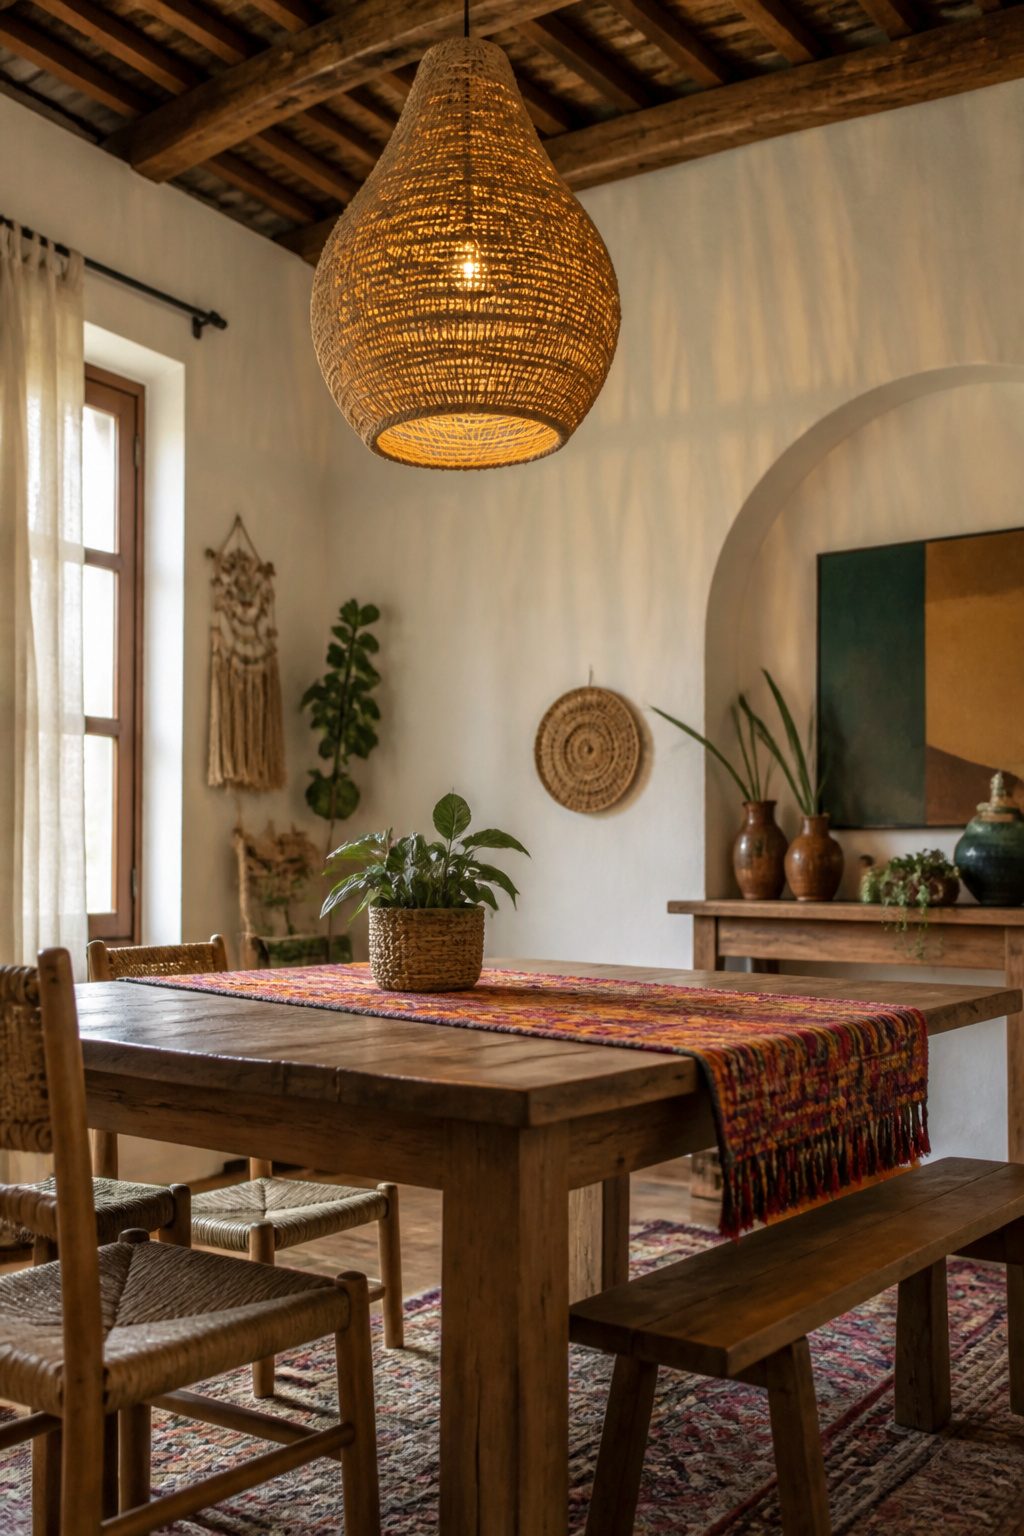
Jute rope wrapped around a wire frame makes a pendant shade that reads as instant bohemian without the vintage-store price. The frame itself can come from a cheap existing fixture, a wire basket with the bottom cut out, or even a tomato cage reshaped into a cylinder. Glue choice matters more here than in most projects because standard bulbs will heat the rope past the melting point of hot glue. Construction adhesive or a high-temp glue gun rated for at least 200°F holds through an evening of use; anything weaker softens and lets the rope sag in rings you cannot fix without starting over. LED bulbs are non-negotiable — they keep the shade surface cool enough that you can touch it after hours of light. I learned that after watching a test run with a halogen bulb leave a dark ring and a smell I did not want in the bedroom. Wrap from the top down, keeping each coil tight against the last; gaps show more under light than they do in daylight. A 40-watt-equivalent LED gives plenty of glow through the gaps and keeps the whole piece safe to leave on.
16. Macrame Picture Frames
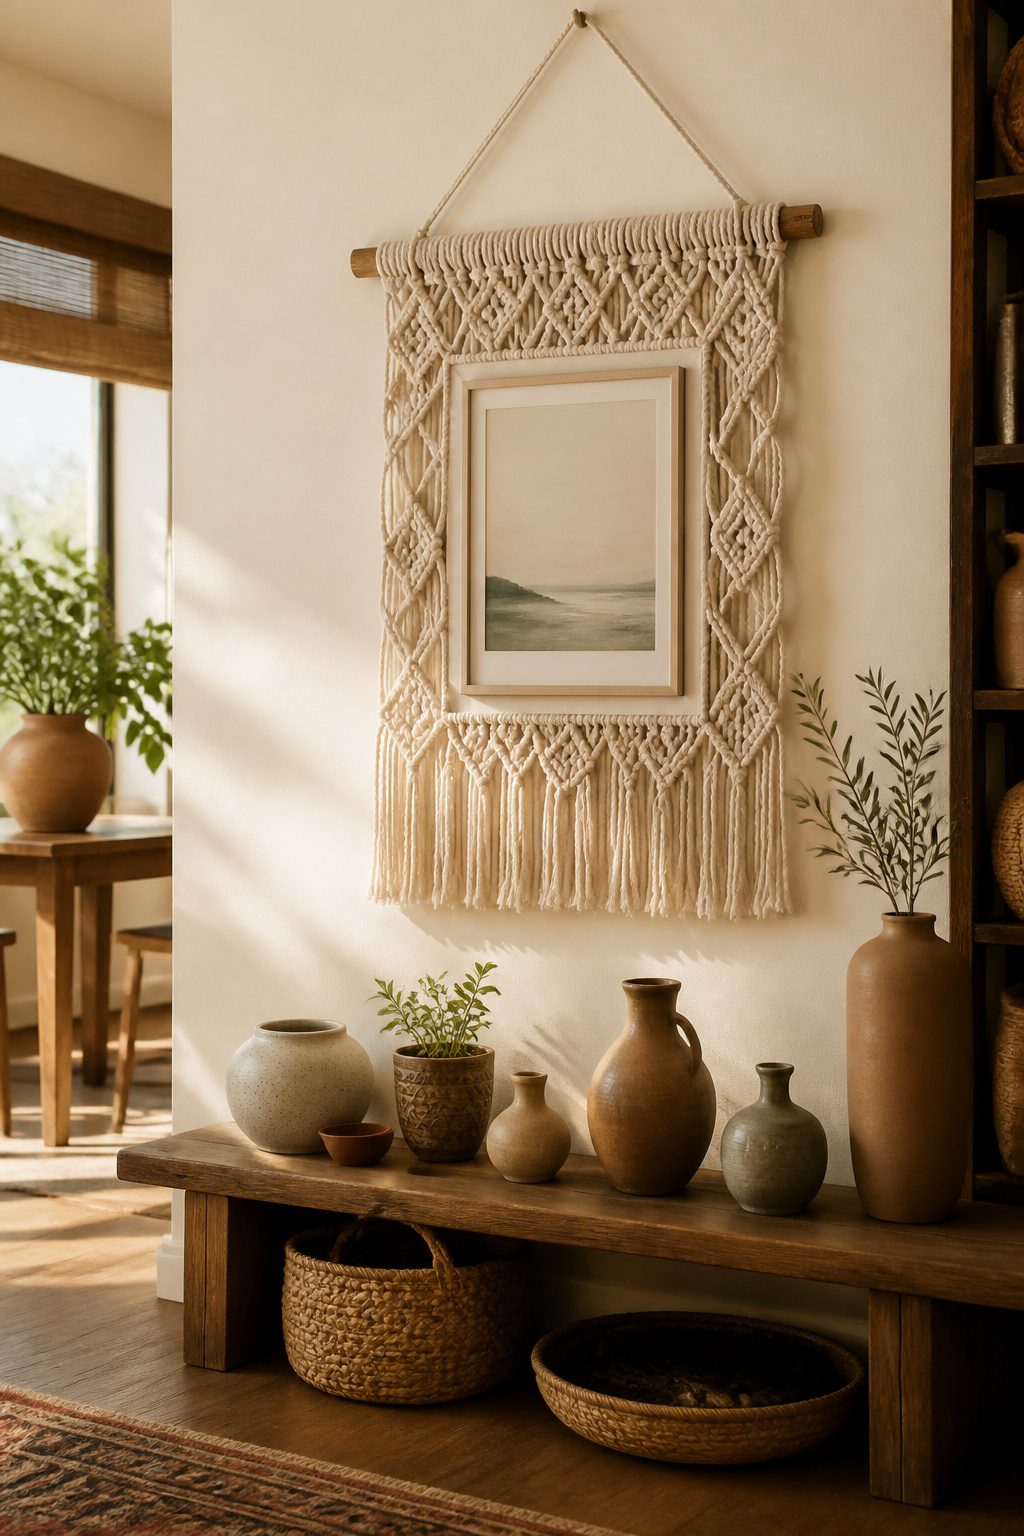
Macrame cord wrapped around a plain wooden frame turns a drugstore print into something that looks picked up at a flea market. I start with a basic 5×7 or 8×10 frame, the kind that costs under ten dollars, and wind 3mm cotton cord in overlapping loops from corner to corner. The trick is keeping tension even; loose wraps read as sloppy, not relaxed.
Fringe along the bottom edge finishes the piece. I cut twelve-inch strands, fold them over the frame rail, and secure with a lark’s head knot, then comb them out so they hang clean. A few tassels at the top corners balance the weight visually, otherwise the whole thing feels bottom-heavy.
The cord adds maybe three dollars and an hour of work. What sells the collected look is imperfection: one knot slightly thicker, the fringe trimmed a touch uneven. Mass-produced prints suddenly look like they traveled somewhere to get there. I have used this on botanical prints, vintage maps, even a plain black-and-white family photo, and the frame does the bohemian work so the image does not have to.
17. Indigo Shibori Dyed Placemats
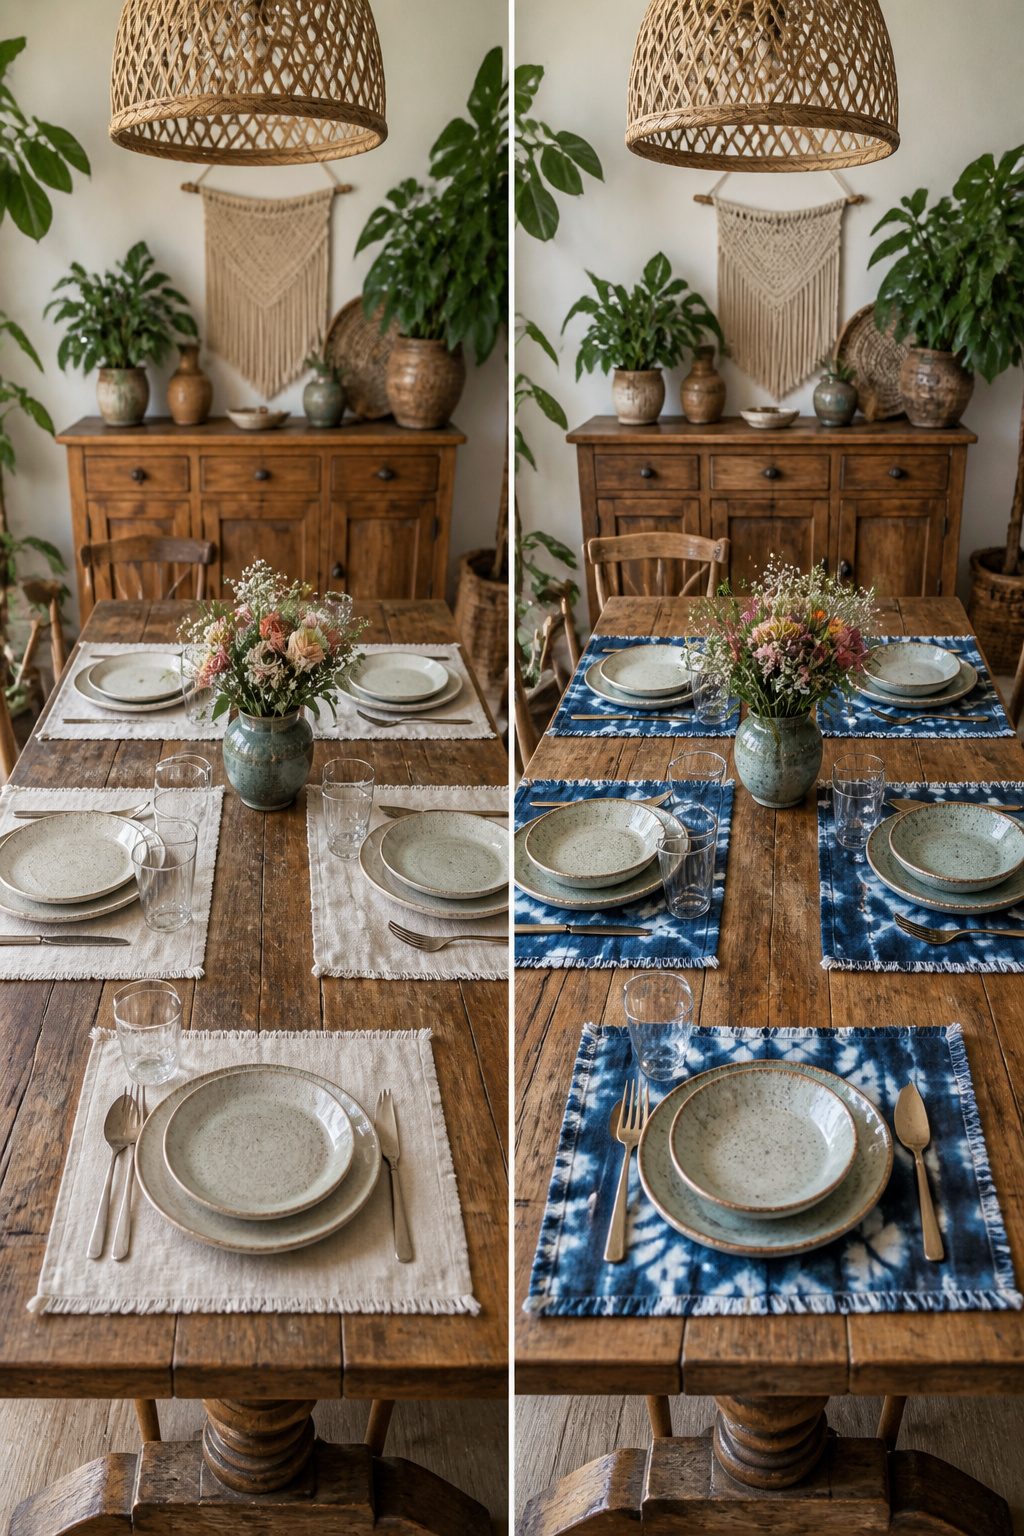
Cotton fabric takes indigo dye best when it has been folded and bound tight enough to block the liquid from reaching every surface. The untouched areas stay pale, creating the irregular white shapes that read as bohemian rather than geometric. I watched a few tutorials before trying this, and the pattern that convinced me was a simple accordion fold with rubber bands every two inches: the resist marks come out organic but not messy.
Synthetic indigo is what you will actually find in kits at craft stores, and the visual result is nearly identical to the natural fermented kind. The synthetic version keeps longer in the bucket, too, which matters when you are dyeing placemats one at a time on a Saturday. Let each piece oxidize in the air for about fifteen minutes before rinsing, or the color will keep shifting on you. Two dips gives a deep navy; three starts to look almost black.
18. Tassel Mirror
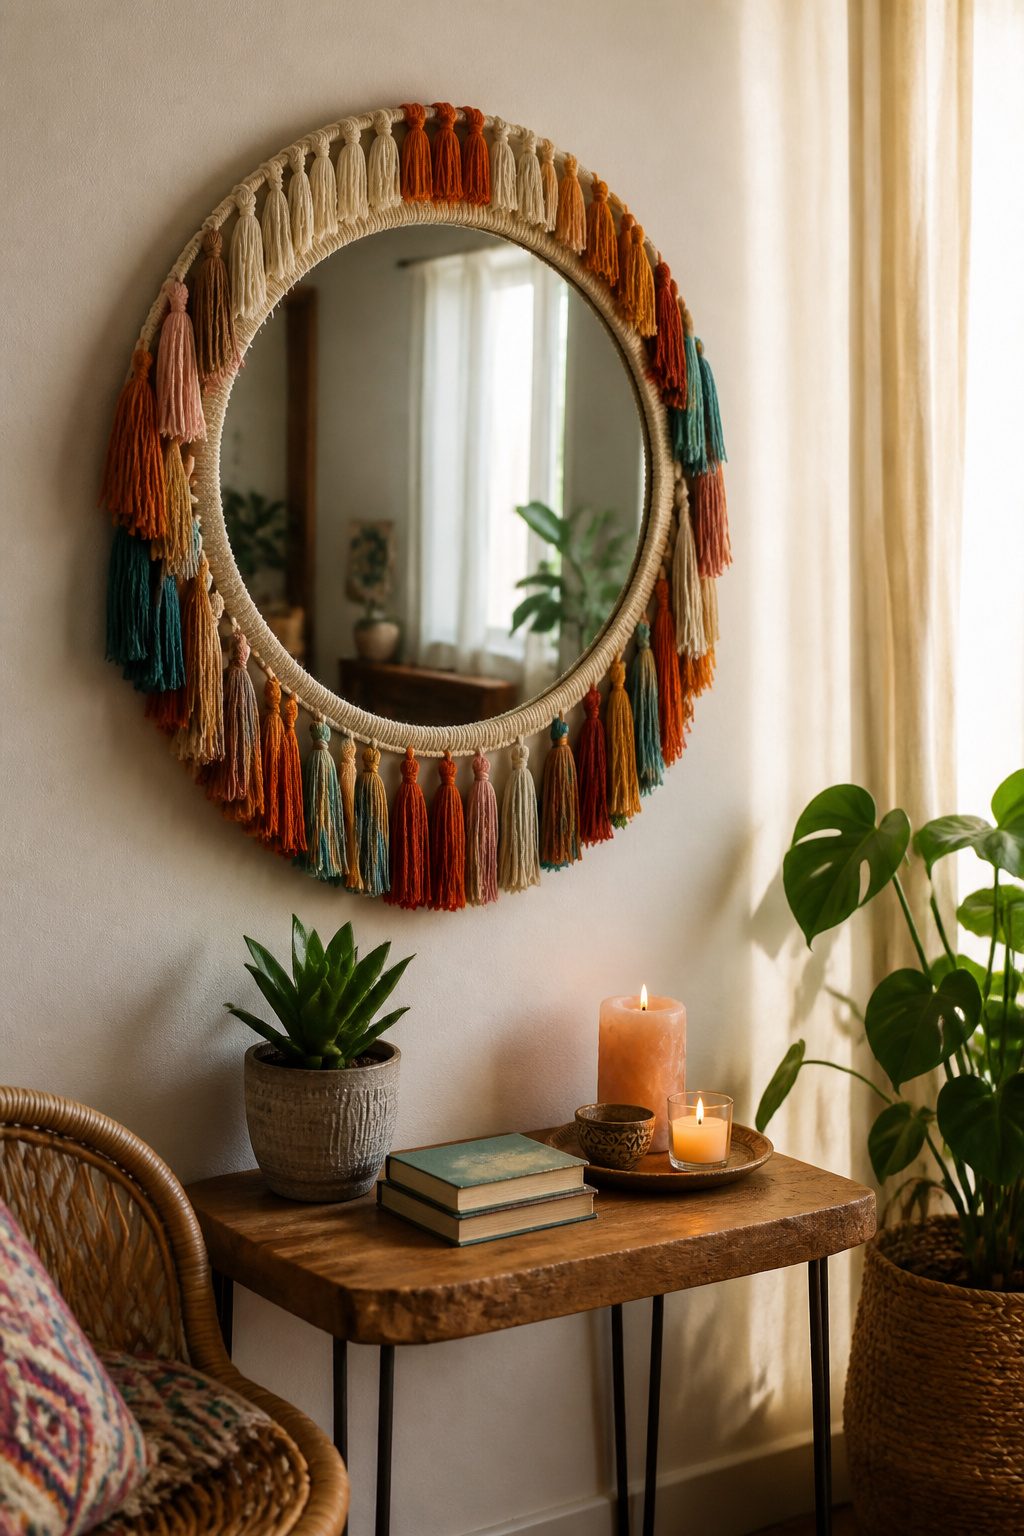
Yarn tassels threaded around a plain mirror’s edge catch air in a way a solid frame never will. The movement is the whole point: each strand sways when someone walks past, so the piece feels alive rather than hung. I learned the hard way that weight matters more than color. My first attempt used upholstery fringe, thick and dramatic for about three weeks, then the adhesive started creeping under its own load. Lighter cotton yarn or unravelled sari silk stays put with simple fabric glue and does not torque the mirror off the wall. Three-inch tassels spaced an inch apart give that dense bohemian fringe without overlapping into your reflection. Leave the mirror’s backing fully exposed; this trim needs no structural frame to anchor to, which is why a cheap door mirror works as well as anything framed.
19. Leather Plant Pot Holder
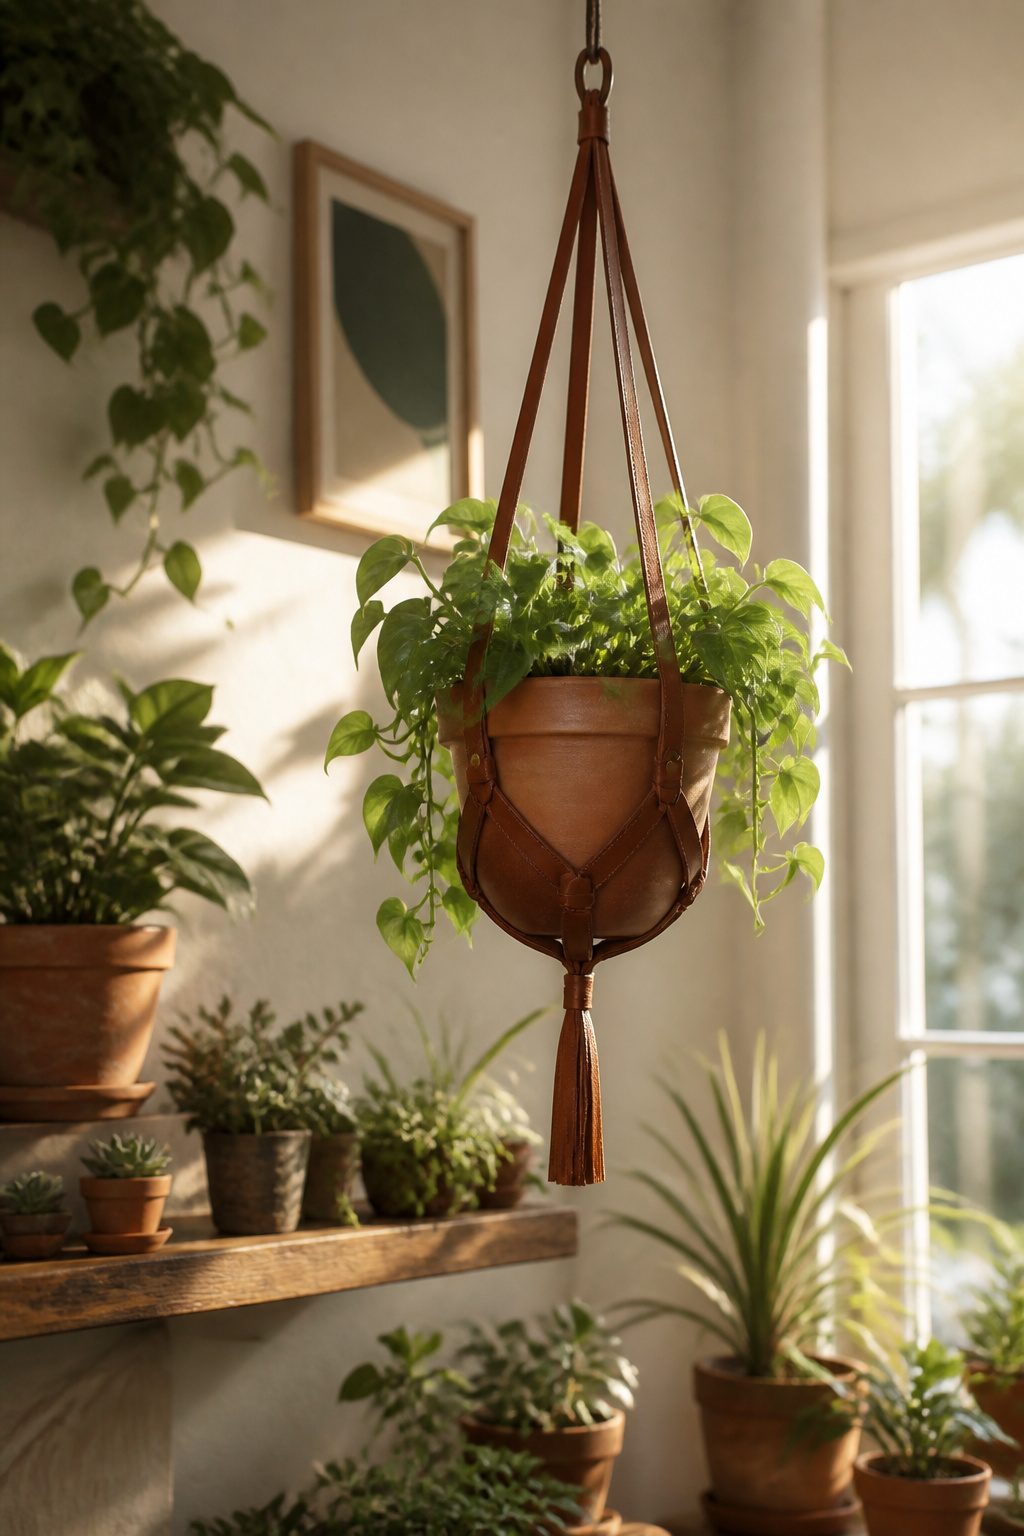
Scrap leather turns up in the remnant bins at upholstery shops and on resale boards for a few dollars a square foot, enough for several slings. The piece needs to be wide enough to wrap around your pot with an inch or two of overlap, and the taper of the pot is what decides the shape, not the height alone. A straight cylinder takes a simple rectangle; a pot that narrows toward the base needs the leather cut wider at the bottom so the sling grips rather than slips through.
I mark the curve by wrapping the pot in paper first, tracing where the sides actually sit, then transfer that to the leather. A leather punch or even a sharp awl makes the holes for the cord; keep them at least half an inch from the edge so they do not tear out under weight. Faux leather works the same way and forgives damp soil better, though it softens faster in sun. The cord runs through the holes, knots underneath, and the whole thing hangs from a ceiling hook in ten minutes.
20. Colorful Modern Yarn Wall Hangings
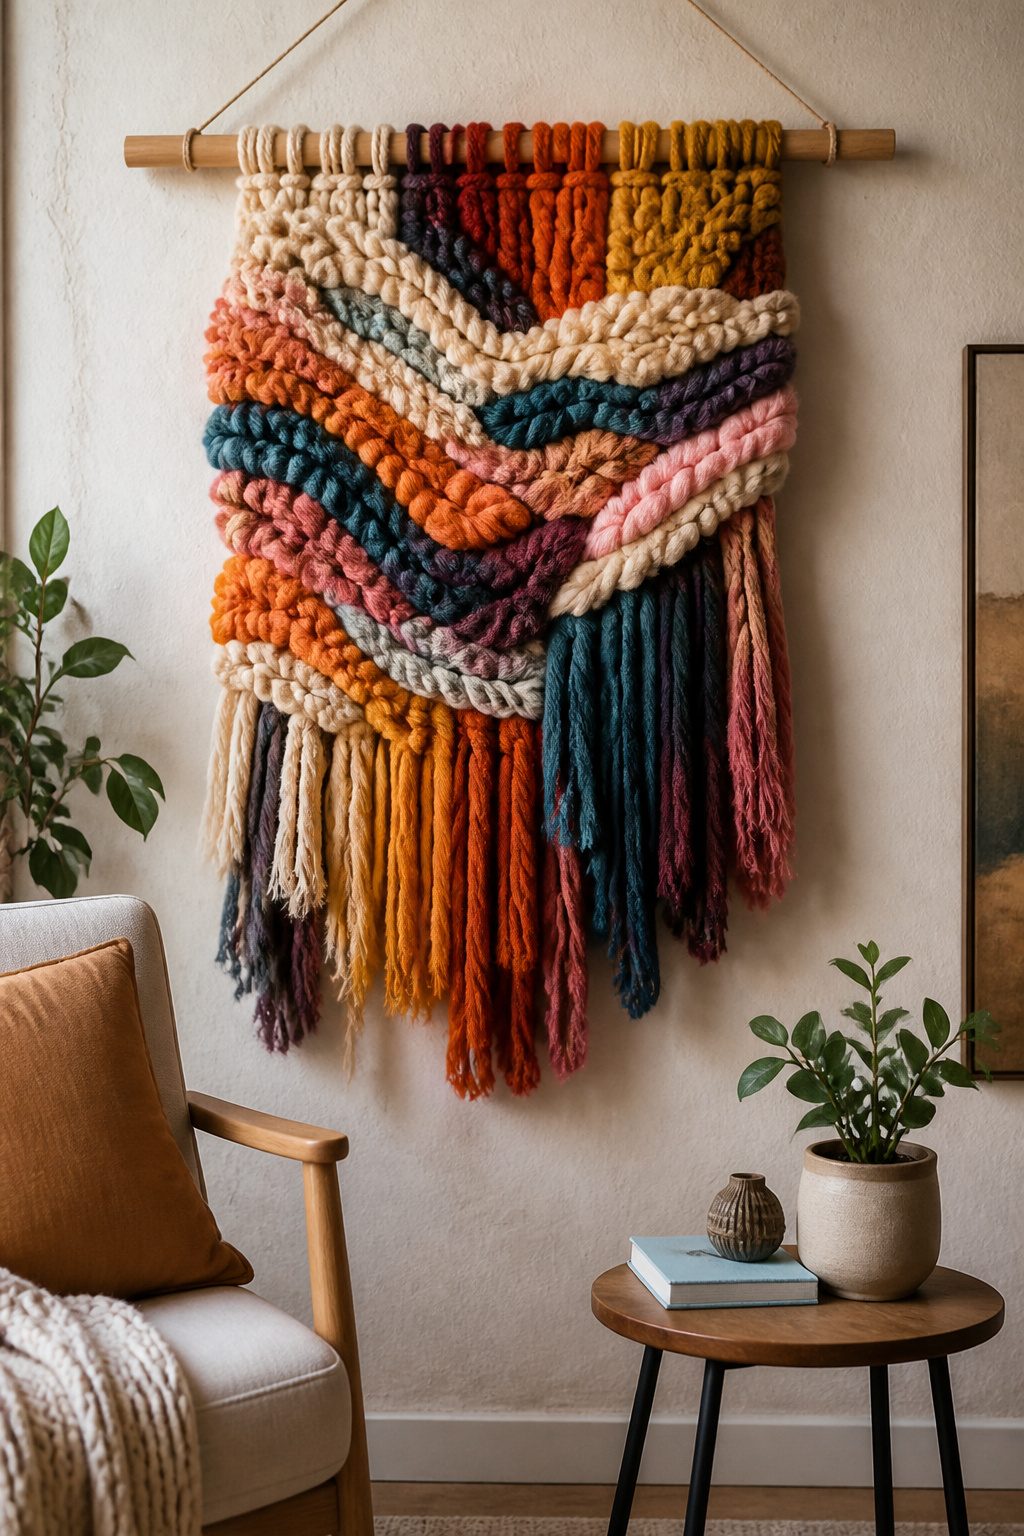
Chunky yarn on a simple dowel gives the look of a woven wall piece without the months it takes to learn loom weaving. I started with a ¾-inch dowel from the hardware store and three skeins of yarn in different weights: one super-bulky wool, one medium cotton, and one thin ribbon yarn for contrast. The trick is varying how tightly you wrap each section. Dense wrapping with the thick yarn builds a solid, almost tapestry-like block; looser spacing with the same yarn lets the dowel show through and reads as negative space. I learned this the hard way after wrapping my first piece evenly all the way across and ending up with what looked like a solid rug, not art.
For texture that reads from across the room, stack three or four rows of fringe cut at uneven lengths and knot them onto the dowel before you start the main wrapping. The yarn sources in the top projects used copper hardware at the top, but a basic dowel keeps this under $15 and renter-friendly. Hang it with a single nail through a loop of yarn at the back; the weight sits on the dowel itself, not the wall.
21. Rattan-Inspired Light Shade
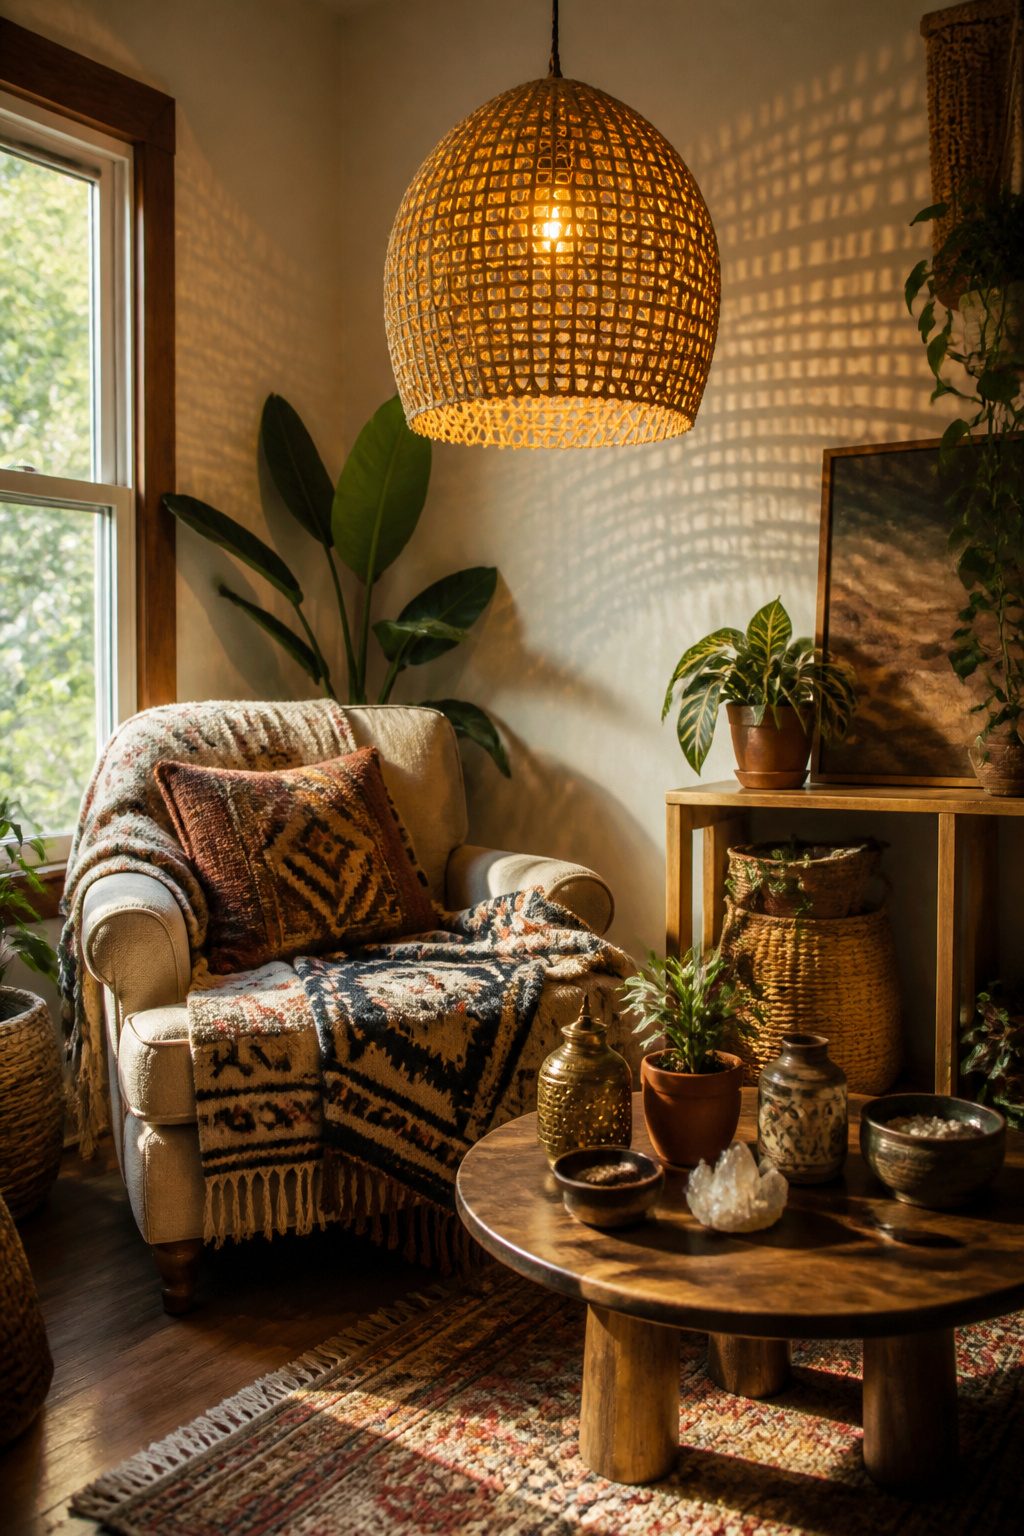
Paper cord from the hardware store wraps around a wire frame the same way rattan does, and the difference in price is enough to matter when you are lighting three rooms on a Saturday. I built my first shade with a $6 tomato-cage base flipped upside down, working from the bottom ring upward in a simple over-under rhythm that hides the joins. Leave gaps of about a finger’s width between rows; the open weave throws leaf-shaped shadows across the walls after dark, where a tight weave only makes a dull glow. For tone, walnut spray stain warms the cord without the plastic sheen of craft paint, and two light coats keep the fibers from stiffening. My second attempt went too dark with the stain and read as muddy against cream walls, so now I test on a six-inch scrap and let it dry before committing to the whole frame.
22. Plant Shelves from Wood Slices
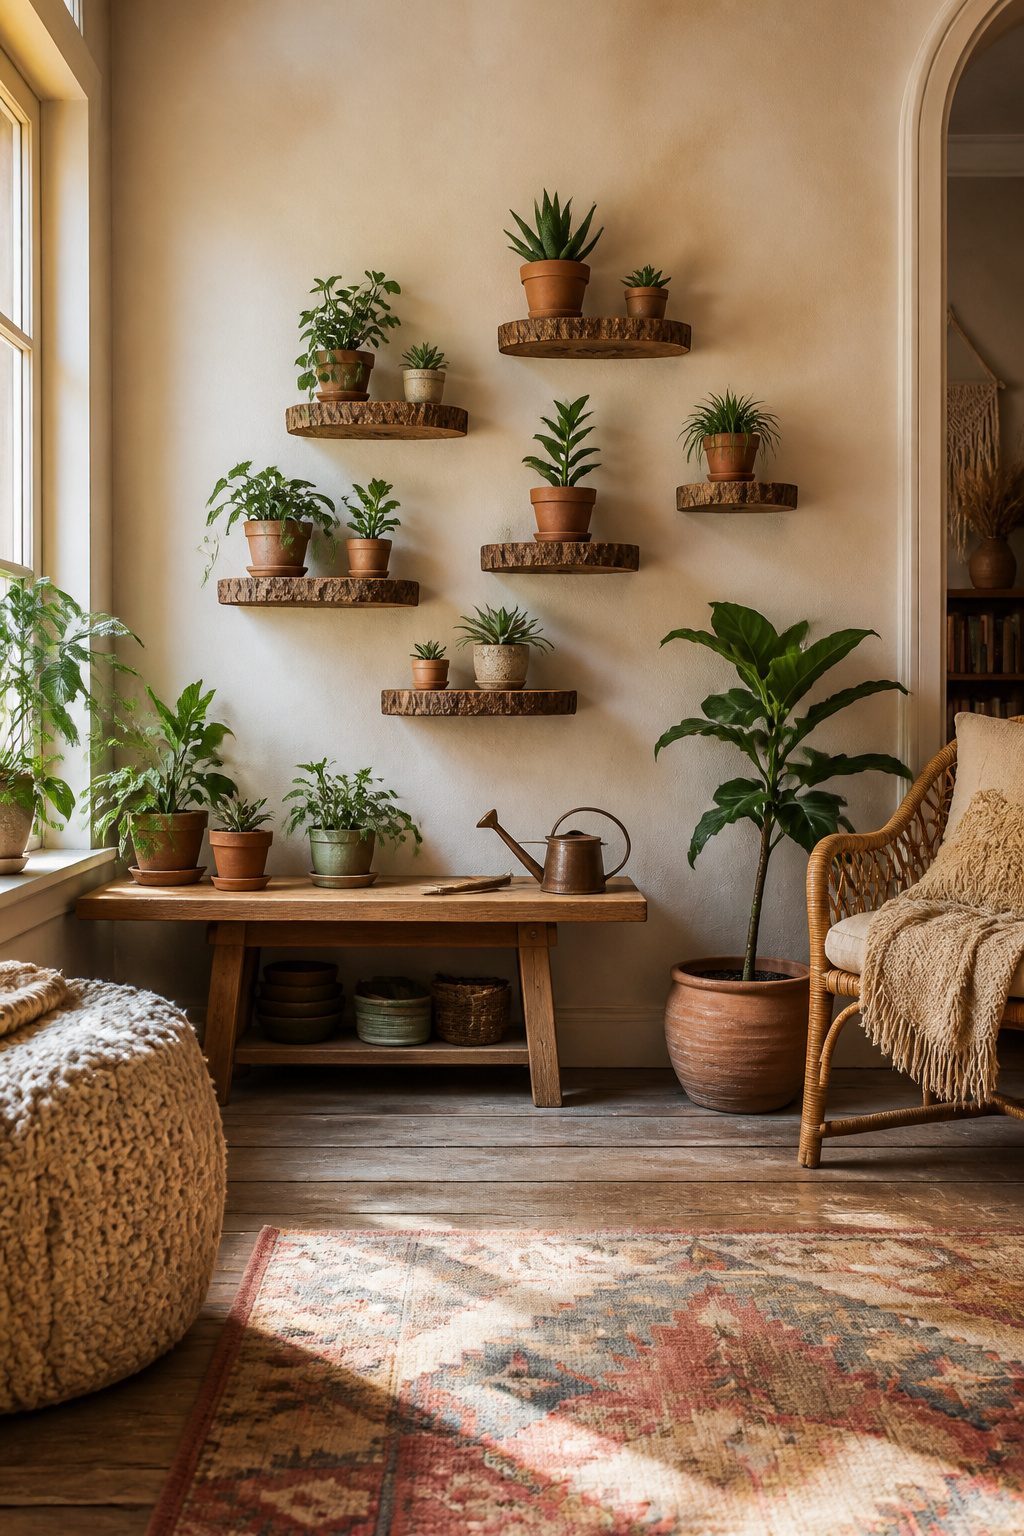
Cross-sections of branch or small log make floating shelves that feel found rather than built. A slice three to four inches thick, bark still on, holds a small terracotta pot and saucer if you anchor it right. Drywall alone will pull free under that weight within a season. I use toggle anchors rated for at least fifty pounds, or a masonry bit and lag shield if the wall is brick or block. The back of the slice needs a flat plane; belt sand it for ten minutes until it sits flush against the wall without rocking. Each shelf should carry no more than two pounds of plant, soil, and pot combined. That rules out anything that wants to trail or climb. A single echeveria, a tiny snake plant, or a rooted cutting in a two-inch pot stays small enough for years if you do not overwater. I tried a four-inch pothos once, and the new growth reached for the window, tipped the shelf, and left soil on the floorboards. Now I stick to plants that grow slower than my mistakes.
23. Boho Eucalyptus Wreath
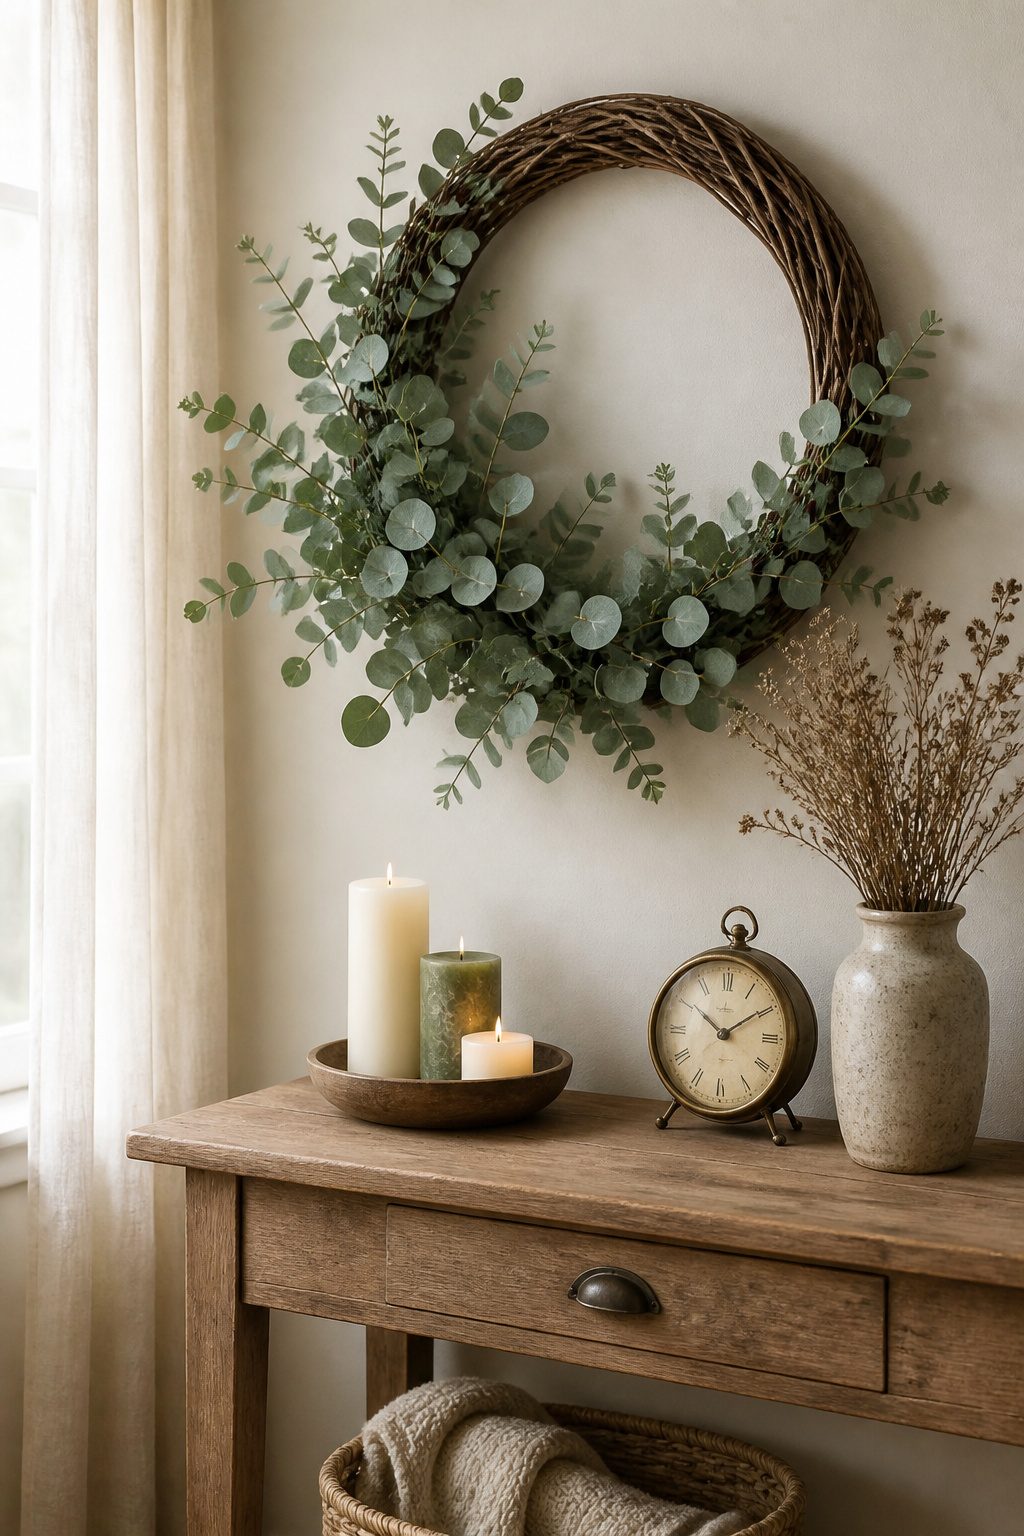
Dried eucalyptus wired onto a grapevine frame gives the soft, muted green that defines boho wall pieces, and the trick is that eucalyptus dries in place without browning or dropping needles the way olive branches or ivy will. Grapevine wreaths from any craft store run about six to eight dollars and already have the nubs and forks that hold wire in place. I use 22-gauge floral wire in short lengths, anchoring each stem at two points so nothing shifts while it cures. The stems shrink slightly as they dry, which tightens the wire’s grip instead of loosening it.
A eucalyptus wreath left untouched lasts roughly two to three years before the color dulls to gray-green. Preserved eucalyptus, the kind sold already treated with glycerin, keeps its brighter tone longer but costs twice as much and can feel leathery rather than crisp. For a weekend project under fifteen dollars, drying your own stems wins. Hang the finished wreath in a spot away from direct sun and bathroom humidity, and the natural oils in the leaves do the preservation work for you.
24. Palm Leaves from Paper or Fabric
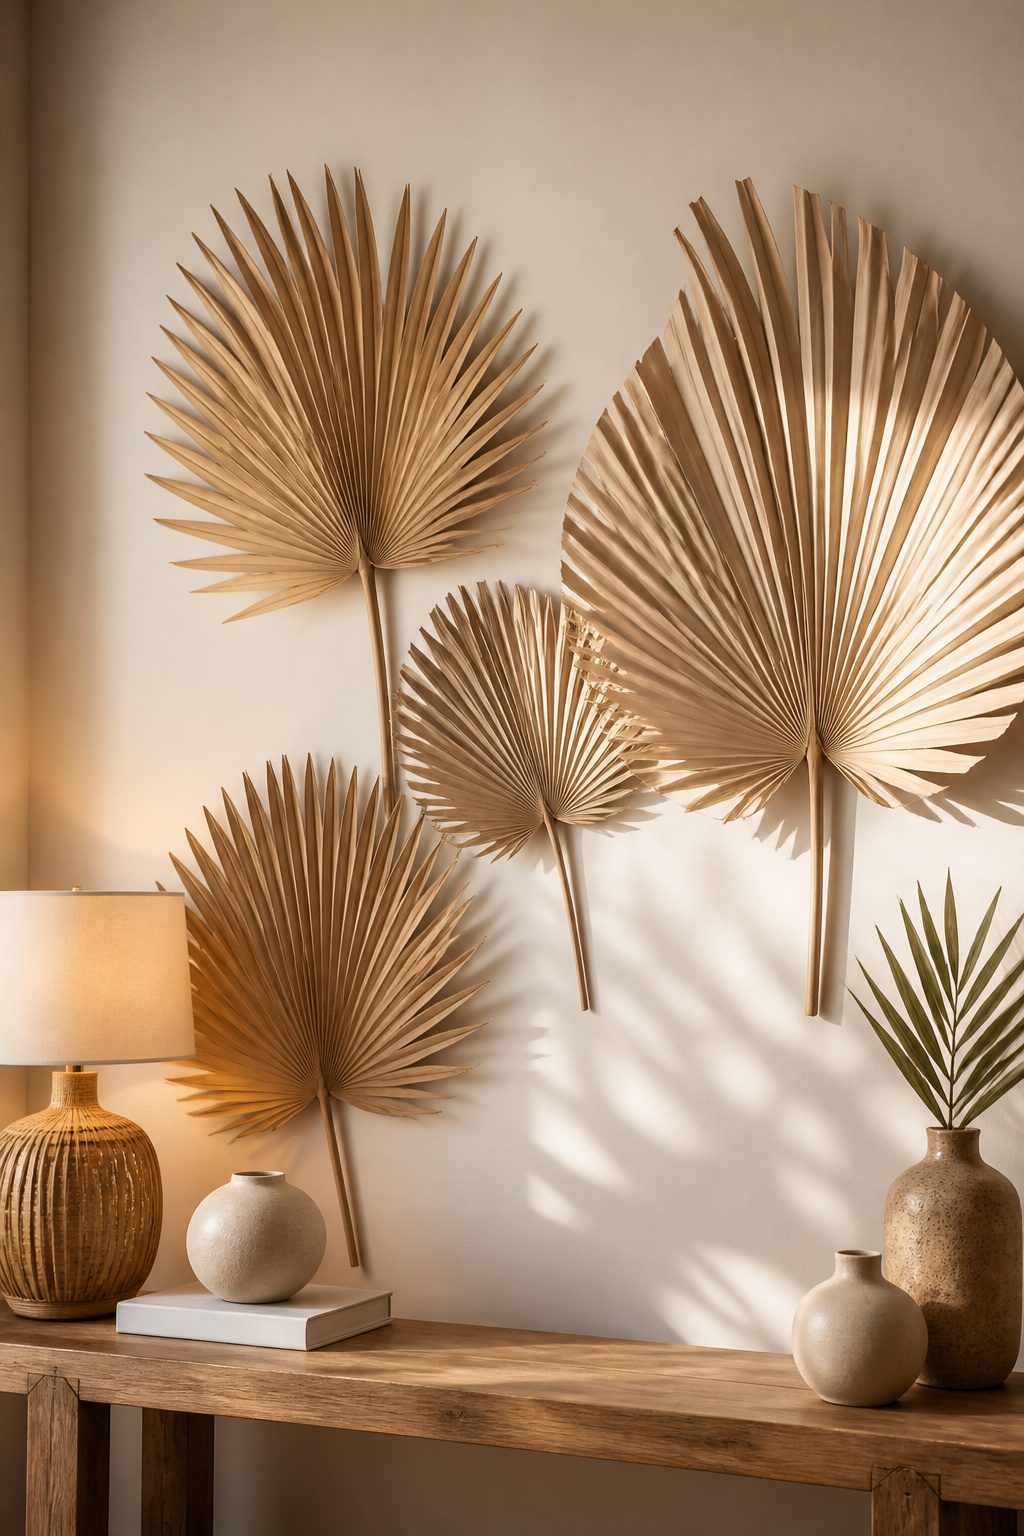
Heavy paper or linen holds a crease well enough to pass for dried palm foliage, and both materials take paint better than the synthetic greenery sold at craft stores. I trace a long central spine first, then sketch individual leaflets branching off at slight angles so the finished shape does not read as a flat fan. Scissors work for small projects, but a rotary cutter against a metal straightedge keeps the edges cleaner on linen, which frays if you look at it wrong.
Wire makes the difference between a wall hanging that droops and one that keeps its posture. Floral wire in 18 or 20 gauge threads through a narrow channel you iron into linen or fold and glue into paper, running the full length of the spine and extending two inches past the base to bend into hooks. Group at least five fronds, wired to a shared ring at staggered heights, so the silhouettes overlap rather than lining up like fence posts. Three fronds looks sparse from every angle; seven starts to read as actual density without needing more wall space.
25. Hanging Planter Without Macrame
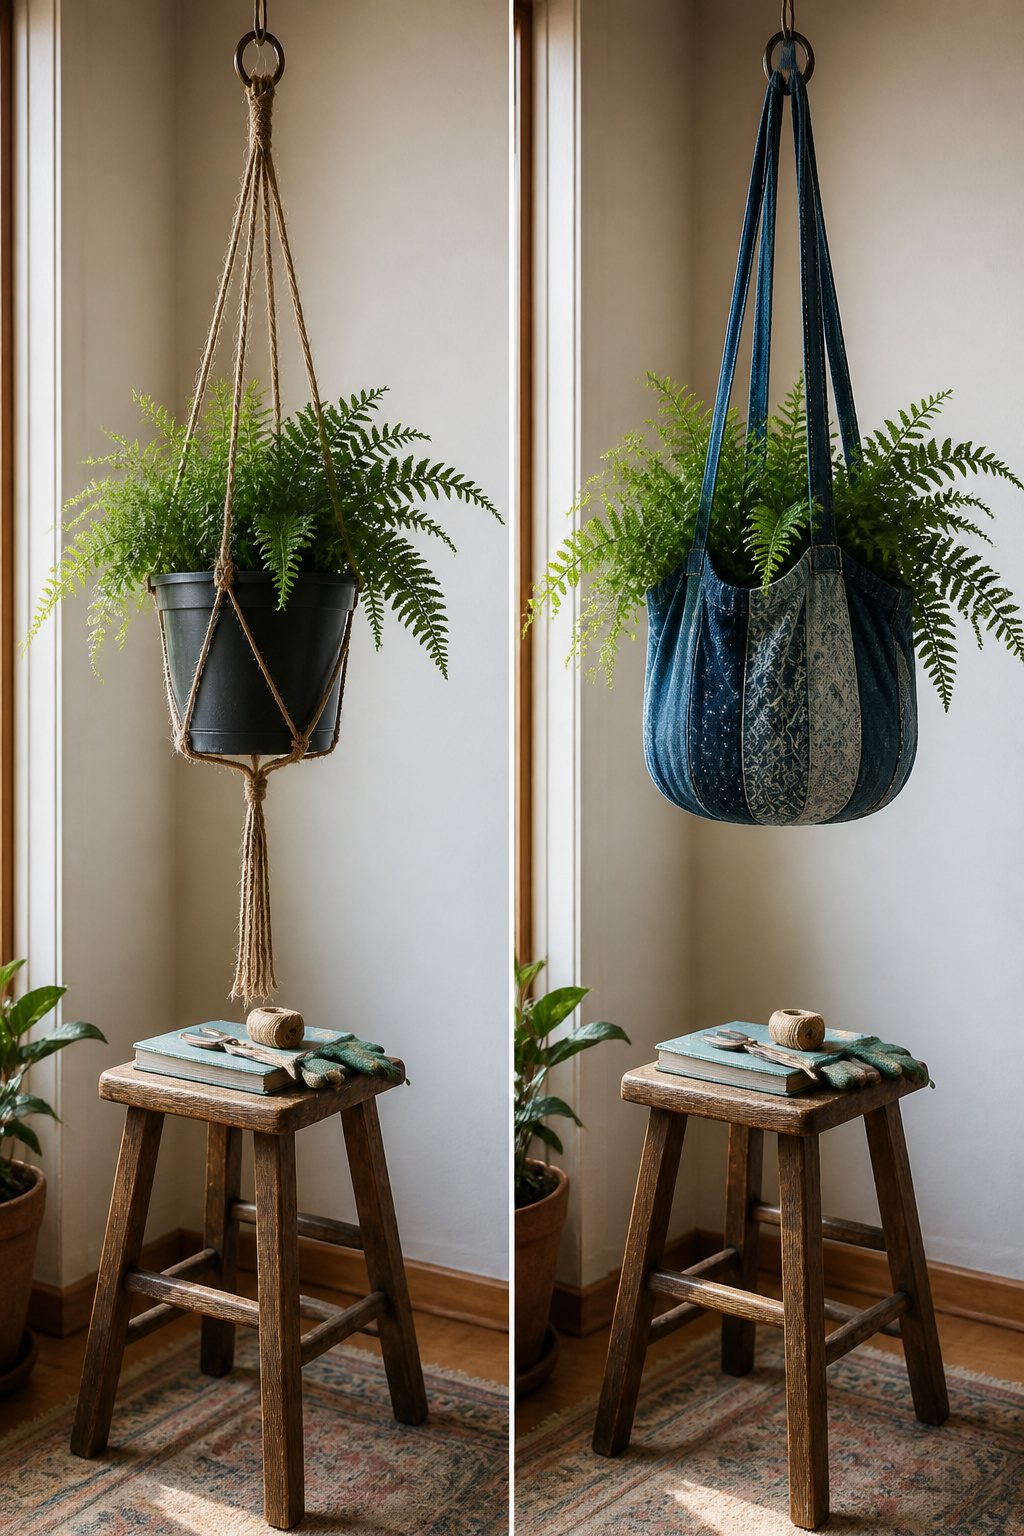
Leather straps, metal chains, and fabric slings each solve the same problem macrame does, but with less patience required and a different relationship to your watering can. The leather option, cut from an old belt or bought as remnant strips, wraps under the pot and leaves the top rim completely open. That matters more than it sounds if you own ceramic pots in earthy tones, which boho rooms already favor, because you can lift the plant straight out for soaking without unthreading anything. Metal chain hangs stiffer and works best with lighter plastic or resin planters; the links let you adjust length by hooking higher or lower, but the pot sits fixed inside a ring or basket, so watering has to happen in place or you unclip the whole assembly. Denim or canvas slings fall somewhere between, soft like leather but washable, and they cradle the pot low so the fabric itself becomes part of the look. What convinced me, reading through a dozen of these setups, is that the strap width matters more than the material: under about an inch and a half, heavy wet soil cuts in and the pot tilts. Wider spreads the load, keeps the hang level, and gives you the weekend project without the knot dictionary.
26. IKEA Coffee Table Hack
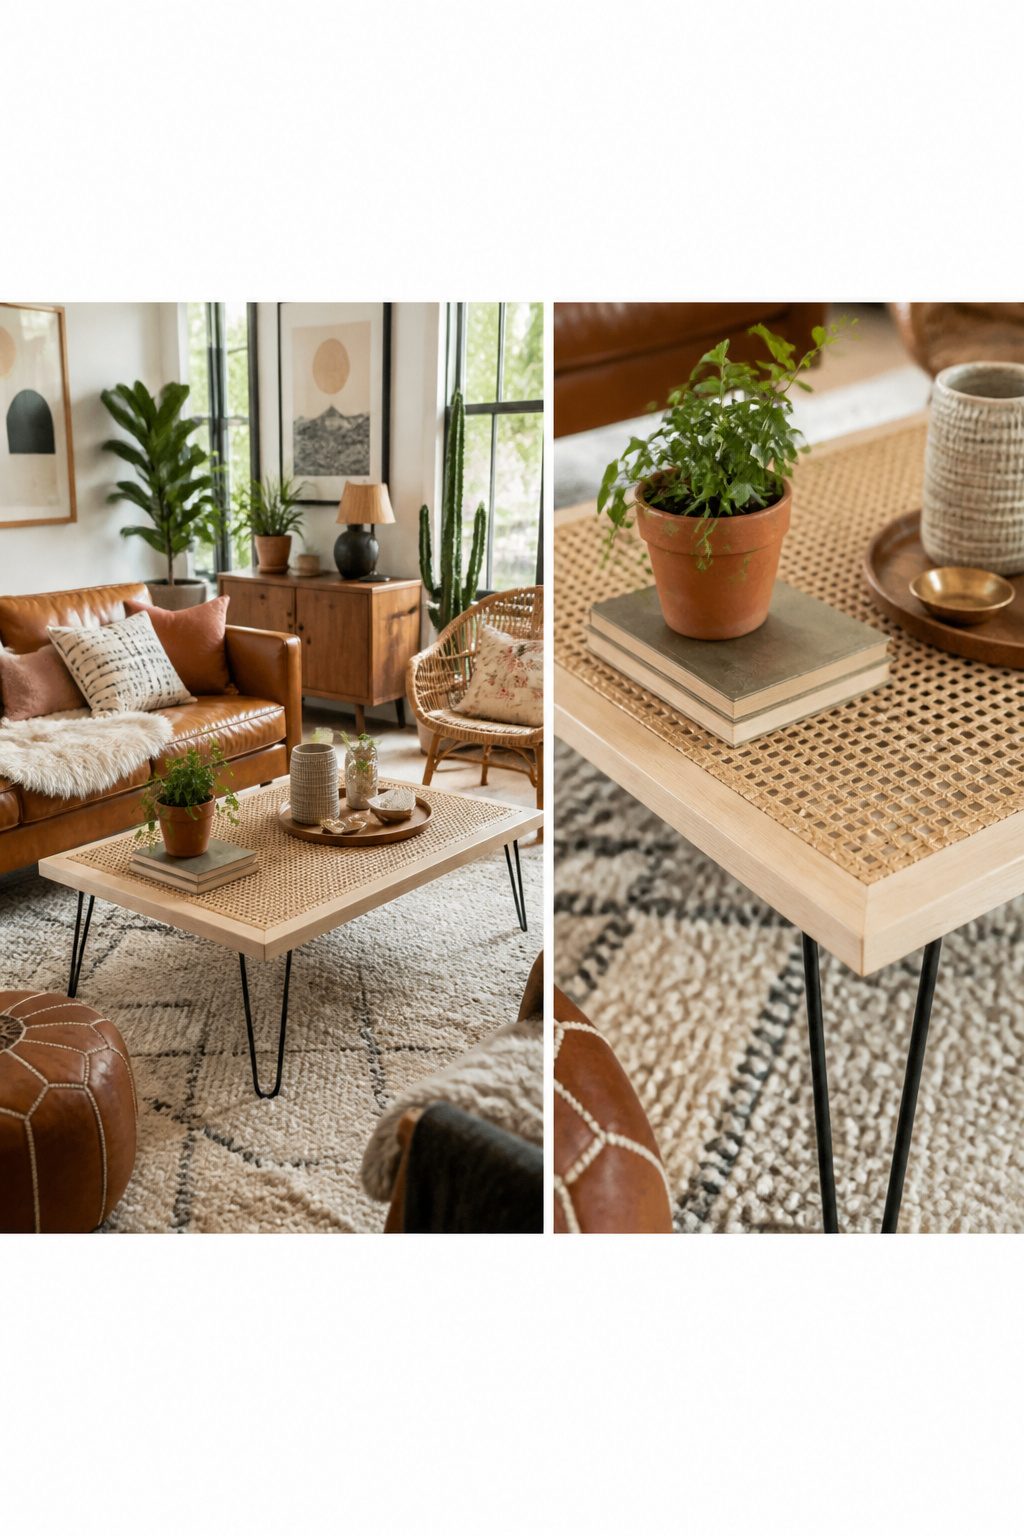
The LACK side table takes cane webbing better than most IKEA pieces because its frame is already open on two sides. Pry the top off with a putty knife, working from the inside corners where the plastic dowels sit; those dowels snap if you twist, so go straight up, not sideways, and have replacements ready. The cheaper LACK line uses particleboard with a veneer that drinks paint unevenly, so a shellac-based primer saves you a second coat. For legs, hairpin or tapered wood styles bolt through the existing mount holes if you buy the 8mm hardware pack most sellers offer as an add-on. I have seen cane panels glued to the underside of the tabletop instead of replacing the center, which keeps the structure intact and still reads bohemian from across the room. Paint first, cane second; the glue residue will resist any topcoat you try to lay over it.
27. Boho Rope Pillow
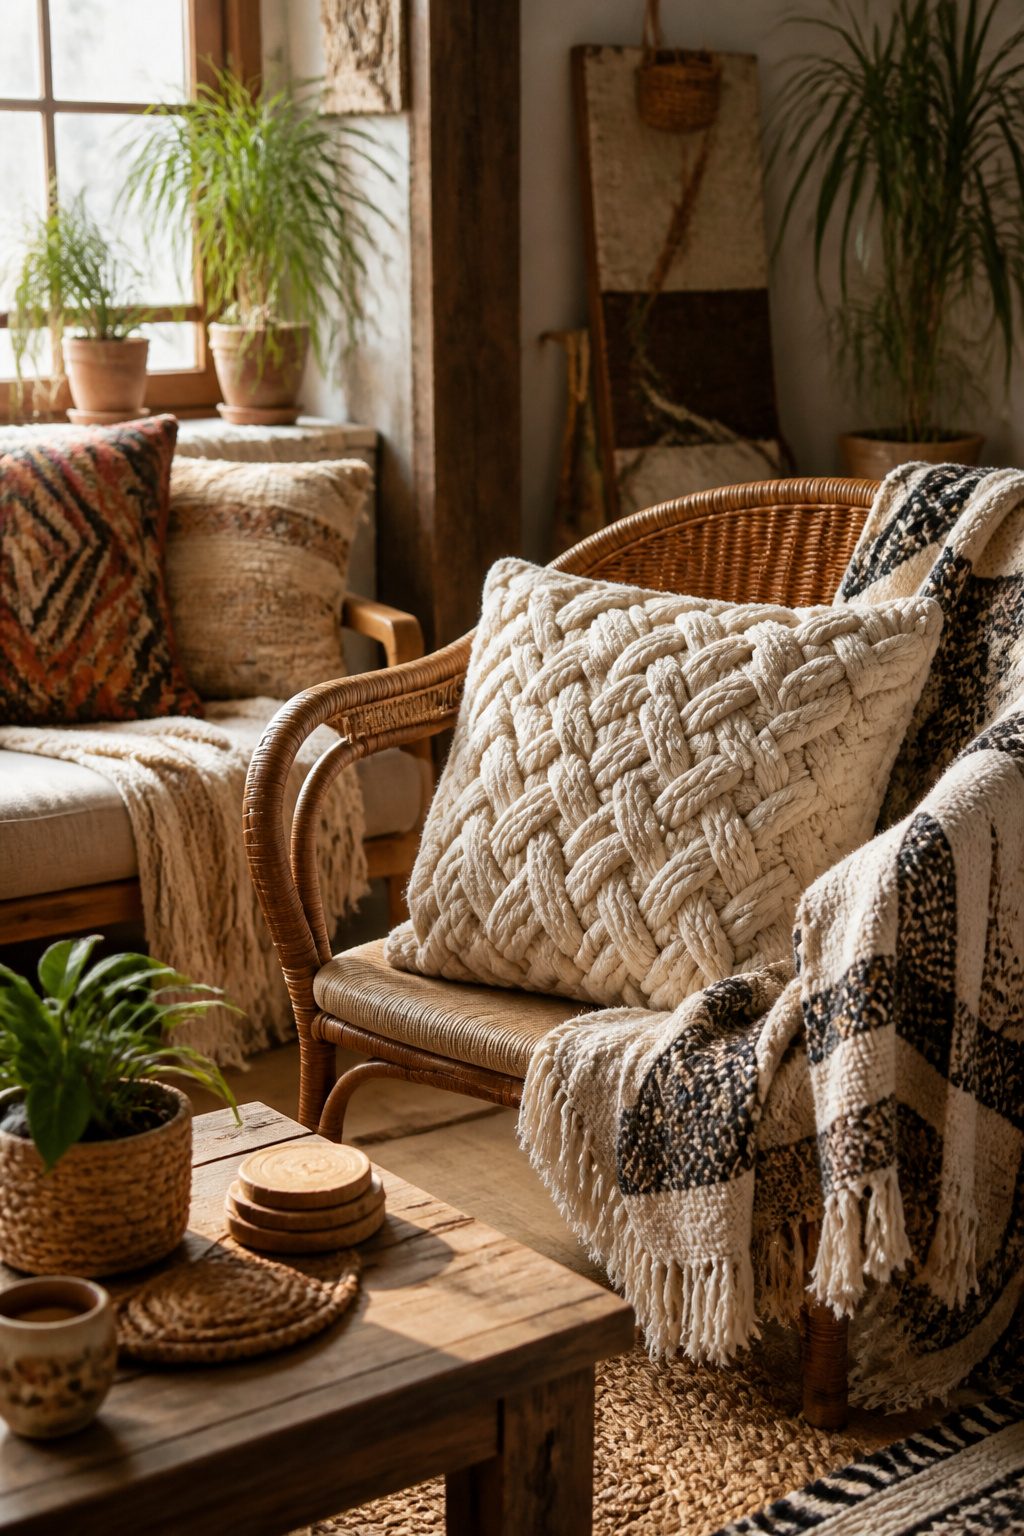
Cotton rope turns a plain pillow form into something that reads coastal-boho without the Anthropologie markup. I buy three-strand cotton clothesline, the soft kind sold by the foot at hardware stores, and wrap it in tight coils from one corner to the other, working in sections so the rope beds down flat against the form. A square or rectangular pillow works better than a round bolster; the flat faces give the rope something to grip, and the edges stay crisp instead of sagging.
For the ends, tuck the last inch under the neighboring coil and anchor it with a few whipstitches in matching thread. Glue alone frays within a month of actual use on a couch. I learned that the hard way on my first attempt, which started shedding like a sweater by week three. A dab of fabric glue under the tucked end, then the stitches through the rope itself, not the pillow fabric, keeps everything reversible when you want to wash the cover.
Knotting works too, if you want texture: a simple spiral knot over the form builds faster than wrapping, though it eats more rope and the back side stays flat against the form so the pillow still sits right on the sofa. Either way, natural cotton darkens slightly with handling, which only helps the look.
28. Boho Shower Curtain
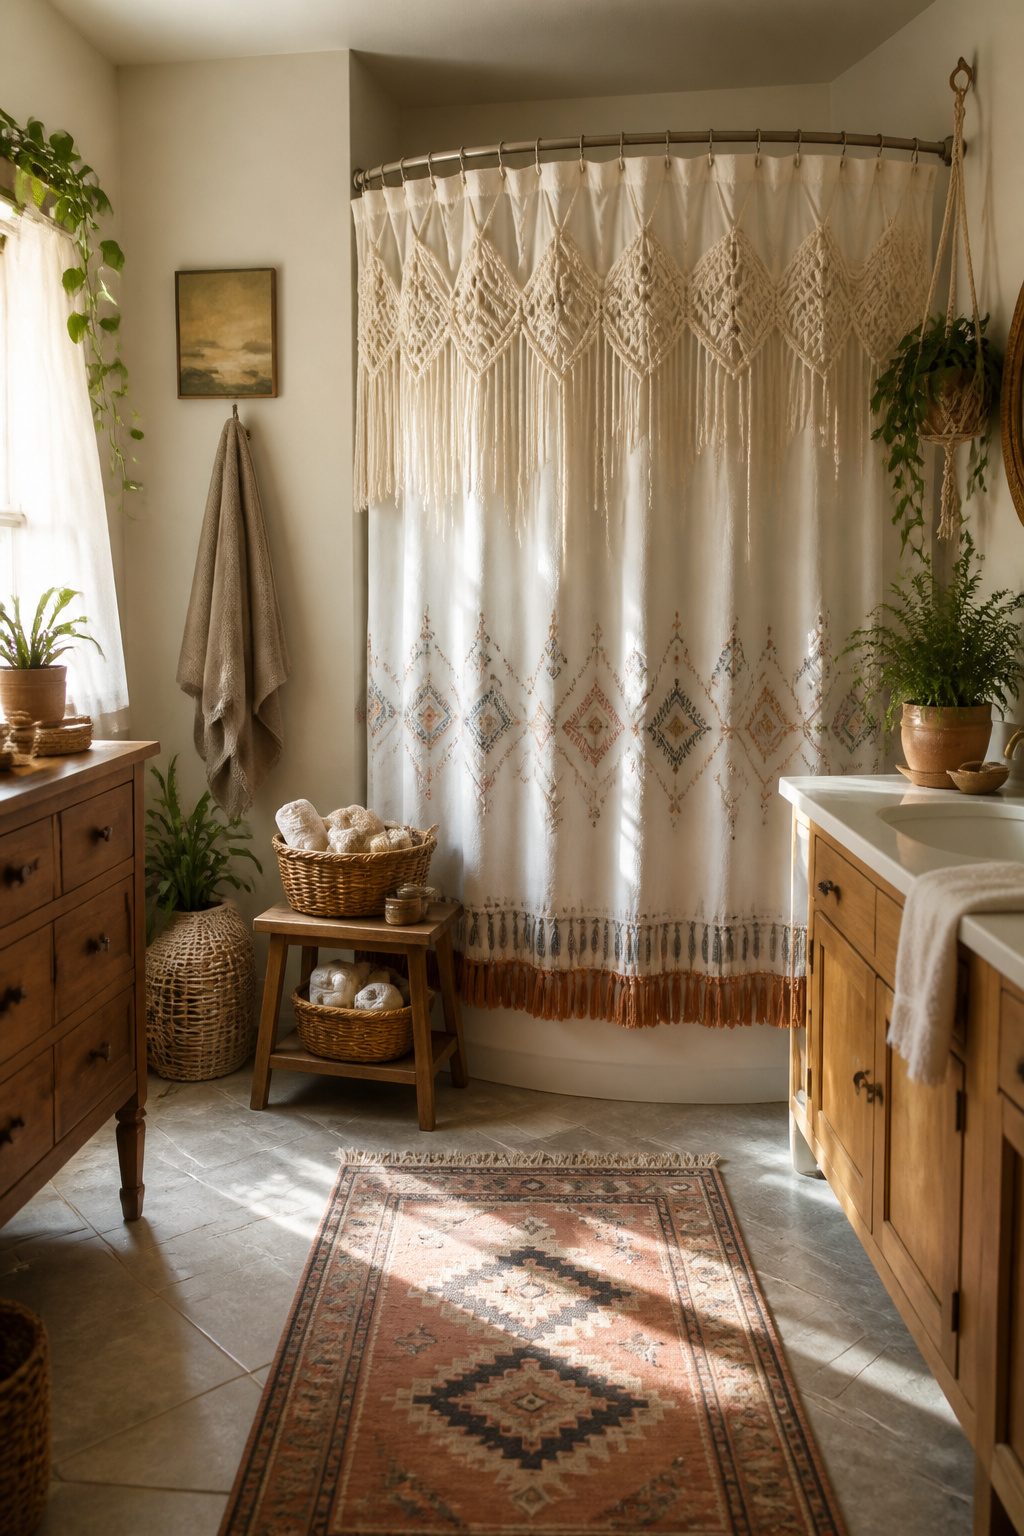
A plain white curtain is the cheapest starting point for a boho bathroom, but the fabric itself does not read as bohemian until you add movement. Fringe trim, cotton tassels, or macrame panels stitched or glued along the bottom edge turn that blank slate into something that looks store-bought from a specialty shop.
Hot glue works for cotton rope wrapped around shower rings, yet the curtain itself needs a different approach because water pools at the hem. Fabric glue labeled water-resistant holds up longer than standard craft adhesive, though sewing still wins for anything that will see daily steam and splashing. A basic running stitch through the top of a fringe band takes ten minutes and outlasts every glue I have watched soften over a summer.
Mildew is the real enemy on bathroom textiles. Cotton fringe and macrame trim are absorbent by nature, so they stay damp longer than the polyester curtain behind them. The fix is distance: attach trim to the outside face only, never the inner wet side, and leave a gap of an inch or two above the tub rim so the fabric is not sitting in pooled water. Machine-washable trim helps, but most decorative fringe is hand-wash or spot-clean, which means the curtain needs to come down every few weeks for a quick rinse and full air-dry before rehanging.
29. Planters from the Recycle Bin
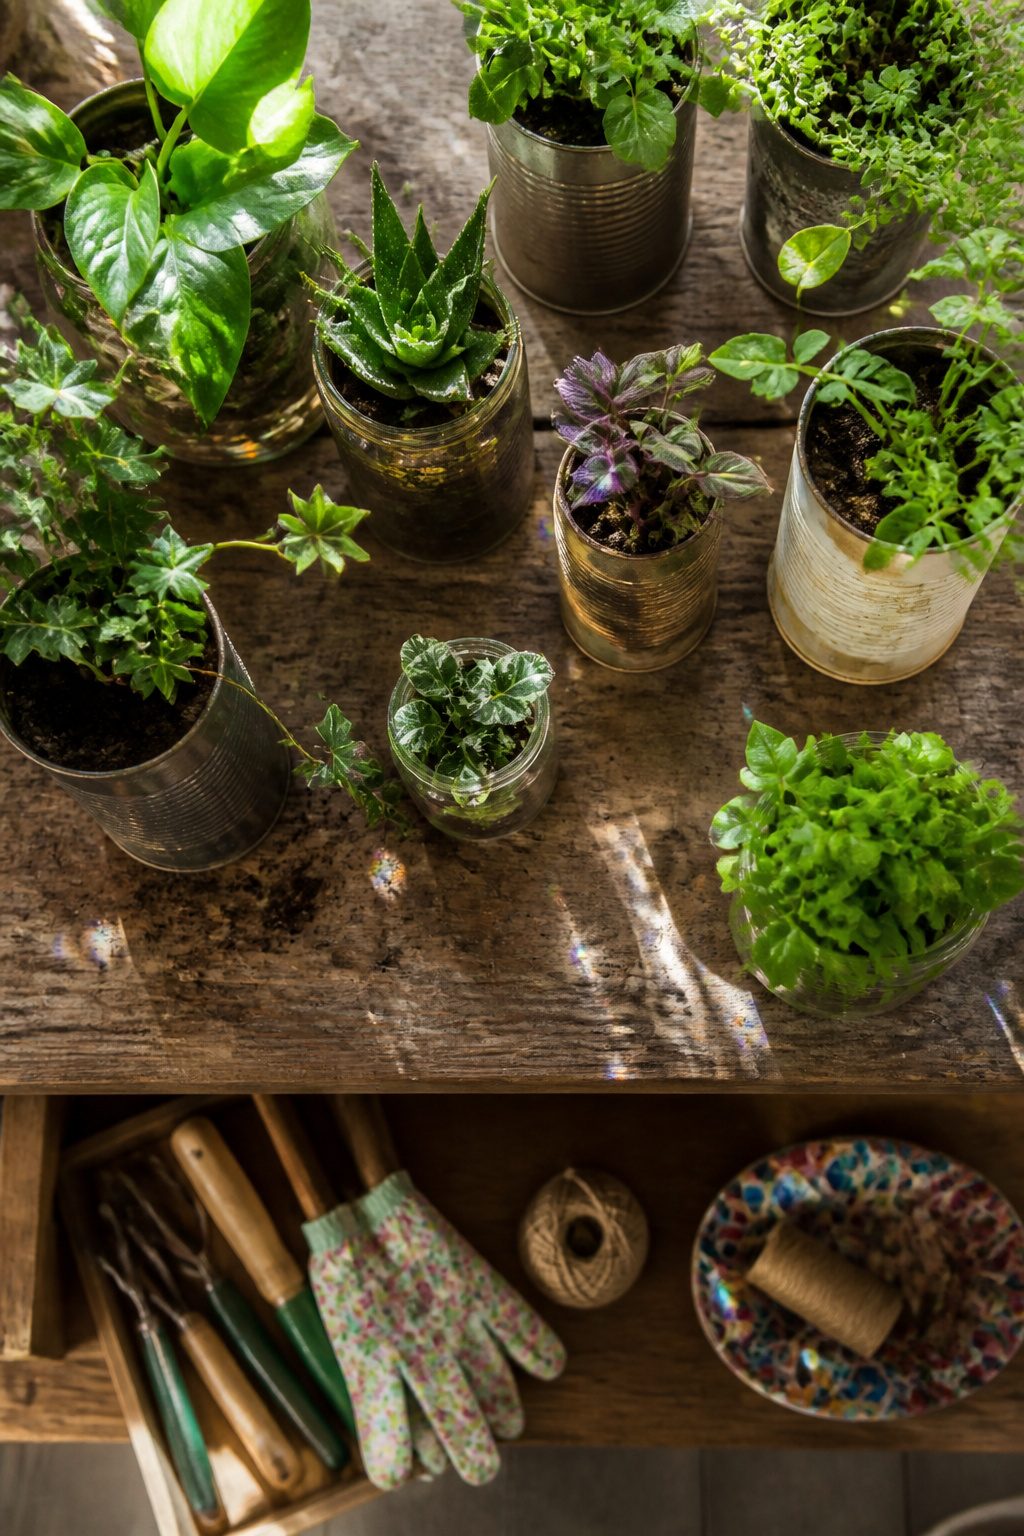
The best planters for a bohemian look are the ones that do not look new. A clean tin can or plastic coffee tub straight from the kitchen reads as recycling, not decor, until you break the surface somehow.
For metal, vinegar and salt will age tin in about an hour. The rust that forms is real oxidation, not paint, so it keeps changing under the plant’s moisture. Glass jars take paint better if you rough the outside with fine sandpaper first; a matte, chalky finish hides the utility shape and catches light the way glazed pottery does. Plastic needs the same sanding, plus a primer meant for slick surfaces, or the paint flakes off by the second watering.
Drainage is the part most people skip and regret. A single hole punched through the bottom with a nail and hammer is enough, but set the planter on a saucer or inside a slightly larger outer pot. Without that, the root ball rots or the windowsill stains. I have lost a rosemary plant to soggy soil in a beautiful undrained jar, and the jar was not beautiful enough to make up for it.
Shibori-dyed fabric sleeves, wrapped around plain nursery pots, give another layer without asking the vessel itself to do all the work. The indigo and irregular pattern read as collected rather than purchased, which is the whole point of the bohemian approach.
30. Wine and Copper Wind Chime
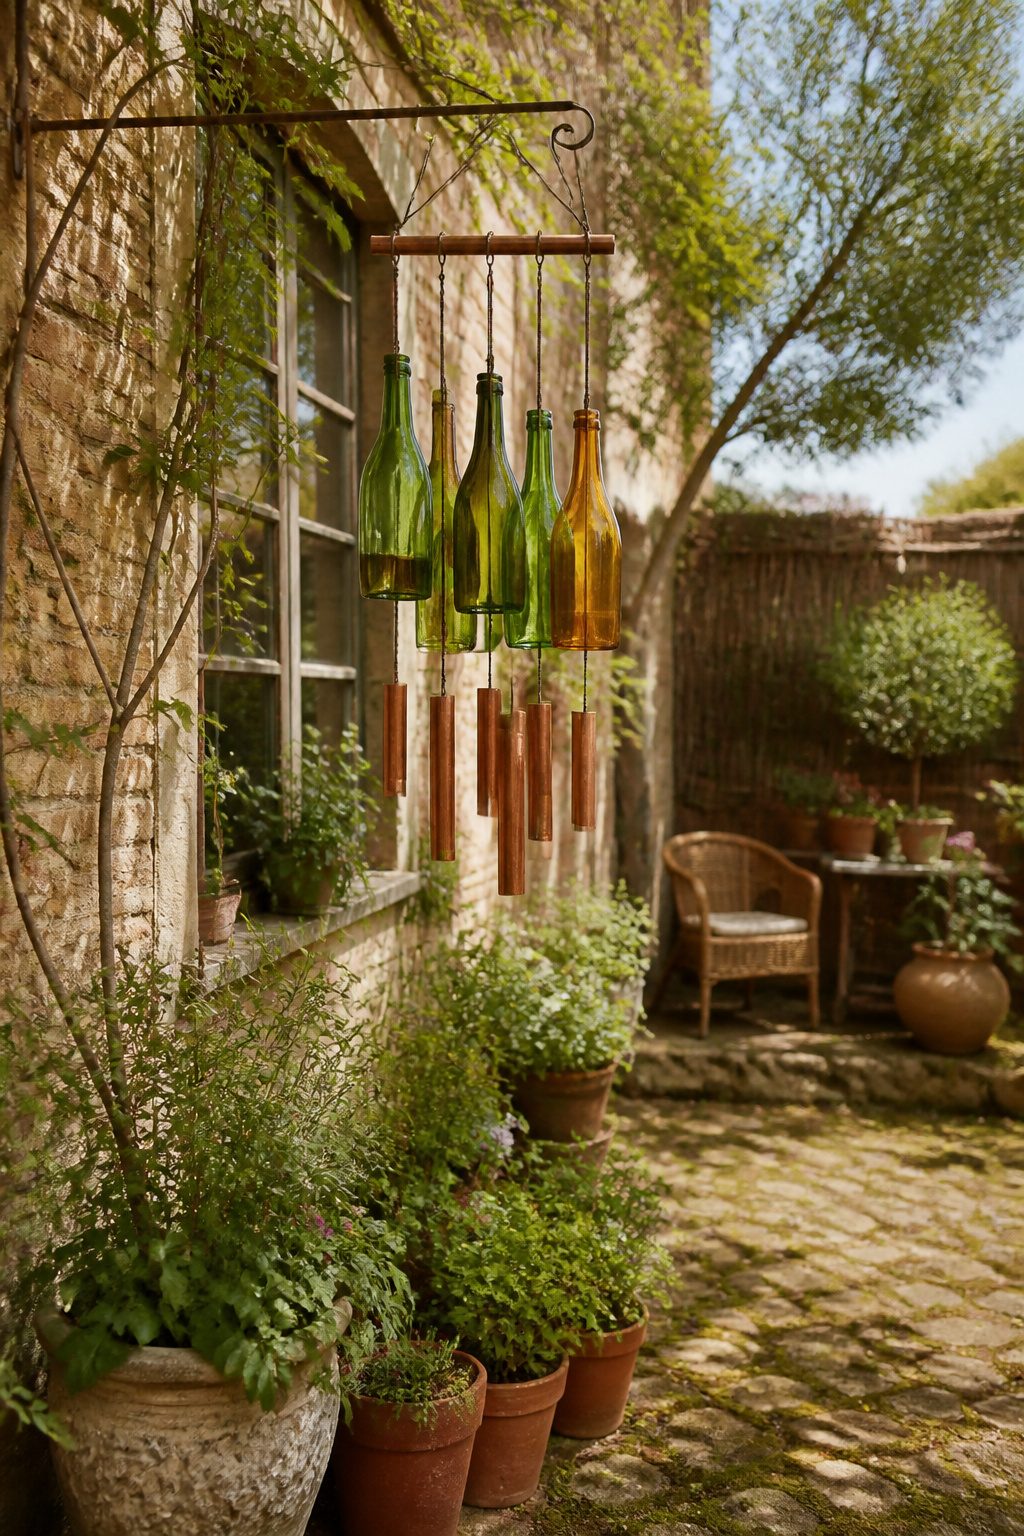
Wine bottles cut at the shoulder make surprisingly resonant chime elements, the green or amber glass catching light like stained glass while the thickness gives each piece a low, hollow tone. I learned the hard way that a standard glass scorer and hot-cold shock works better than the tile saw I borrowed; the saw chattered and left micro-fractures that split two bottles in the first breeze. Cut four to six bottles at graduated heights so they strike in sequence rather than clattering together, and sand the cut edges with wet-dry paper until they feel smooth under a fingertip.
Copper pipe from the hardware store cuts cleanly with a tubing cutter and rings against glass with a bright, metallic answer. The necks of intact bottles, hung upside down, make natural strikers; their weight and curve catch the wind better than flat discs. For tuning, shorter copper gives higher notes, longer pipe goes lower, and the glass pitch rises as you cut closer to the base where walls thin. I space mine so no element touches another at rest, each suspended on fishing line through a drilled cork stopper so the whole piece turns freely. The line should run through a swivel hook at top, otherwise one good gust twists everything into a silent knot by afternoon.
Renter-Friendly Hanging and Mounting
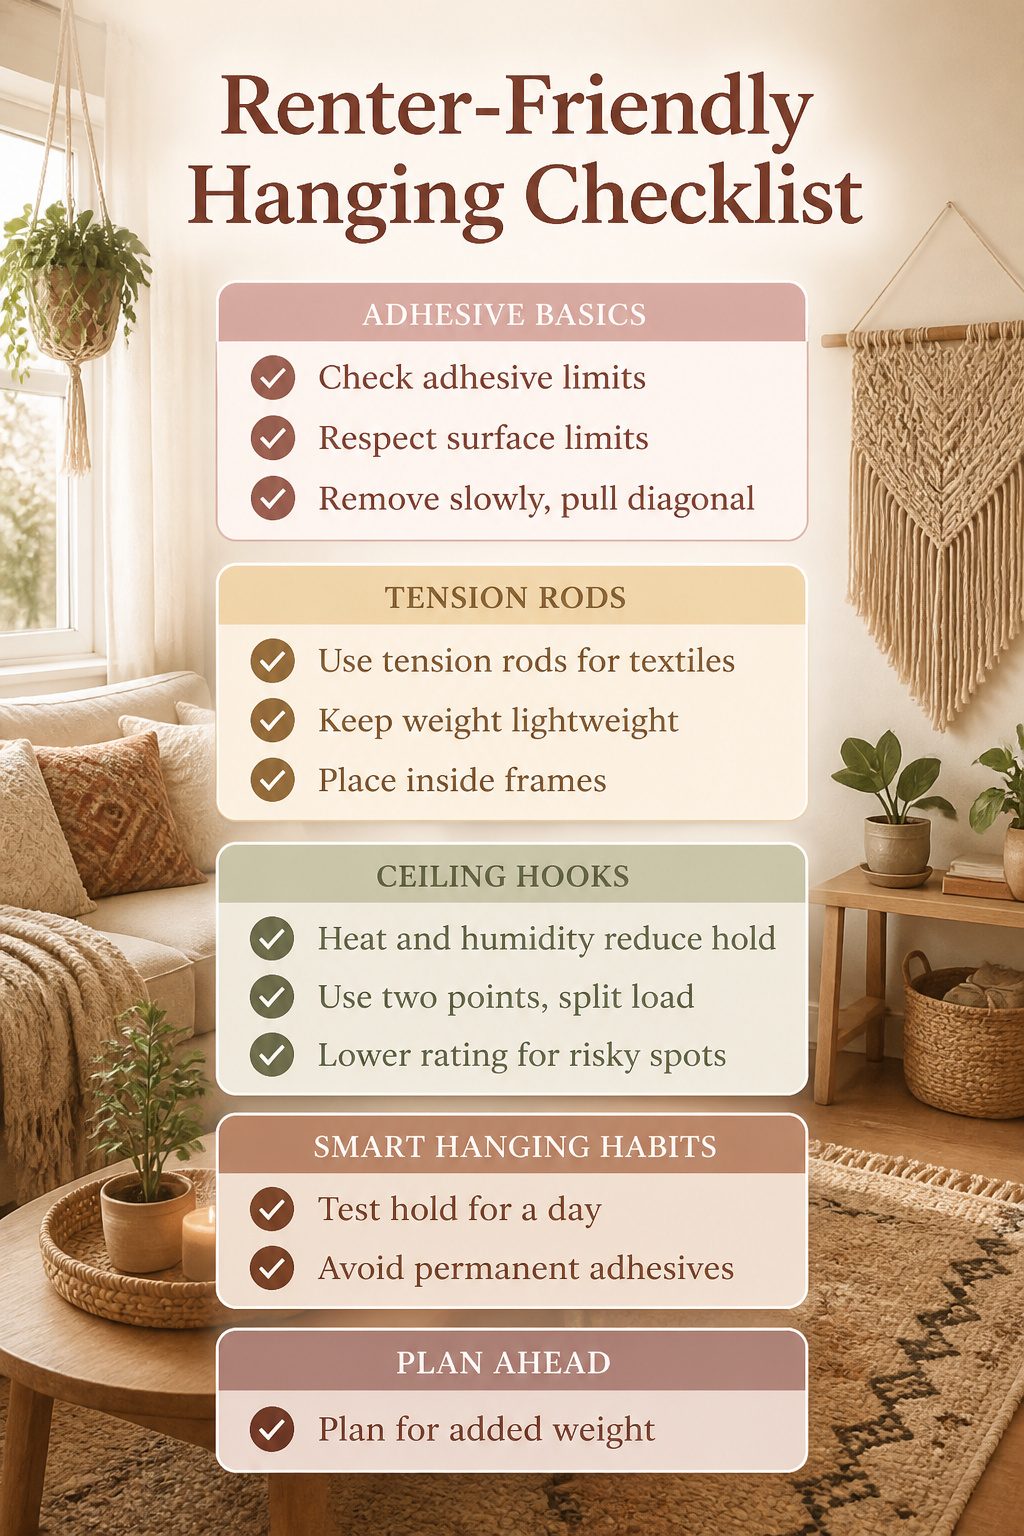
Command strips and adhesive hooks carry most of the weight in a rental, but only if you respect their limits. The small strips top out around four pounds, the large ones near sixteen, and that rating assumes a smooth, clean surface. Textured walls, fresh paint, or anything with a slight give will cut that number in half, sometimes more. I have peeled a strip off too fast and taken paint with it; the slow diagonal pull matters as much as the prep.
Tension rods work for lightweight textiles and hanging planters, though anything over a few pounds will bow the rod or slip the mount. The rubber ends grip best on drywall or tile; bare concrete or glossy trim tends to let them walk. For a macrame piece or a small woven wall hanging, a rod inside a window frame or doorway keeps the hardware invisible and the deposit safe.
Ceiling hooks with removable adhesive exist, but the weight limits drop sharply with heat and humidity. A feather lampshade or yarn art in a bathroom or over a stove needs a lower rating than the package suggests. I would rather hang two points and split the load than trust a single hook at its max.
The real mistake is treating any adhesive as permanent. These products work because they let you change your mind, which is the whole point of bohemian style anyway. Plan the piece, test the hold for a day, and accept that a few dollars in replacement strips is cheaper than spackle and a paint match.
Thrift Store Materials to Watch For
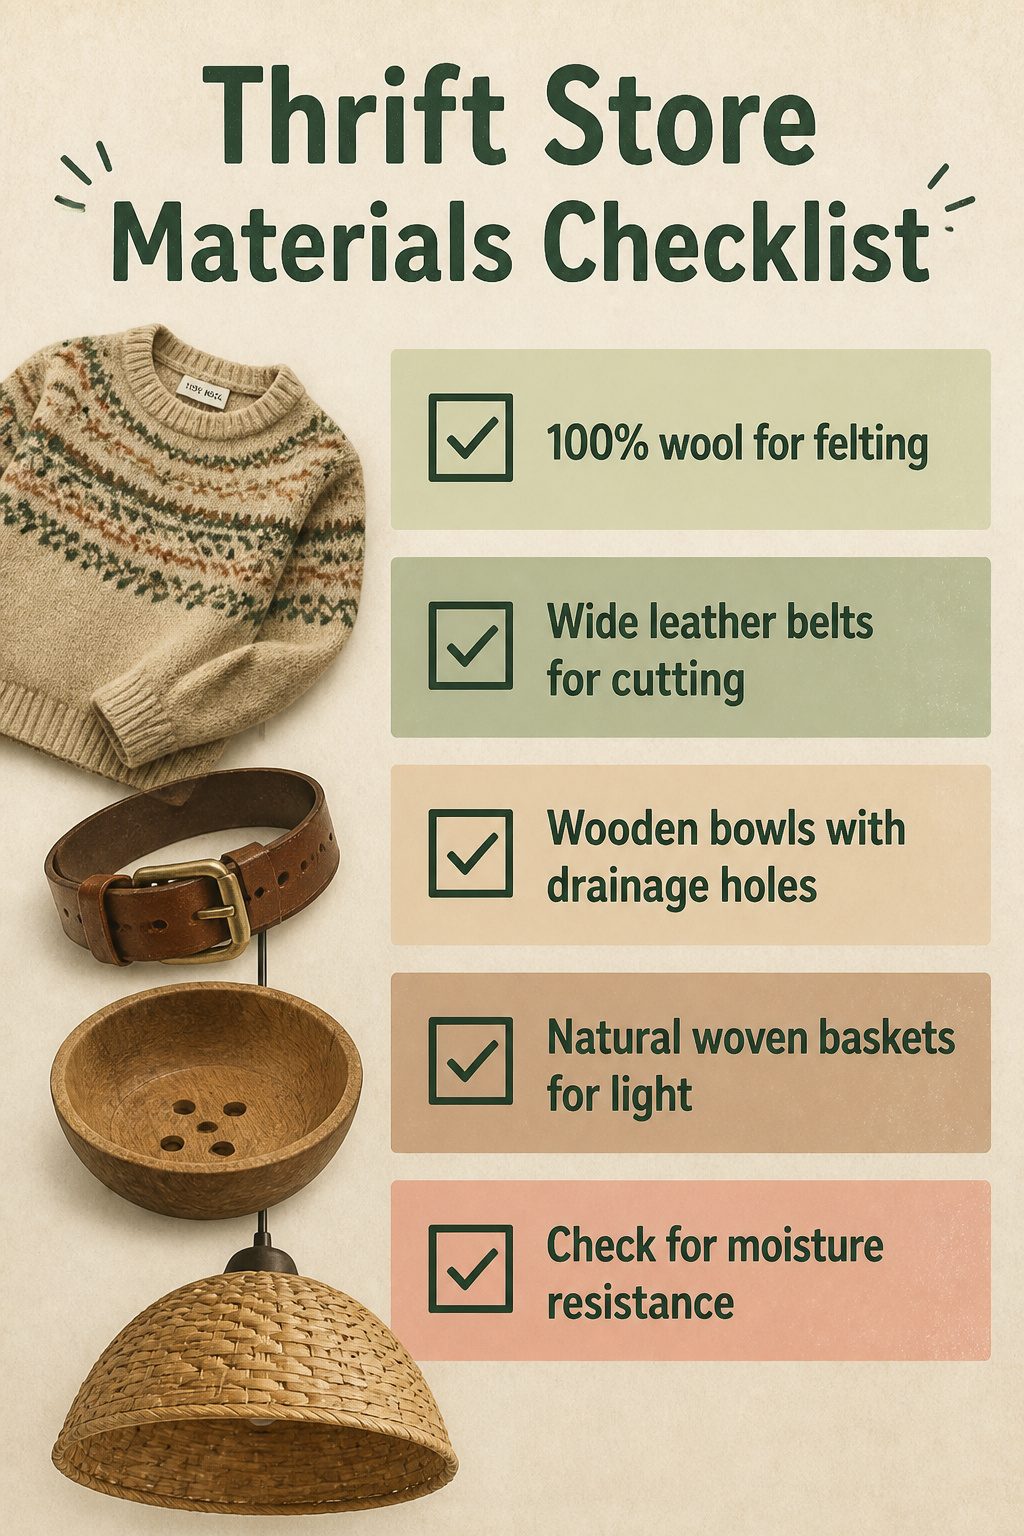
Wool sweaters with a tight weave felt better than loose knits when I tried making pillow covers last winter. The fibers lock together under hot water and agitation, and the finished fabric holds its shape without a backing. Look for 100% wool tags; blends with acrylic or polyester will not felt no matter how long you run the cycle.
- Leather belts cut cleanly with a sharp utility knife and a metal ruler for straight edges. A belt 1.5 inches wide or more gives you enough material for plant pot straps or drawer pulls without piecing scraps together. Avoid bonded leather, which crumbles at the cut edge.
- Wooden bowls with drainage holes already drilled are rare finds, so plan to bore your own. Hardwoods like teak or acacia hold up to moisture better than pine, which warps within a season of watering. A bowl 8–12 inches across works for a single pothos or a cluster of small succulents.
- Woven baskets with a wide, flat rim double as pendant shades. The rim sits against the ceiling canopy while the body hangs open below the bulb. Stick to natural fibers; synthetic weaves can soften or distort from bulb heat over time.
Layering Textures Without Clutter
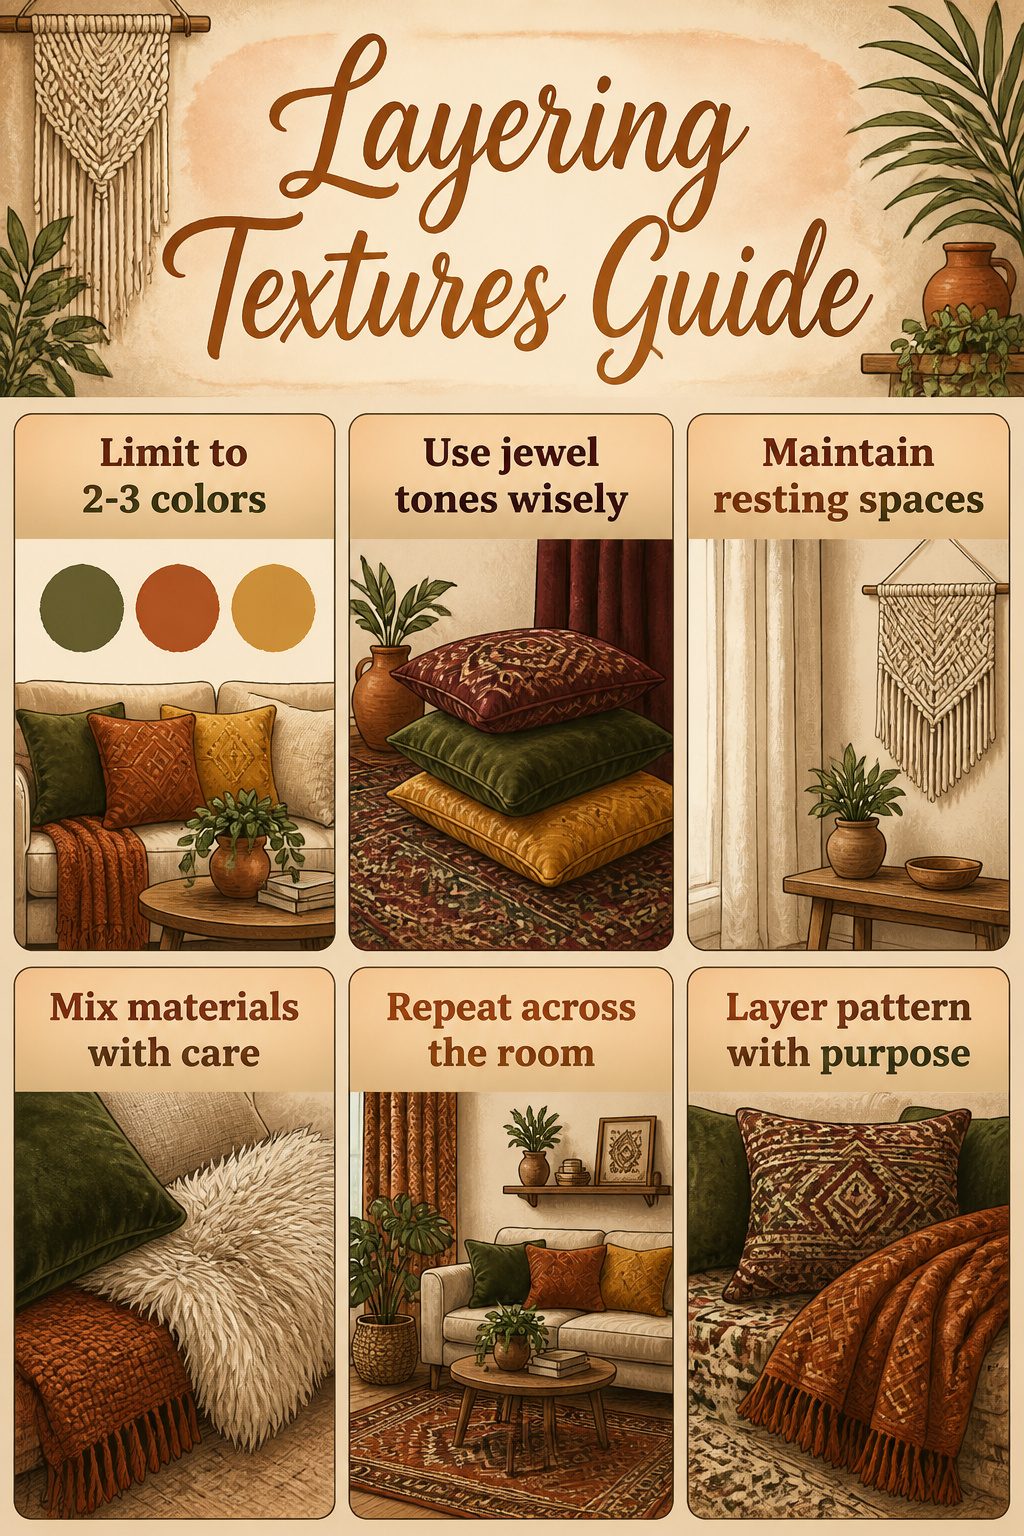
The first time I tried bohemian decorating, I ended up with what my sister called "thrift-store explosion." Every surface held something: velvet pillows, a woven wall piece, a stack of patterned blankets. The room felt busy, not cozy. What I missed was the two-to-three color limit that actually makes layered textures work.
Jewel tones run deep in this style, terracotta and mustard and olive and burgundy. But they need restraint. Pick two, maybe three, and let them repeat across your throws, your rug, your curtains. That repetition creates rhythm; without it, the eye has nowhere to rest.
Resting space matters as much as the objects themselves. A plain linen curtain between two patterned pieces gives the eye a break. A solid-colored wall behind a macrame hanging lets the texture speak instead of competing. I learned to leave at least one surface in every room deliberately simple: a bare wood tabletop, an unadorned corner.
Mixing velvet, linen, and faux fur still adds the depth bohemian rooms need, but the materials should share a color family or sit against a neutral ground. Layer similar patterns in varied colors for a traditional boho feel, or reverse it with different patterns in similar tones. Either approach works; switching between them in the same room does not.
Frequently Asked Questions
How do I incorporate boho decor into a small space?
Keep larger pieces like rugs and furniture in warm neutrals, then layer in texture through smaller items: macrame hangings, clay wall pieces, or a tassel chandelier that draws the eye upward. Floating shelves with air plants or dried flowers add vertical interest without eating floor space, and mirrors with rope or driftwood borders bounce light around to make the room feel bigger.
What are some easy DIY boho decor projects?
Start with ring yarn art using embroidery hoops and leftover fibers, or a clay wall hanging that needs only air-dry clay and a fork for texture. A rag rug from old t-shirts takes braiding or basic crochet, and a tassel chandelier wraps up in an afternoon with a hoop and yarn. Each project in the list runs under a weekend and uses materials from craft stores or thrift bins.
What materials are best for boho decor?
Natural fibers and reclaimed items carry the look: cotton cord for macrame, felted wool from thrifted sweaters, jute and sisal rope for wraps and fixtures, and air-dry clay for lightweight wall pieces. Wood shows up in dowels and driftwood, while scrap leather and old denim give second life to materials that already have patina and variation.