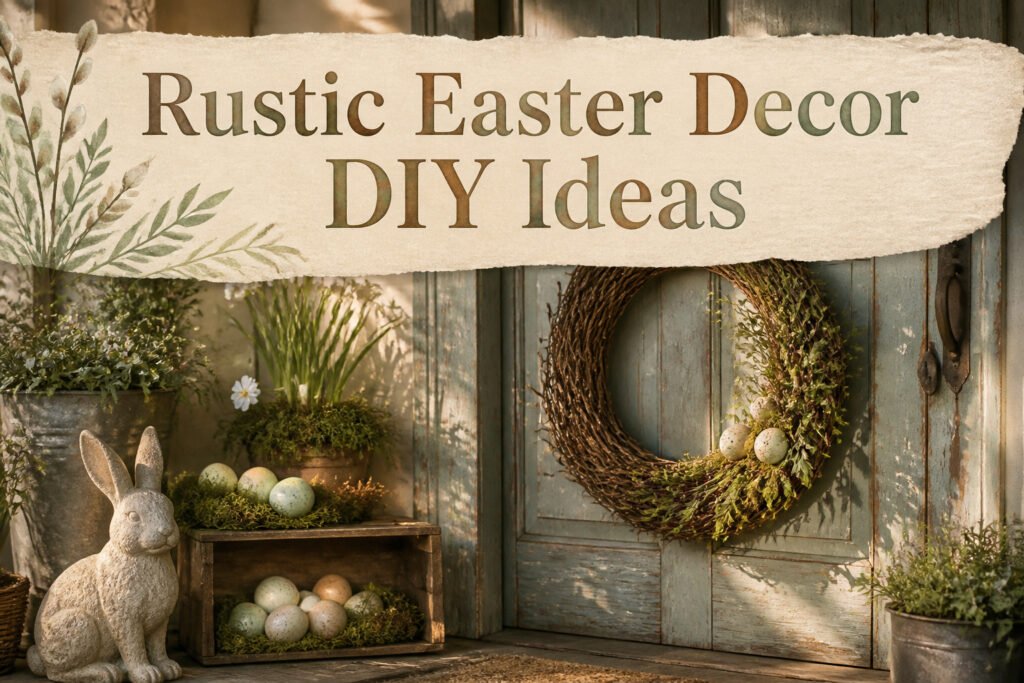
Rustic Easter decor DIY projects span from a twenty-minute grapevine wreath to a full Saturday building a stained wood bunny, and the deciding factor is how much imperfection you can stand to leave alone.
The moss-and-crate porch display works because you resist tucking every stem into place; the joint-compound stone bunny sells its illusion only if you stop smoothing before it looks manufactured.
One detail that separates the styles: grapevine wreaths cost six dollars at the dollar store, but buy the heavier base even when the lighter one is cheaper, or you will lose the shape to March wind by Palm Sunday.
1. Rustic Farmhouse Easter Floral Porch Decor
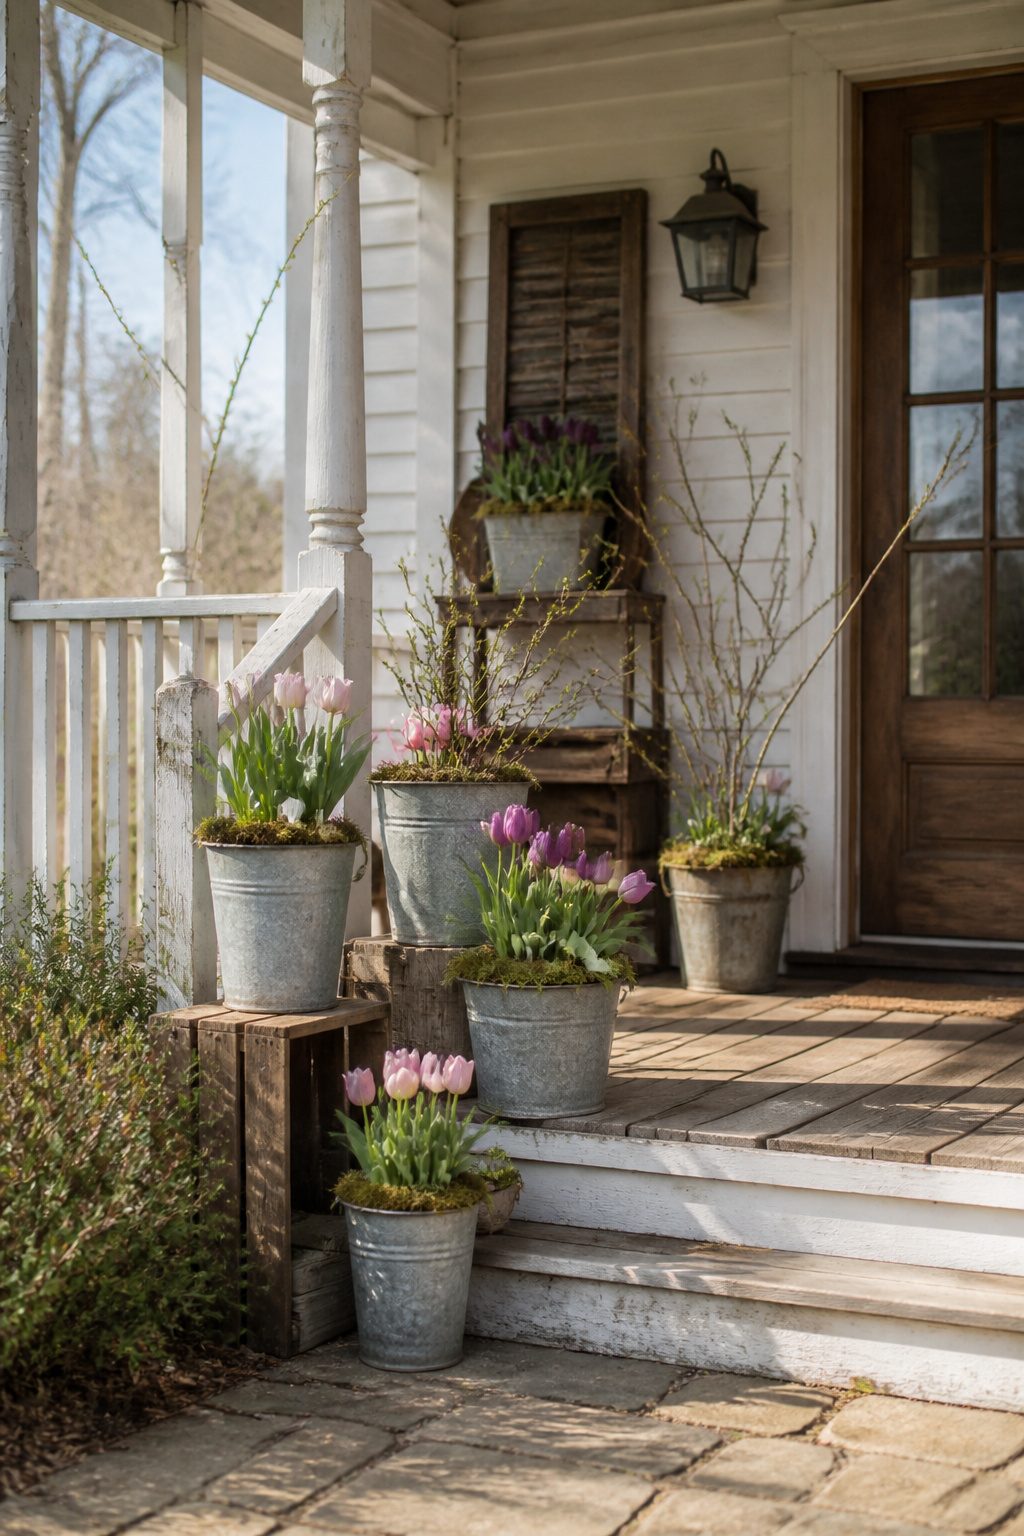
A porch display reads rustic when the materials look like they were gathered, not purchased as a set. Galvanized planters from the hardware store give that weathered farm look without waiting decades for patina.
Nestle grocery-store tulips inside, still in their plastic pots, and pack moss around the gaps so no bright nursery labels show.
The moss is what separates this from a standard spring planter; it breaks up the lines and makes the arrangement feel like something found in a barn rather than staged for a catalog.
Weathered wood crates layer in height and give you spots to tuck smaller details.
A few backyard twigs, maybe with buds just starting to break, stuck into the moss at odd angles keep the eye moving and prevent that symmetrical, store-display stiffness.
Faux florals work fine here if your porch gets unreliable light; the trick is choosing ones with some variation in color rather than that uniform Easter-egg pink that reads artificial from ten feet away.
The whole setup takes an afternoon and comes apart easily when the season shifts. Bulbs can move to a garden bed afterward, and the crates store flat.
What makes it worth doing is that slightly untamed look, the sense that the wind could have blown these pieces together, even though you placed each one deliberately.
2. DIY Glass Easter Egg Decorations
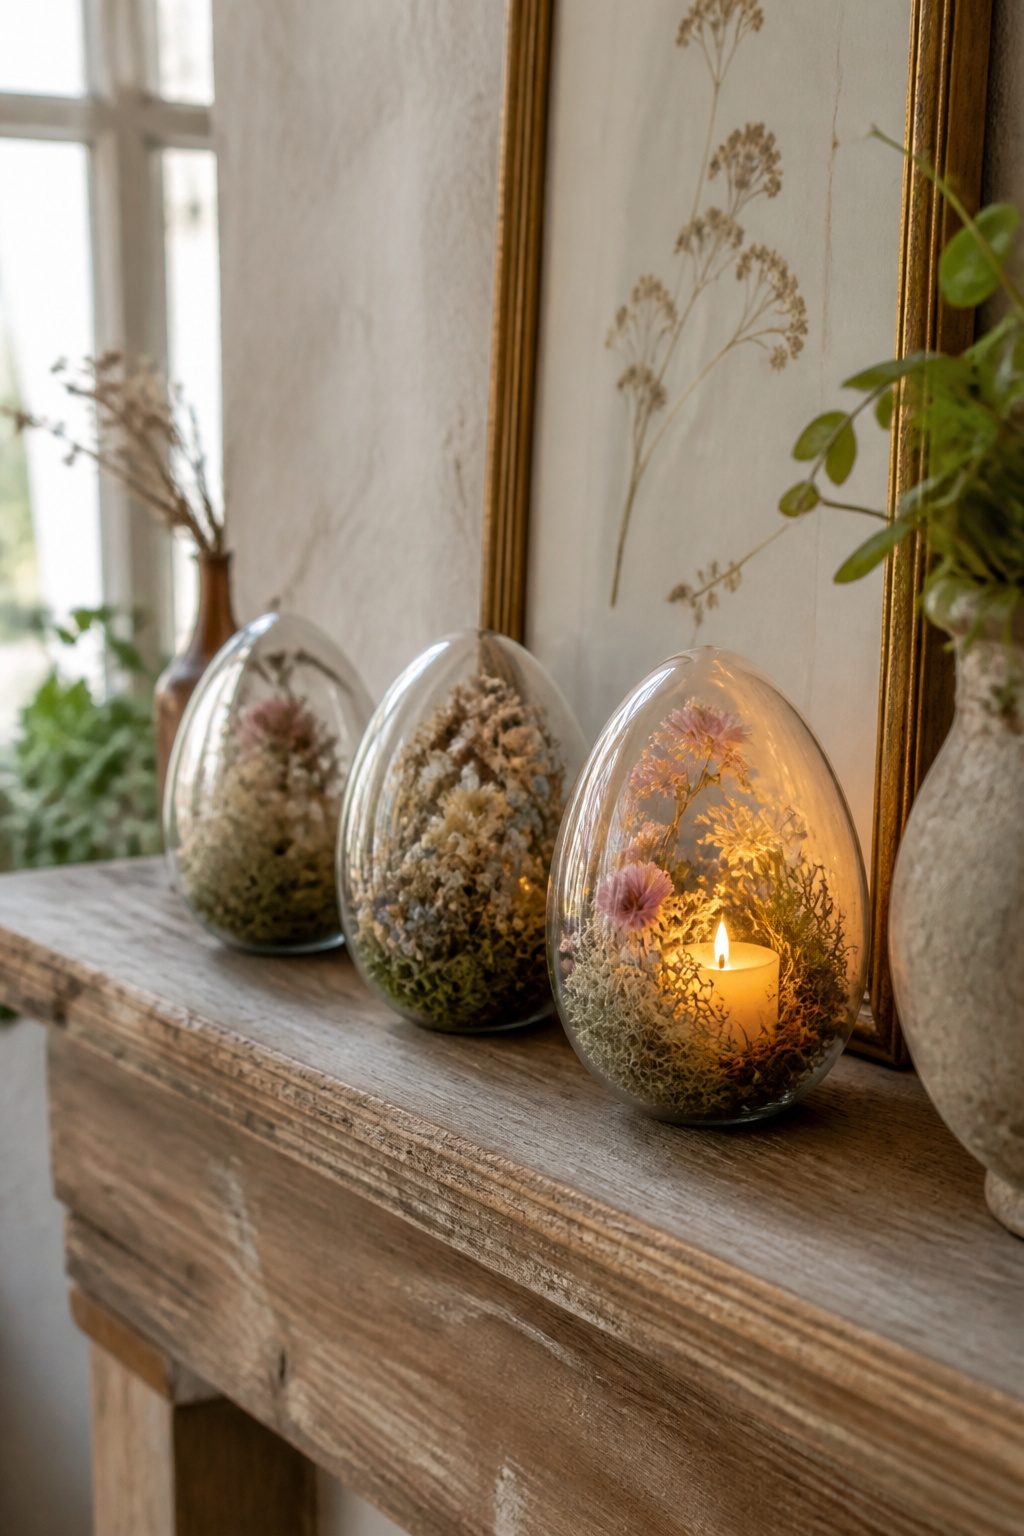
Glass eggs give a rustic display a delicacy that ceramic or wood cannot quite match, but that same delicacy changes where you can use them.
I learned this after placing a filled glass egg on a mantel where a draft from the front door knocked it onto tile two hours later.
Craft stores sell hollow glass eggs in spring assortments, usually in packs of six to twelve for under ten dollars.
The glass is thin, and the seam where the mold halves meet is often visible, so I turn that seam toward the back.
Filling them takes patience: tweezers help moss settle without tearing, and dried flowers need stems trimmed to two inches or they bunch at the curve.
A single battery tea light inside flickers through the glass and whatever filler you chose, though the heat, minimal as it is, can dry moss over a few weeks and turn it brown faster than an unfilled display.
Blowing out real eggs and sealing the hole with wax is the slower route, and the shell stays fragile in a different way.
It weighs almost nothing, which means a branch display needs ribbon tied at two points, not one, or the egg spins to show its hole.
The sources I found for egg trees use a twenty-inch ribbon length, wrapping around the egg and gluing at top and bottom before tying to flowering quince or pussy willow branches in a heavy vase.
That weight in the vase matters more than you think: bare branches with a dozen glass or shell eggs become top-heavy.
For rustic Easter decor, glass eggs belong where hands rarely reach: the center of a tablescape, inside a vine nest, behind the front pane of a cabinet.
The mantel, the entryway console, any spot with passing sleeves or curious children, calls for wood or ceramic instead.
3. No Sew Easter Hand Towel Wall Hanging
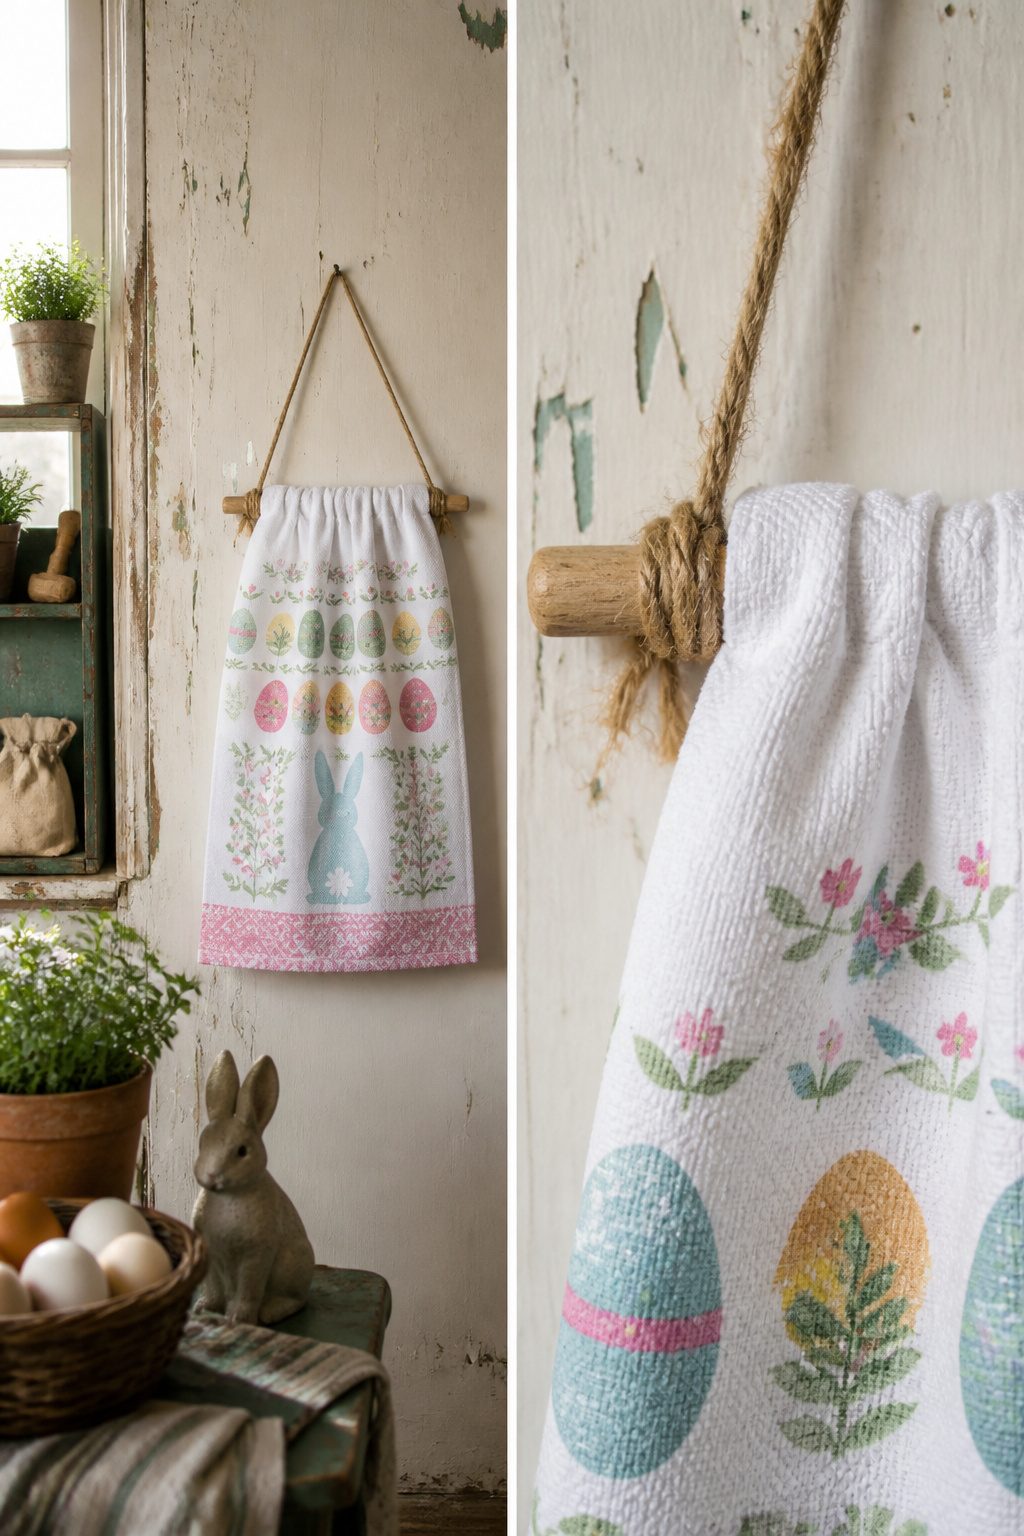
A seasonal hand towel from the dollar store already carries the print and color you want, so the job is just getting it onto the wall without a frame that costs three times as much.
I fold the top edge down about two inches, wrong sides together, and run a thin line of fabric glue along the inside edge to form a channel wide enough for a dowel or a straight stick from the yard.
Too much glue bleeds through and stiffens the fabric, so I keep the bead narrow and press it flat with a ruler while it sets.
Once dry, the dowel slides through, twine ties to each end, and the whole thing hangs from a single hook. Jute twine looks right with the rustic theme, but anything you have works.
The towel stays readable as Easter decor and comes down in ten seconds when the season ends.
4. Easter Bunny Wall Decor
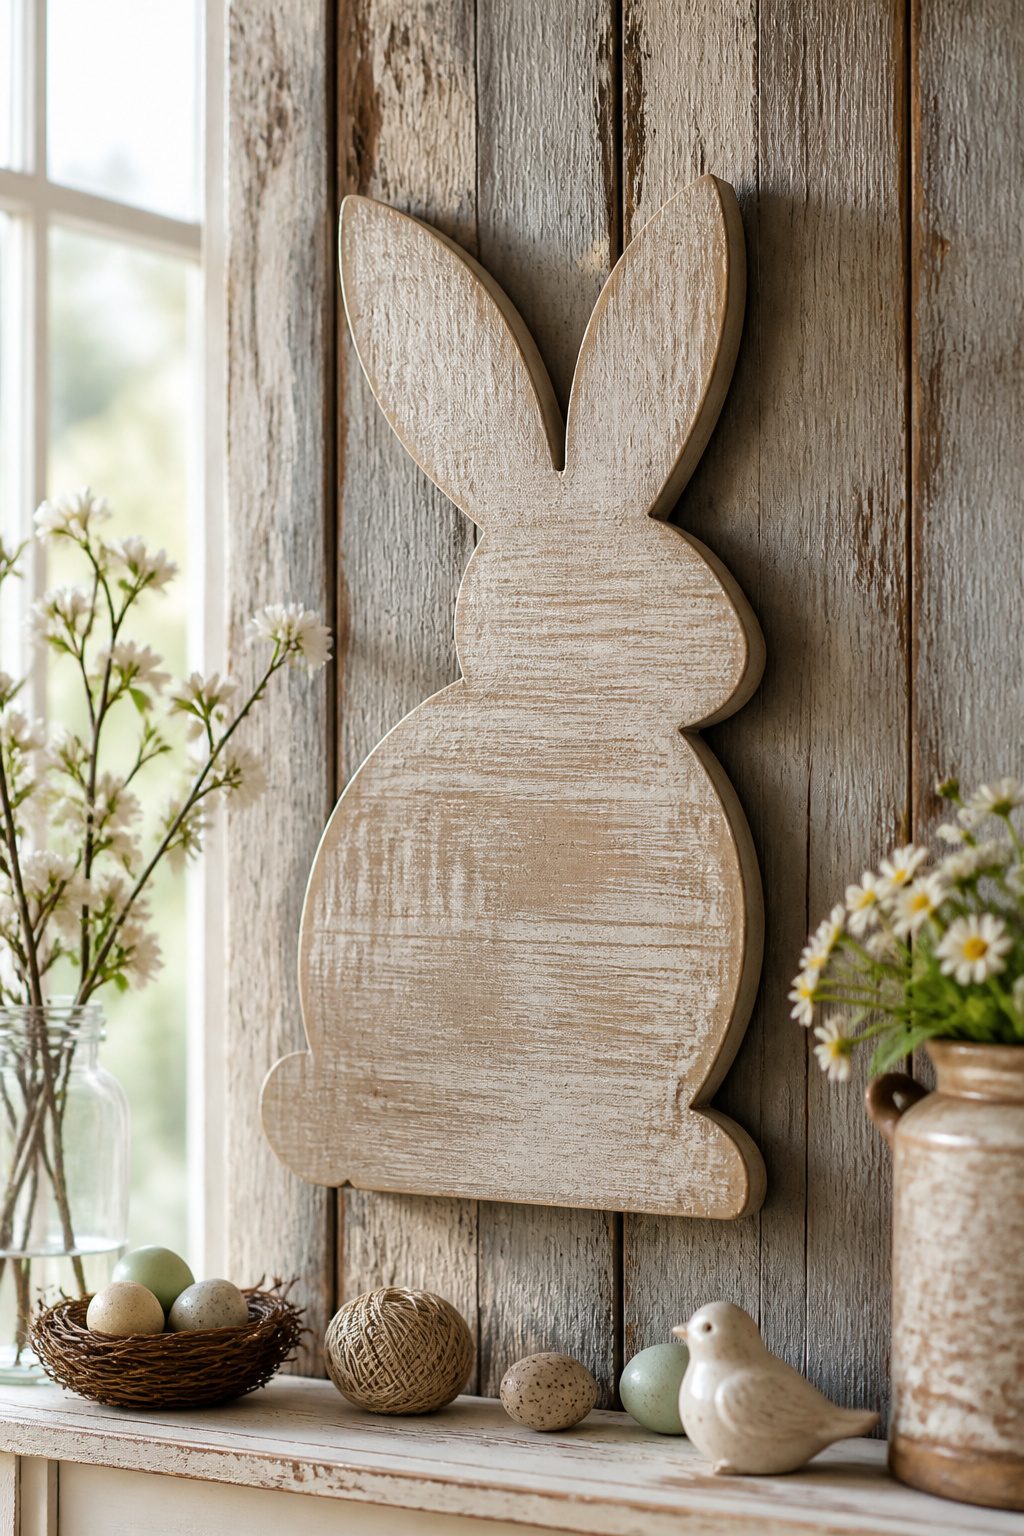
A bunny silhouette traced onto reclaimed barn wood gives Easter wall decor the kind of weight that cardboard never quite manages.
I start with a simple side-profile outline, about 14 inches tall, cut with a jigsaw if the wood is thin enough to behave.
Thicker stock fights the blade and splinters at the ears, so anything over half an inch gets a coping saw and patience instead.
The paint technique matters more than the color. Solid acrylic, even in a muted sage or cream, reads as craft-store finished.
Dry brushing the same color over a base coat of raw umber lets the grain show through and catches on the cut edges where real wear would accumulate.
I load the brush, wipe most off on a rag, then drag it across the surface in the direction the wood grew. Two passes, no more, or the effect goes from weathered to merely streaky.
Cardboard works for renters who cannot put holes in walls. Trace the same silhouette, cut with a sharp utility blade over a cutting mat, then distress the face with coarse sandpaper before painting.
The fuzzed surface catches light like old plaster.
Mount it with removable poster strips rated for the weight; a 12-inch cardboard bunny runs lighter than the adhesive can handle until you seal it, so skip the polyurethane and leave the surface open.
Metal roofing scraps, the kind with a light rust patina already started, cut clean with tin snips if you wear gloves and accept a few sharp points at the ear tips.
The silhouette reads as farmhouse immediately, no paint needed, though a single coat of flat white dry-brushed over the rust turns it coastal-rustic instead of industrial.
5. DIY Modern Bunny Decor Made From Popsicle Sticks
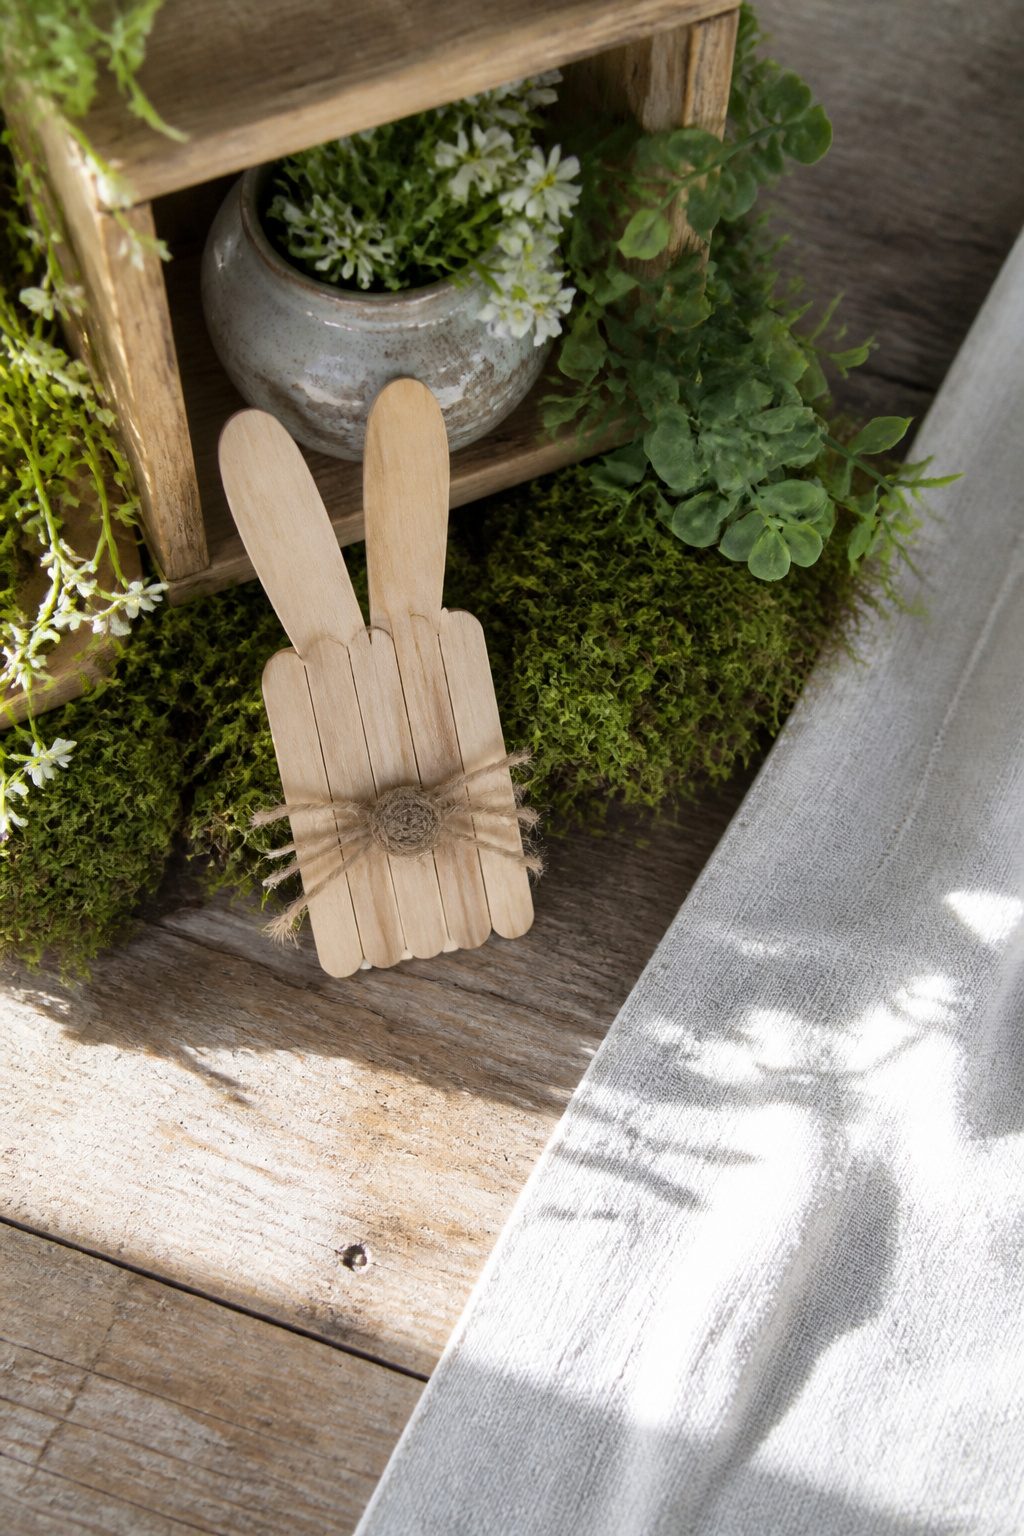
Craft stick bunnies start flat, which is why they work for garlands or single ornaments without much rethinking.
I lay out fourteen sticks for the body, two shorter ones for ears, and a single stick cut at an angle for the tail.
The trick that separates the ones that last from the ones that warp inside a week is letting the sticks breathe before you commit them to backing.
Glue the arrangement directly to cardboard or a hanger while the wood still holds moisture, and the whole shape curls like a potato chip as it dries.
A day on the counter, maybe two if the air is humid, costs nothing and saves the piece.
Paint or stain goes on after the frame is locked, not before. I learned that the hard way when the color seeped under the tape mask and the whiskers I had already glued turned stiff and plastic-looking.
Twine for whiskers, pulled apart into single fibers and knotted through a drilled hole, keeps the rustic texture consistent. The whole build runs under an hour of actual hands-on time, spread across two days of drying.
Scale it by wiring five or six bunnies at varying heights onto a length of jute, or keep one solo on a shelf where the uneven stain catches the light.
6. Naturally Dyed Easter Eggs
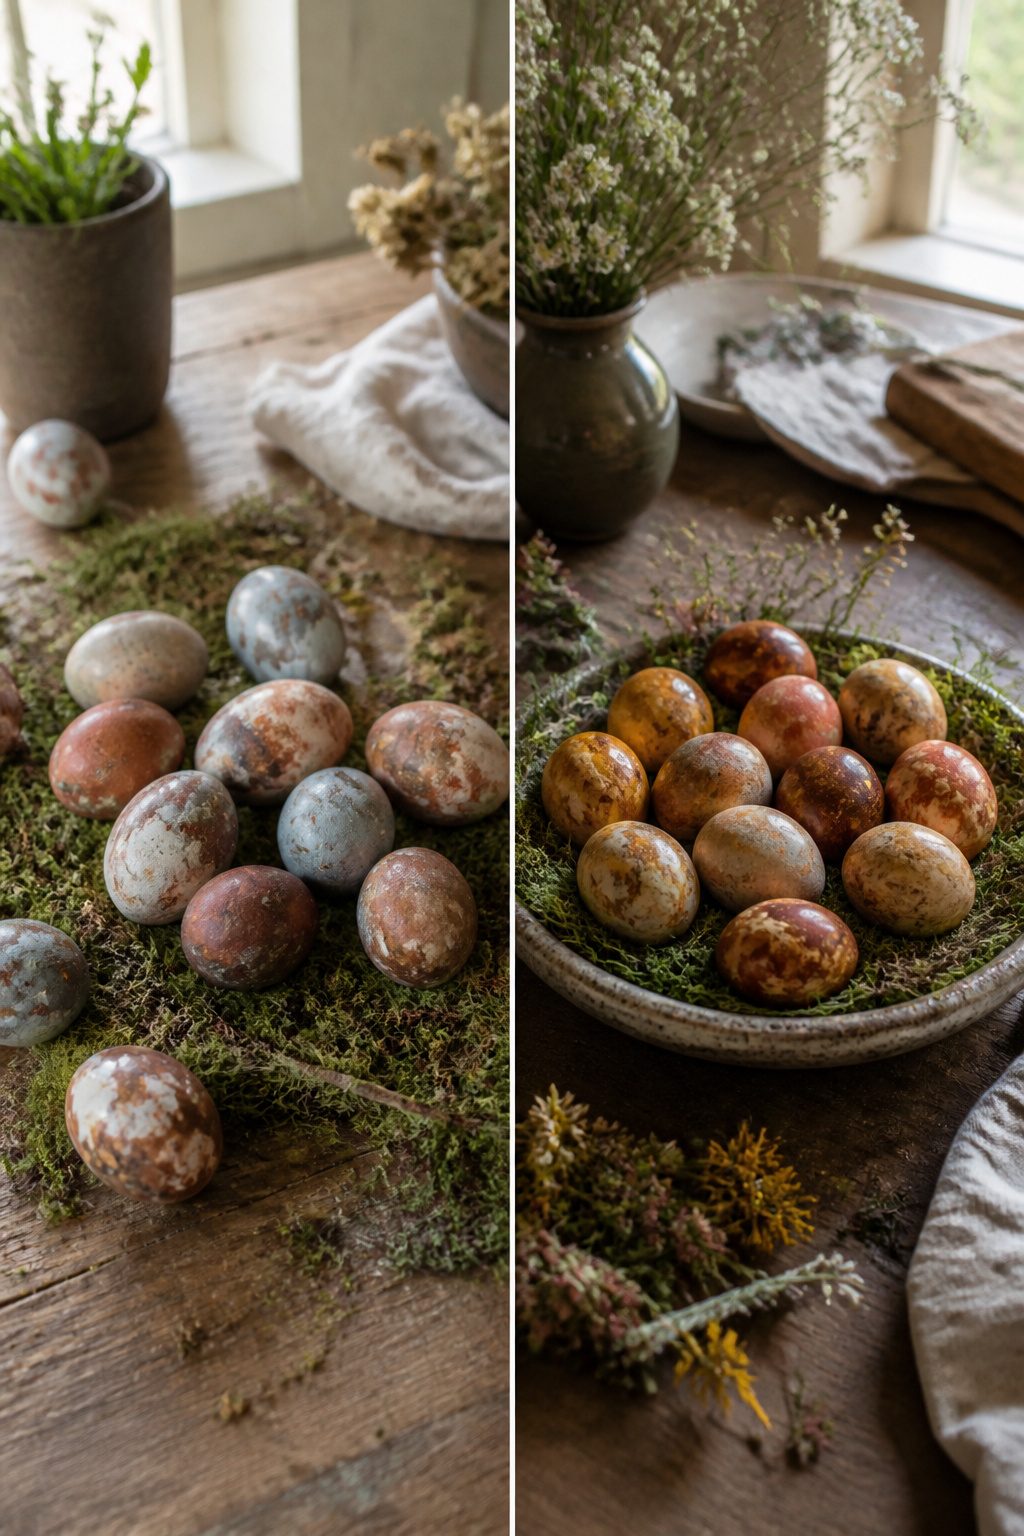
Onion skins give the deepest rust-red of any natural dye, but the color needs time. I wrap each raw egg in the dry papery skins, secure them with rubber bands, and boil them in plain water for about forty-five minutes.
The shells come out mottled and uneven, with streaks where the skin touched and paler patches where it didn’t. That imperfection is the whole point.
Commercial dyes aim for uniform color; these look like something pulled from a barn loft.
Turmeric works faster, twenty to thirty minutes for a warm mustard yellow, and beets need closer to an hour for anything beyond a faint blush.
Coffee grounds steeped overnight give a soft sepia that reads more farmhouse than Easter, which some years is exactly what I want.
These eggs are for display only unless every step stays food-safe. That means starting with clean, refrigerated eggs, keeping them below 40°F until the dye bath, and discarding any that crack.
Natural dyes are not inherently safer than artificial ones; bacteria grow just as happily on a turmeric-stained shell.
If the eggs will sit in a bowl on the table for three days, I treat them as decoration and buy a separate dozen for egg salad.
7. DIY Faux Stone Bunny Planter
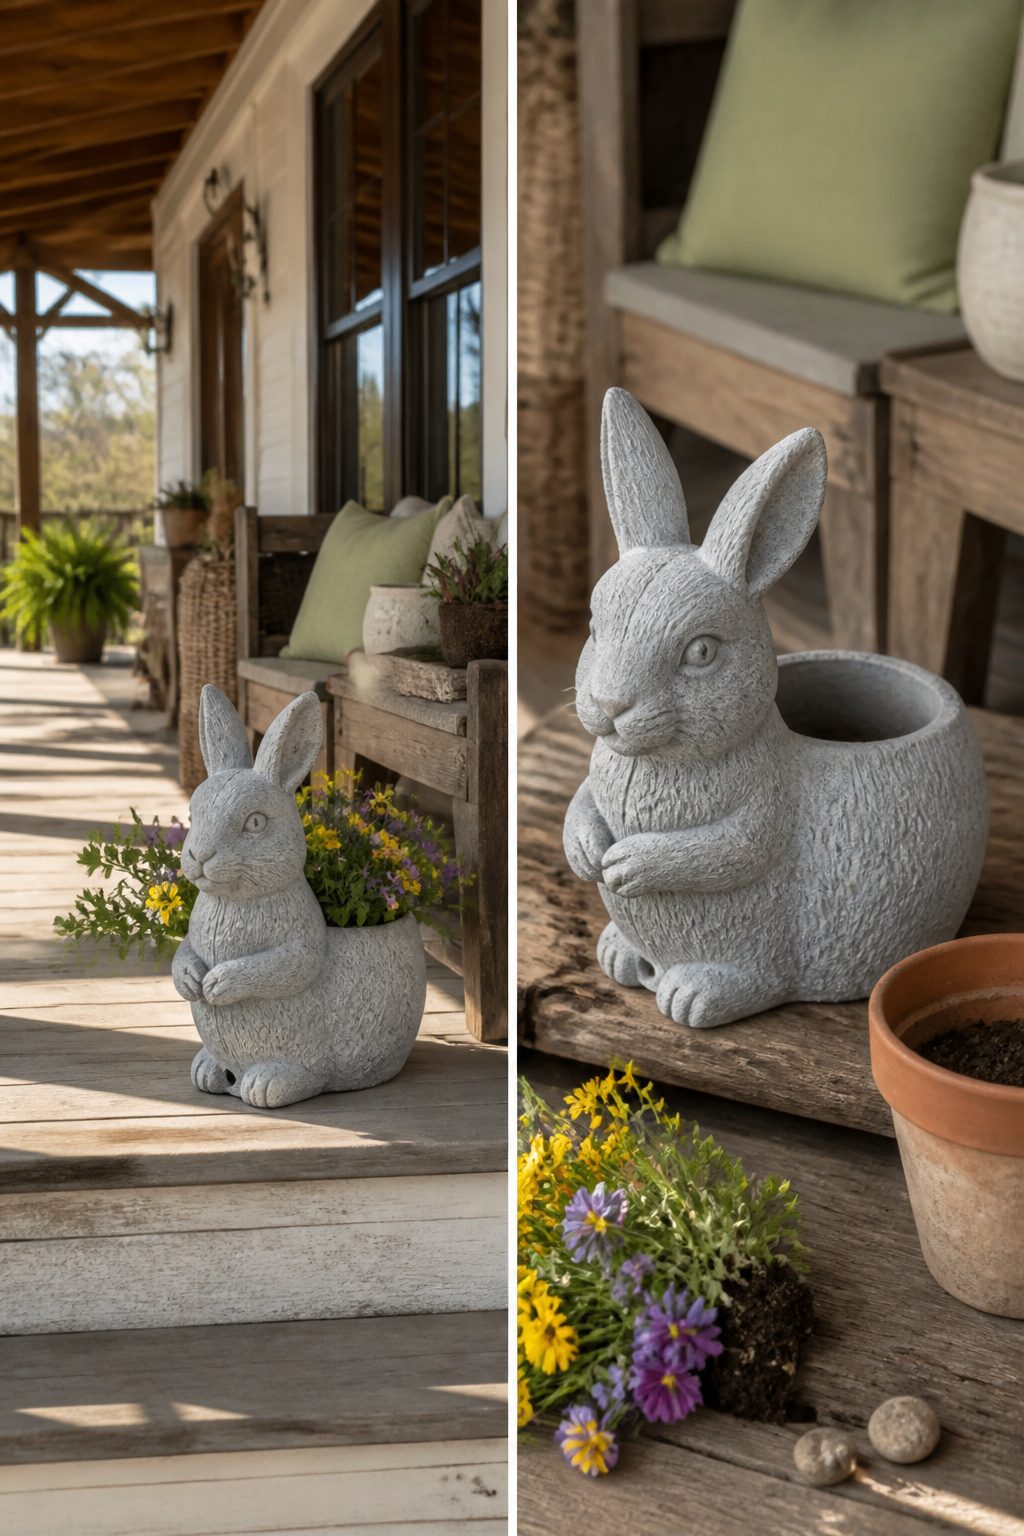
A plastic nursery planter from the hardware store makes the right starting shape for a stone bunny, but the weight of real stone on a porch rail or tabletop gets risky fast.
Joint compound over foam or thin plastic keeps the piece light enough to move without a second person, and the compound takes texture paint or a second skim coat to build up that rough, chalky surface you want.
Base coat first with a flat gray exterior paint, something that reads as limestone shadow rather than cartoon color.
Once that dries, trowel on a thin layer of lightweight joint compound and press a crumpled plastic bag into it while it is still wet; the creases leave random pitting that reads as weathered stone at three feet.
Let that cure fully, then dry-brush a lighter gray or cream across the high points with an almost-dry chip brush. The highlights catch the eye and sell the illusion.
Check your drainage before you start: the original hole in the planter bottom has to stay open, or spring rain collects and the whole thing turns to mush from the inside out.
I mark the hole with a piece of tape before the first coat of compound, then clear it with a dowel while the material is still soft.
A coat of exterior sealer on the finished piece keeps the compound from drinking up water and swelling, but skip the glossy finish; satin or dead flat looks like stone, not plastic trying to be stone.
8. DIY Cross Easter Wreath for Christ-Centered Decor
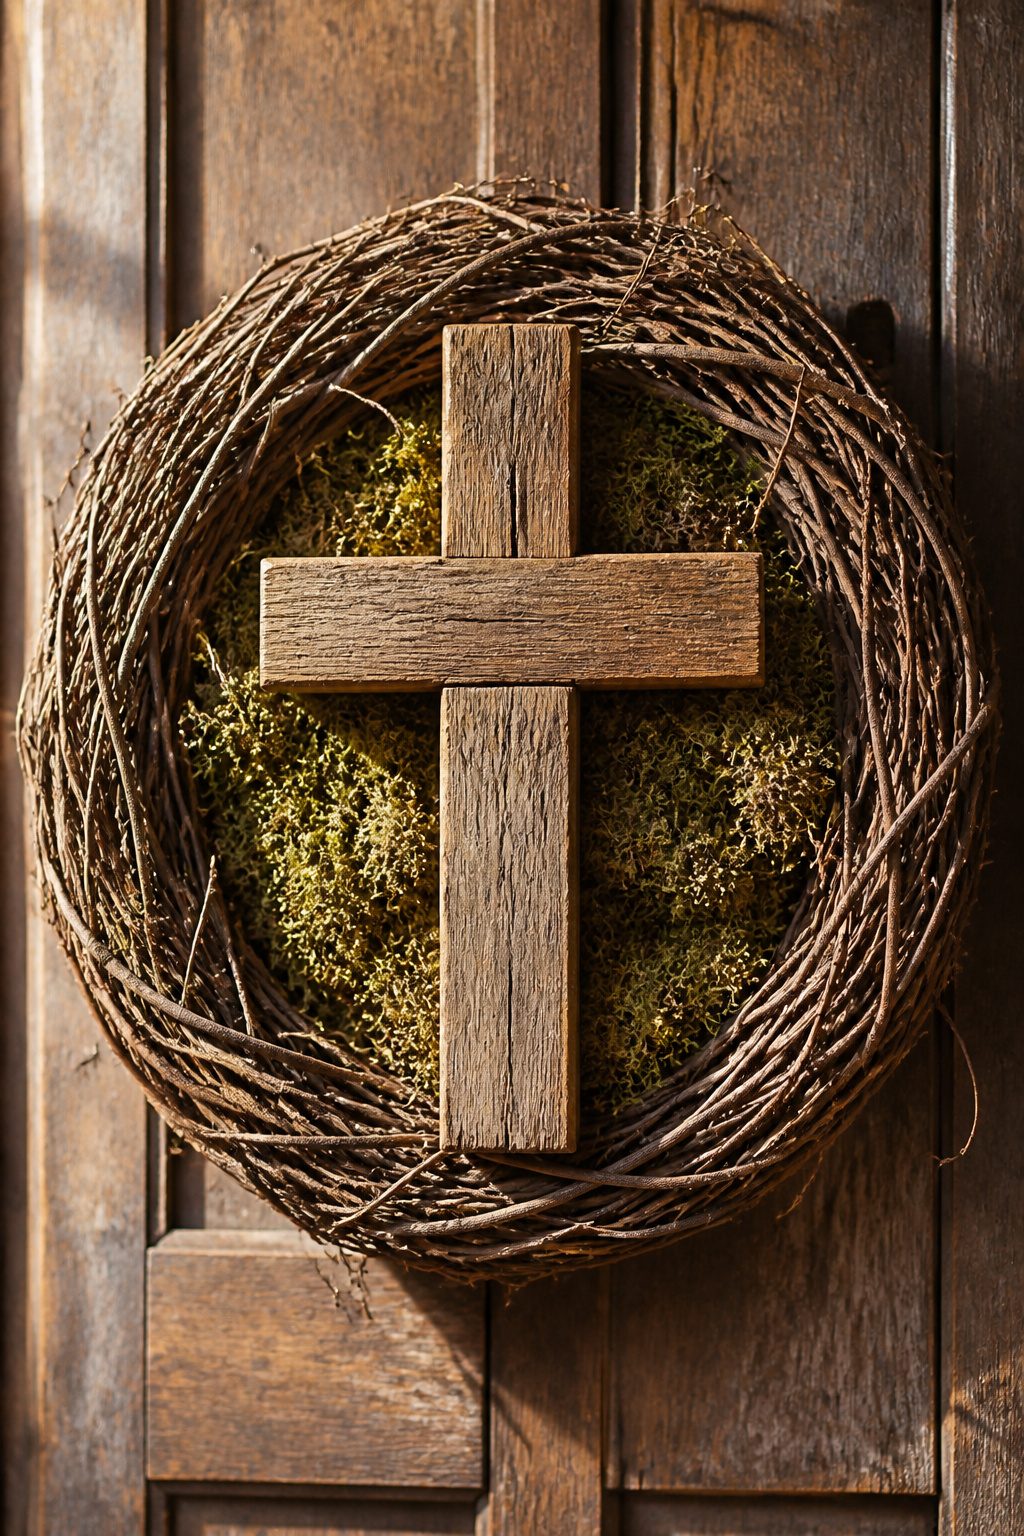
Grapevine wreaths carry weight better than foam ever could, which matters once you strap a wooden cross to the center. I learned that the hard way with a straw base that sagged into an oval by Palm Sunday.
For this piece, a 14-inch grapevine form gives you enough heft without turning the door into a gym workout.
The cross itself wants to be reclaimed wood, barn siding or pallet oak with the gray still on it. Two inches thick keeps it from reading as craft-store flimsy.
Moss fills the gap between cross and wreath so the attachment points disappear; hot glue works, but florist wire through the back holds up to March wind. A few dried hydrangea stems or nothing at all finishes it.
The emptier the wreath, the more the cross reads as the point, which is exactly what separates this from the egg-and-bunny overload stacked on every drugstore shelf.
For hanging, a screw-eye into the door frame beats an over-the-hook situation. The finished piece runs heavier than it looks, maybe four or five pounds with a dense cross.
A 50-pound picture hanger set into stud or solid wood keeps it where you put it through Holy Week and beyond.
9. Easter Egg Hunt Centerpiece
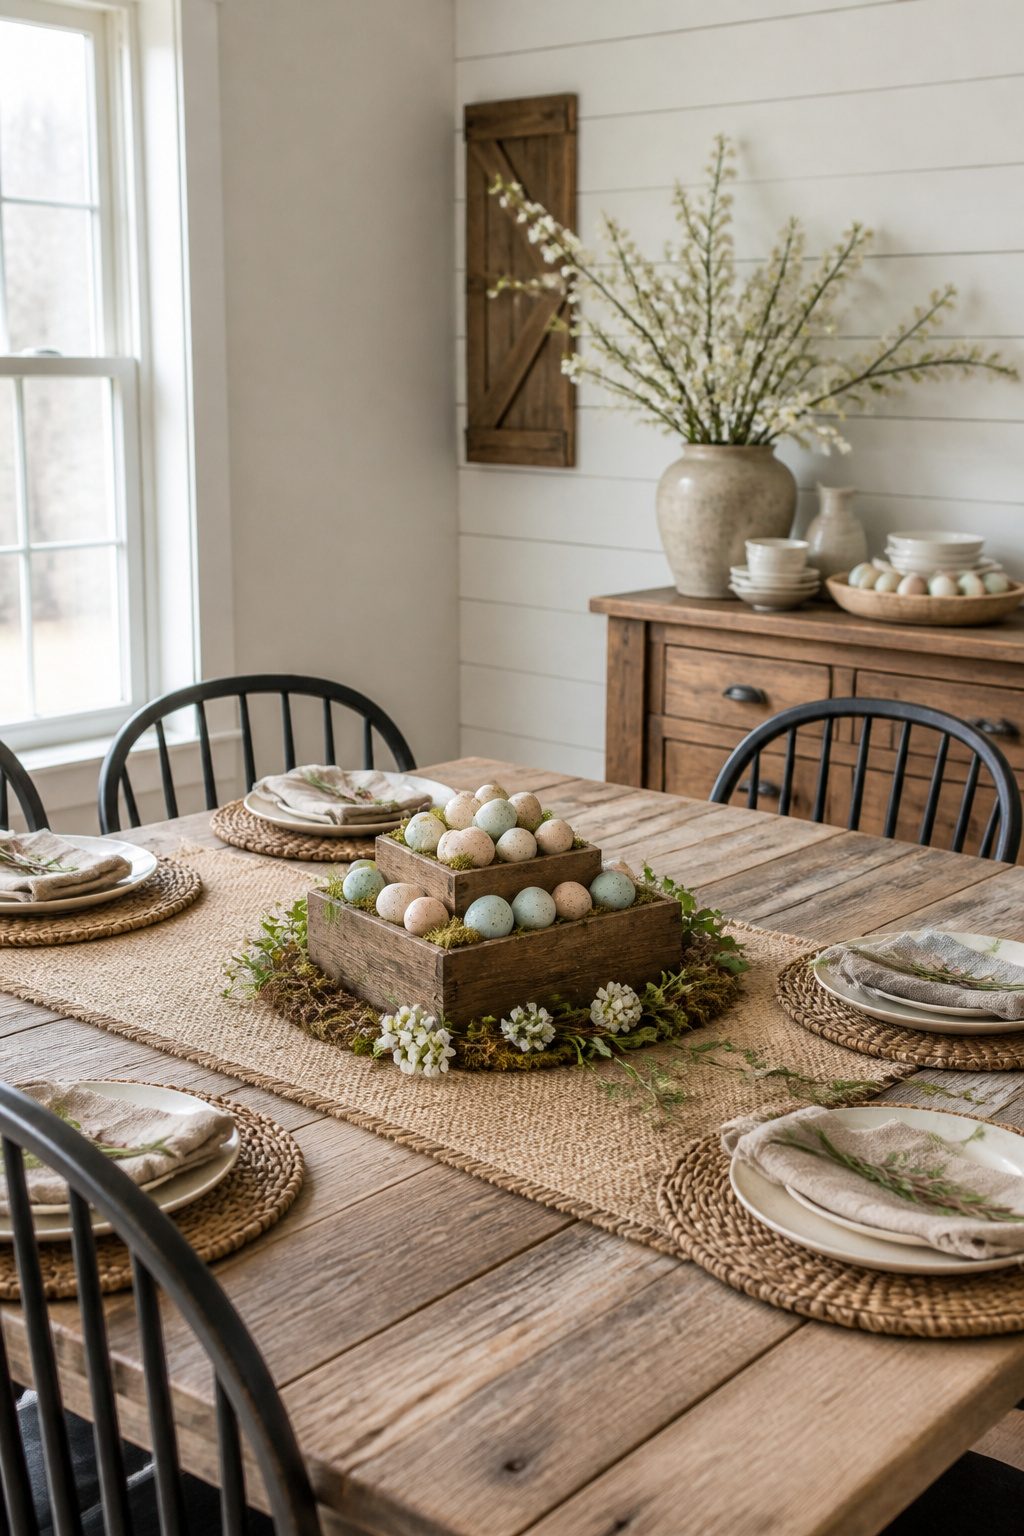
A nested wood box set, stacked into tiers, turns a simple Easter egg hunt into something that stays on the table through brunch.
The smallest box sits inside the next, each rim catching the one above so the whole thing reads as one piece rather than three separate objects.
Moss fills the gaps between eggs and softens the corners; faux robin eggs, scattered loose, give the speckled texture that reads rustic against the raw grain.
Keep the total height under nine inches or guests end up talking around the centerpiece instead of across it.
I learned that the year I built up with branches and a bird’s nest; the result was pretty from the doorway and impractical from the seats.
Now I plan for the sightline: if someone at the head of the table can see the faces at the far end without tilting, the scale is right.
A vine nest tucked into one corner, a clay pot with a tiny moss bunny at the front, and a greenery candle ring slipped around a small saucer fill out the lower levels without adding height.
The eggs themselves do the work of color; living greens or faux flowerbuds keep the palette from going too pastel.
Woven placemats and a burlap runner underneath tie the whole thing to the table rather than letting it float as a separate display.
10. DIY Paper Flowers
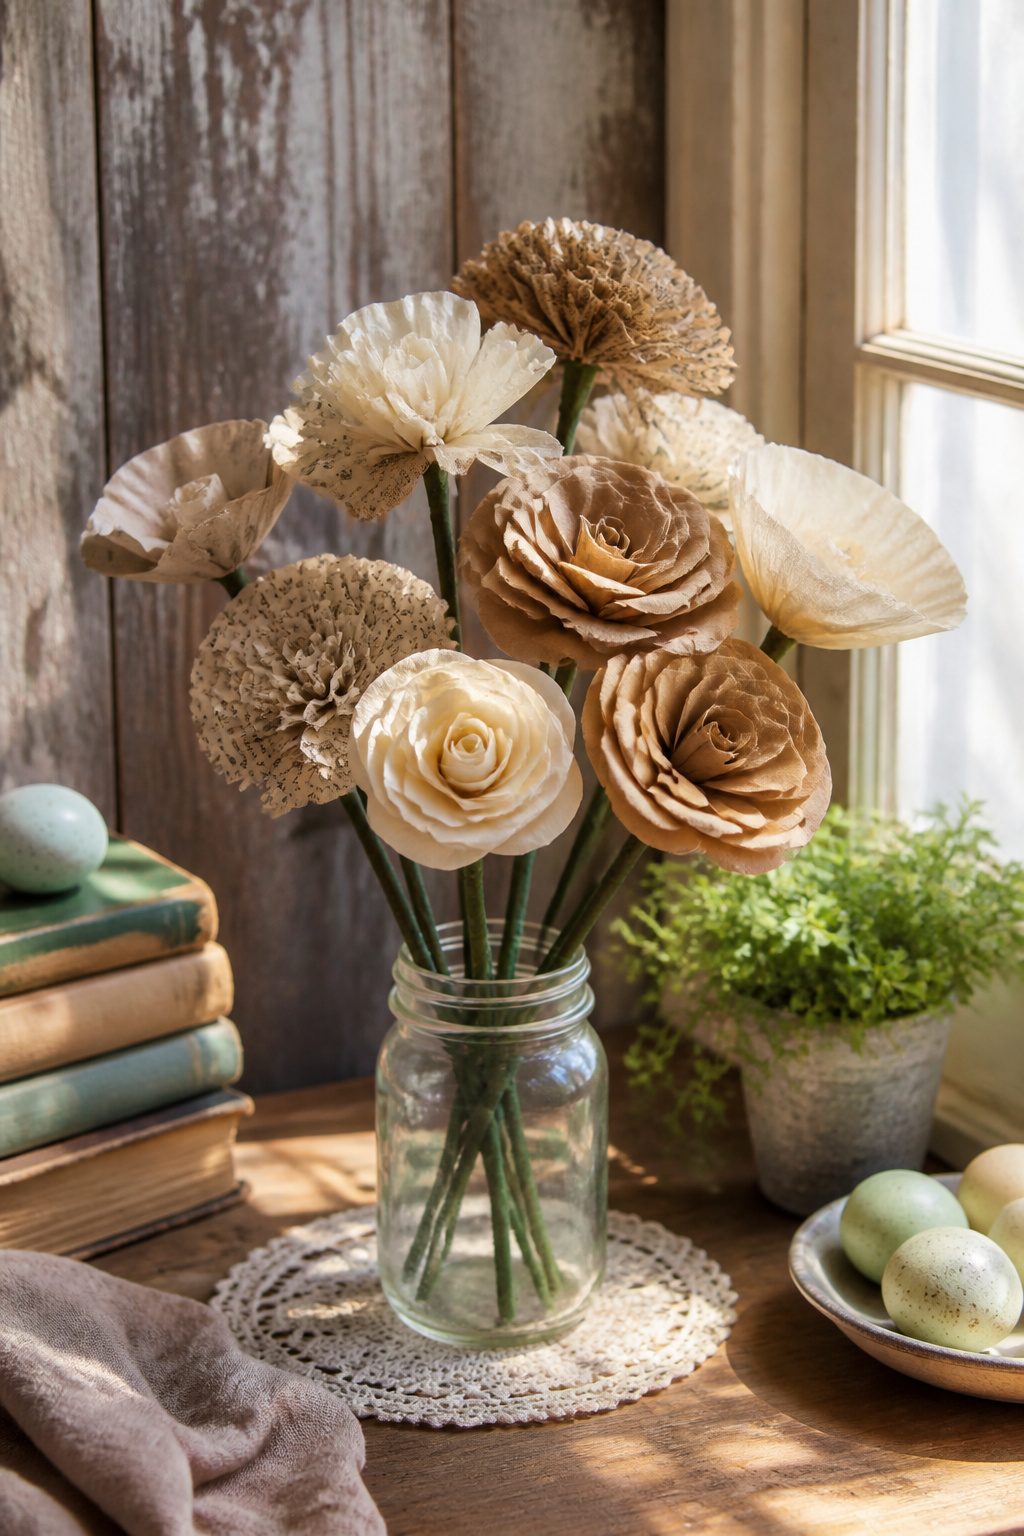
Coffee filters, old book pages, and kraft paper each give a different weight to rustic paper flowers.
Filters are the softest, almost peony-like when you stack eight to ten circles, poke a hole through the centers, and cinch them with a wire twist.
Book paper is crisper and holds a crease better for roses; the printed text becomes a texture, not a distraction.
Kraft paper splits the difference and takes coffee staining beautifully, a quick soak in cooled brew that dries into the uneven amber of something found in a barn rather than bought.
The stems matter more than you’d think. Floral tape wrapped tight over wire gives you something to push into foam or twine around a jar neck, and the matte green hides the mechanics.
Without that step, the flowers read as craft project, not decor.
Layering is where the rustic look lives. I usually graduate sizes, smaller petals inside larger ones, and offset each layer so the edges don’t line up too neatly.
Fresh tulips in a galvanized bucket are lovely for a Sunday, but these last the full six weeks of Easter without water, without dropping petals, without the guilt of throwing away something alive.
What Counts as Rustic
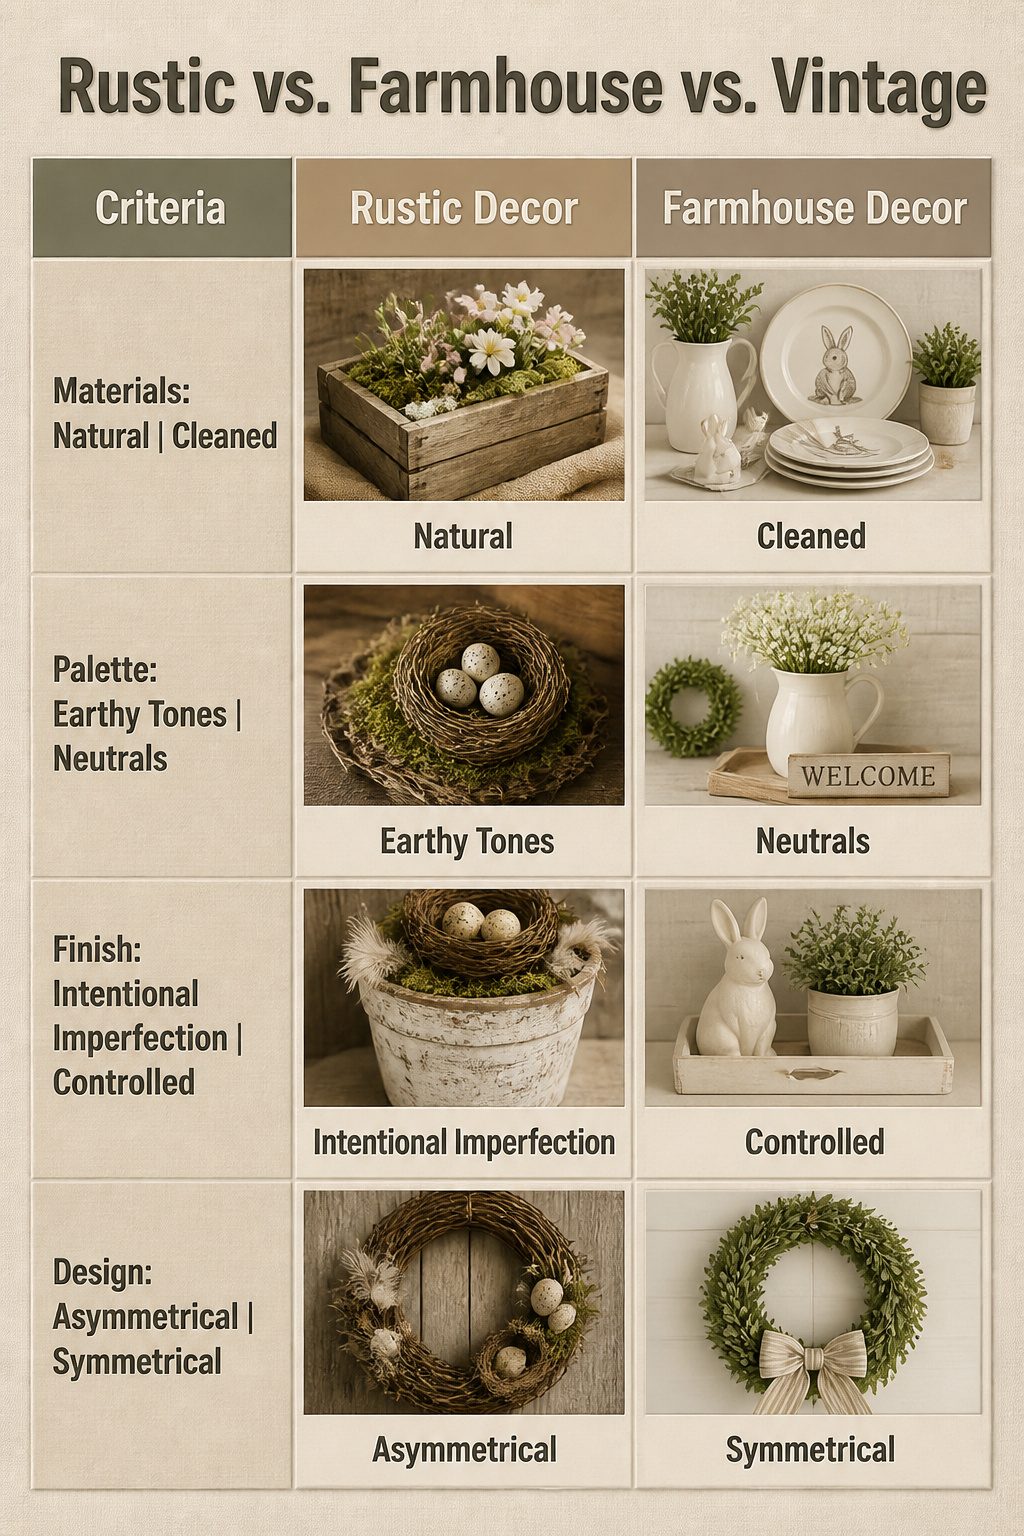
Natural materials, a muted palette, and intentional imperfection are the three things that separate rustic Easter decor from the styles it gets mixed up with.
Wood, moss, linen, and burlap read as rustic because they carry the irregularity of the actual outdoors.
A wooden crate with spring blooms or a moss table runner works because the material itself has texture, not because someone distressed it into submission.
The color side stays in earth tones or faded pastels; high gloss or saturated color shifts the whole thing toward something else.
Farmhouse pulls from some of the same sources, but it cleans them up. Neutral bunny plates on a styled tablescape still read farmhouse because the arrangement is deliberate and the finish is controlled.
Rustic lets the edges stay rough. Vintage is different too: vintage is found, not made.
A ceramic bunny from the thrift store with a makeover sits in that overlap, but the rustic part is what you do with it, not the provenance.
The third element is the one that trips people up. Distressing, asymmetry, and handmade variation aren’t flaws to fix; they’re the goal.
A vine wreath with eggs, feathers, and a nest works because nothing about it is uniform. Whitewashed pots with speckled eggs succeed when the whitewash is patchy and the nest sits slightly off-center.
That asymmetry is what keeps the look from sliding into farmhouse territory, where symmetry and cleaner lines usually win.
Two ways to play this: lean into the raw texture and let the materials do the work, or control the distressing and risk a style that reads closer to farmhouse with every careful choice.
The first wins if you want the rustic label to stick.
Materials I Keep on Hand
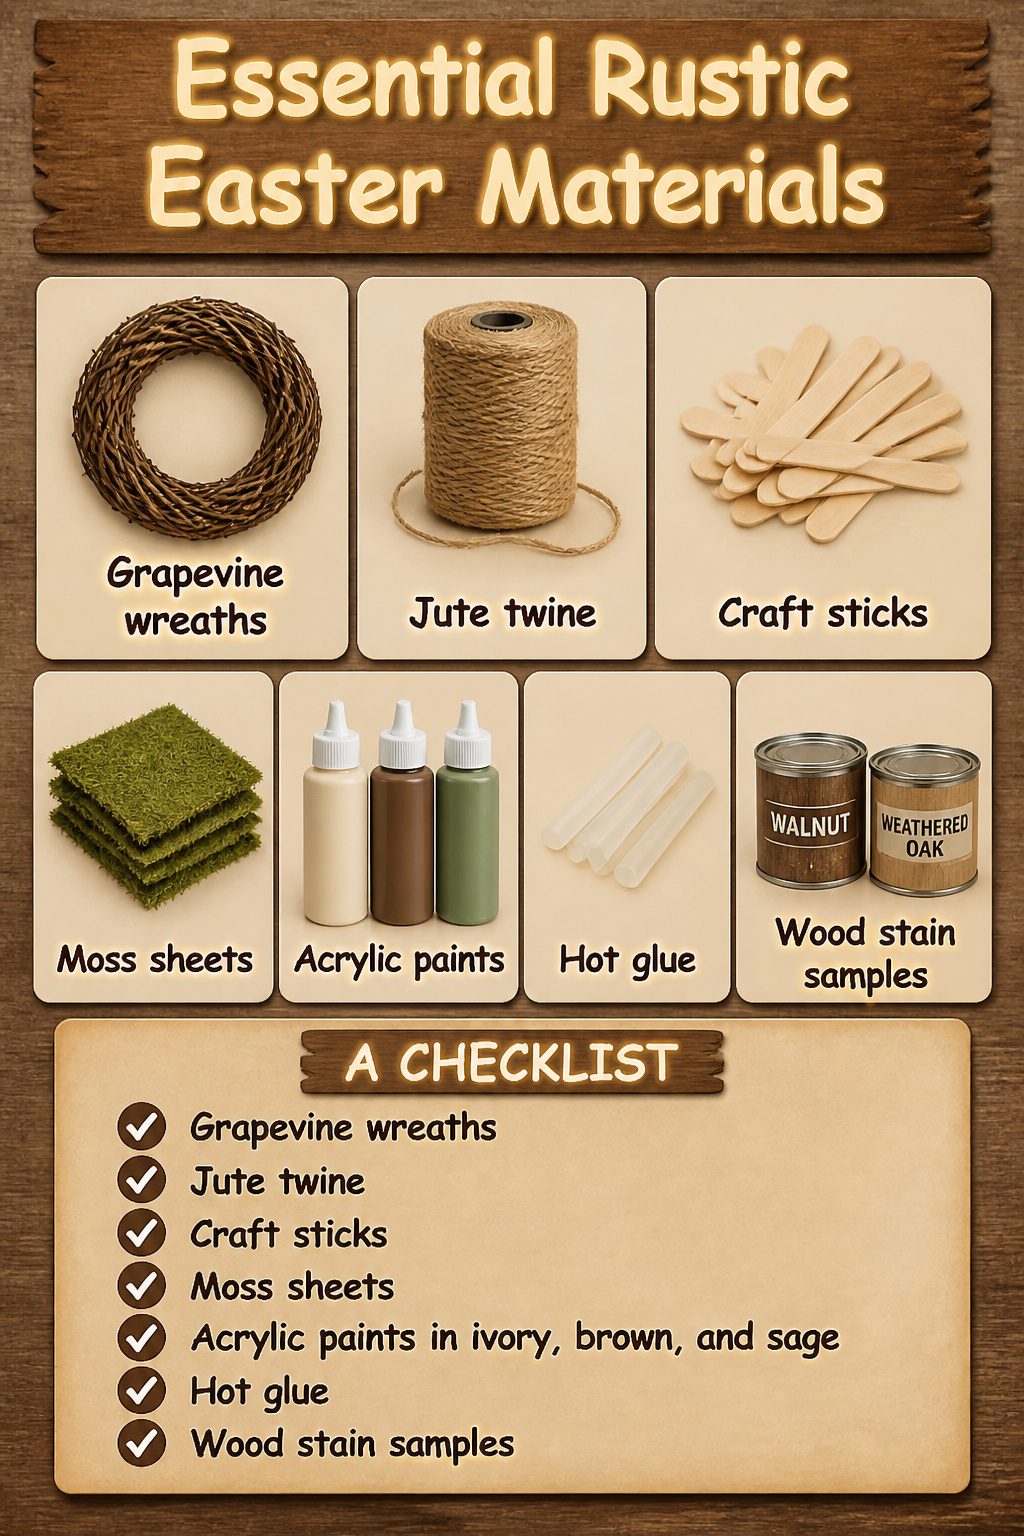
Most of my rustic Easter builds pull from the same small stash, so keeping these in one spot saves me from mid-project store runs.
- Grapevine wreaths — the dollar store usually carries 12–18 inch ones seasonally; I grab two or three and they last years if kept dry in a closet shelf bin
- Jute twine — hardware store, 200-foot spool for under $4; I use it for hanging, wrapping, and making bows, and it does not really expire
- Craft sticks — dollar store, 500-count box; store flat so they do not warp
- Moss sheets — craft store, about $6; keep them in a sealed bag away from humidity or they green up and smell
- Acrylic paints in ivory, brown, and sage — the three colors that read "rustic" without overthinking; squeeze bottles last me two to three years if the caps seal
- Hot glue — hardware store mini sticks, low temp for grapevine work; high temp will melt through the gaps
- Wood stain samples — the hardware store counter sells 8-ounce cans for $3–5, enough for a dozen small projects; I have a walnut and a weathered oak that cover every Easter thing I build
The whole bin fits under a bed. Pull it out in February and I am already halfway started.
Budget and Timeline Reality
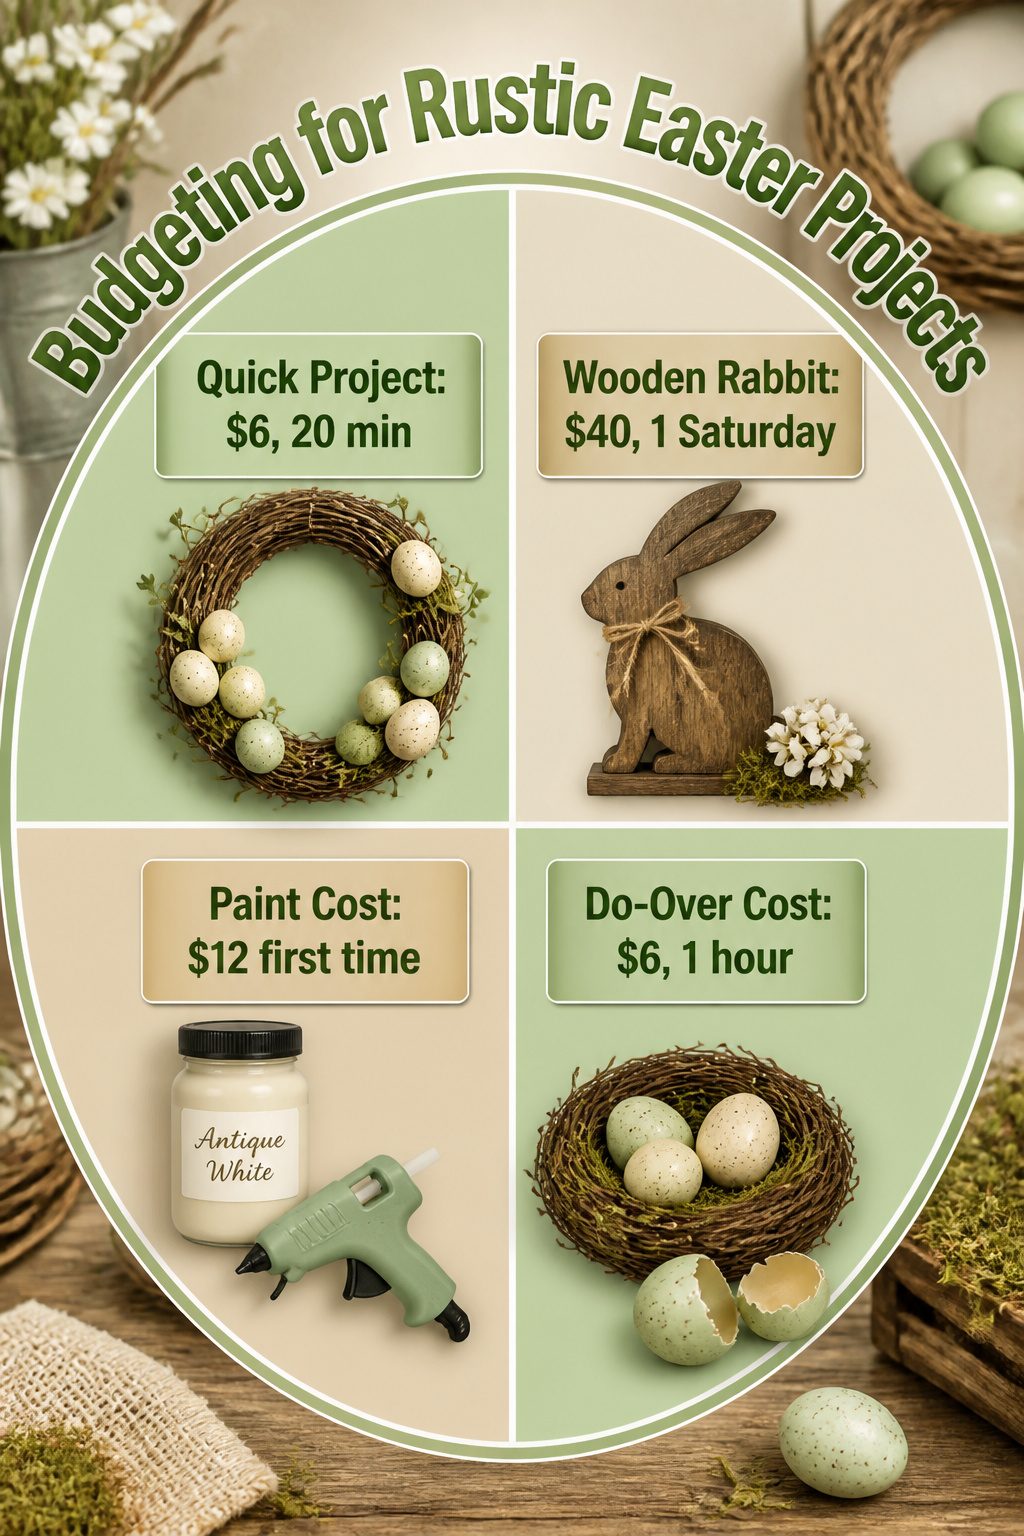
Most rustic Easter projects land in two camps. The quick ones, a grapevine wreath base with a few faux eggs wired on, run about six dollars and twenty minutes if the craft store has grapevine in stock.
The rabbit you build from scrap wood and stain needs a Saturday, forty dollars in lumber and brushes, and three stops because nobody carries the right twine on a Saturday afternoon.
Paint and glue guns hide in the math too. My bottle of antique white has lasted four Easters now, so the per-project cost is pennies, but the first buy stings at twelve dollars.
The same goes for florist wire, moss, and that bag of excelsior you open once and find in the garage the next spring.
The real budget killer is the do-over. A wreath that sags because the grapevine was too thin, eggs that roll off a centerpiece because the nest was built too shallow.
I have lost an hour and six dollars to each. Now I buy the heavier wreath base even when the lighter one is cheaper, and I test balance before the hot glue sets.
Frequently Asked Questions
How can I make rustic Easter decorations?
Start with natural materials like wood, moss, and burlap, then let intentional imperfection do the styling. A galvanized planter packed with moss around grocery-store tulips reads as gathered rather than purchased.
Weathered crates, backyard twigs, and asymmetrical arrangement keep the look from sliding into catalog territory.
What are some easy DIY Easter crafts?
Coffee-filter peonies, craft-stick bunnies, and no-sew towel hangings all build in under an hour of hands-on time. The paper flowers need only stacked circles cinched with wire; the bunny silhouette traces onto reclaimed wood or cardboard for renters.
Each uses materials from the dollar store or hardware store bin.
How do I decorate for Easter on a budget?
A grapevine wreath with a few faux eggs wired on runs about six dollars and twenty minutes.
Dollar-store hand towels become wall hangings with a glued dowel channel and twine; craft-stick bunnies scale into garlands from a 500-count box under two dollars.
The real savings come from keeping a stash bin of jute twine, moss sheets, and sample-size wood stain so mid-project store runs do not happen.